Category: Alfresco Developer Series

The Alfresco Developer Series is a set of articles aimed at getting you up-to-speed on the Alfresco platform.

Cool things you can do in Alfresco with cmis:item support

allyoursysbaseI’ve been taking a look at the newly-added support for cmis:item in Alfresco. As a refresher for those who may not be familiar, cmis:item is a new object type added to the CMIS 1.1 specification. Alfresco added support for CMIS 1.1 in 4.2 but did not immediately add support for cmis:item, which is optional, according to the spec. Now cmis:item support is available in Alfresco in the cloud as well as the nightly builds of 4.3.a Community Edition.

So what is cmis:item?

We’ve all written content-centric applications that have included objects that don’t have a content stream. You might use one to store some configuration information, for example, or maybe you have some other object that doesn’t naturally include a file that needs to be managed as part of it. There are a few approaches to this in Alfresco:

  1. Create your custom type as a child of sys:base (or cm:cmobject if you don’t mind your objects being subject to the file name constraint)
  2. Create your custom type as child of cm:content and simply do not set a content stream
  3. Ignore the content model altogether and use the attribute service

I’m not going to cover the third option in this post. If you want to learn more about the attribute service you should take a look at the Tech Talk Live we did in April.

The second option is fine, but then you’ve got objects with content properties that will never be set. Your objects look like they want to be documents, but they really aren’t because you don’t expect them to ever have a file as part of the object. Not the end of the world, but it’s kind of lazy and potentially confusing to developers that come after you.

The first option is what most people go with, but it has a drawback. Instances of types that do not extend from cm:content or cm:folder are invisible to CMIS 1.0. Not only are those objects invisible to CMIS 1.0 but relationships that point to such objects are also invisible. Depending on how much you use CMIS in your application this could be a fairly severe limitation.

Thankfully, CMIS 1.1 addresses the issue with a new object type called cmis:item. It’s made precisely for this purpose.

What can I do with it out-of-the-box?

Even if your custom content model doesn’t need a “content-less object” you can still benefit from cmis:item support. Let me walk you through my five favorite object types that you can now work with via cmis:item support in CMIS 1.1 that were not previously available: Category, Person, Group, Rating, and Rule. I tested everything I’m showing you here using Alfresco 4.3.a Community Edition, Nightly Build (4/27/2014, (r68092-b4954) schema 7003) and Apache Chemistry OpenCMIS Workbench 0.11.0.

Category

Man, if I had a bitcoin for every person I’ve seen asking how to get the categories of a document via CMIS, I’d have a garage full of Teslas. With cmis:item support, it’s easy. Here’s how you get a list of every category in the system with a CMIS Query Language (CQL) query:

SELECT * FROM cm:category

That returns a list of cm:category objects that represent each category in the system. Note that this is a flat list. In Alfresco, categories are hierarchical. I’m not sure what the plan to address that is, to be honest.

Now suppose you have an object and you want to know the categories that have been assigned. Here is some Groovy code that does that:

(Can’t see the code? Click here)

Categories live in a property called “cm:categories”. It’s a multi-value field that contains the Alfresco node references for each category that has been assigned to a document. Once you get that list you can iterate over them and fetch the cm:category object to figure out the category’s human-readable name. That’s pretty cool and wasn’t possible before CMIS 1.1 support.

How about assigning existing categories to documents? Sure, no problem. Here’s how.

(Can’t see the code? Click here)

This is a little Groovy function that takes a full path to a document and the name of a category. Obviously it depends on your categories being uniquely-named.

First, it finds the category by name using CQL and snags its Alfresco node reference.

Next, it checks to see if the cm:generalclassifiable aspect has already been added to the document and adds it if it has not.

Finally, it gets the current list of categories from the cm:categories property and adds the new category’s node reference to it.

I started to look at creating new categories with CMIS, but it isn’t immediately obvious how that would work due to the hierarchical nature of categories. The only parent-child association supported by CMIS is the one implied by folder-document relationship. I’ll ask around and see if there’s a trick.

That’s it for categories. Let’s look at Person objects next.

Person

Here’s another frequently-asked how-to: How do I query users through CMIS? Before cmis:item support you couldn’t do it, but now you can. For example, here is how you can use CQL to find a list of the Person objects in Alfresco:

SELECT * FROM cm:person

You can qualify it further based on properties of cm:person. For example, maybe I want all users who’s first name starts with “Te” and who work for an organization that starts with “Green”. That query looks like:

SELECT * FROM cm:person where cm:firstName like 'Te%' and cm:organization like 'Green%'

Suppose you wanted to find every Alfresco Person object that has a city starting with “Dallas” and you want to set their postal code to “75070”. Ignoring cities named “Dallas” that aren’t in Texas (like Dallas, Georgia) or the fact that there are multiple zip codes in Dallas, Texas, the code would look like this:

(Can’t see the code? Click here)

That’s it for Person objects. Let’s look at Group objects.

Group

Similar to querying for Person objects, cmis:item support gives you the ability to query for groups–all you have to know is that groups are implemented as instances of cm:authorityContainer. Here’s the query:

SELECT * FROM cm:authorityContainer

Unfortunately, it doesn’t seem possible to use CMIS to actually add or remove members to or from the group. Maybe that will change at some point.

Rating

It’s easy to query for ratings:

SELECT * FROM cm:rating

But it’s hard to do anything useful with those objects because, at least in this nightly release, you can’t follow the relationships from or two a rating. As a sidenote, you can get the count and total for a specific node’s ratings by getting the value of the cm:likesRatingSchemeCount and cm:likesRatingSchemeTotal properties respectively. But that’s not related to cmis:item support.

Rule

Rules are a powerful feature in Alfresco that help you automate document handling. Here’s how to use a query to get a list of rules in your repository:

SELECT * FROM rule:rule

Rules are so handy you might end up with a bunch of them. What if you wanted to find all of the rules that matched a certain criteria (title, for example) so that you could enable them and tell them to run on sub-folders? Here is a little Groovy that does that:

(Can’t see the code? Click here)

First the code uses a join to find the rule based on a title. The property that holds a rule’s title is defined in an aspect and that requires a join when writing CQL.

Then the code simply iterates over the result set and updates the rule:applyToChildren and rule:disabled properties. You could also set the rule’s type, description, and whether or not it runs asynchronously. It does not appear to be possible to change the actions or the filter criteria for a rule through CMIS at this time.

What about custom types?

Custom types? Sure, no problem. Suppose I have a type called sc:client that extends sys:base and has two properties, sc:clientName and sc:clientId. Alfresco automatically makes that type accessible via CMIS. It’s easy to create a new instance and set the value of those two properties. Here’s the groovy code to do it:

(Can’t see the code? Click here)

Did you notice I created the object in a folder? In Alfresco, everything lives in a folder, even things that aren’t documents. In CMIS parlance, you would say that Alfresco does not support “unfiled” objects.

The custom object can be queried as you would expect, including where clauses that use the custom property values, like this:

SELECT * FROM sc:client where sc:clientId = '56789'

In CMIS 1.0 you could not use CMIS to work with associations (“relationships”) between objects that did not inherit from either cm:content (cmis:document) or cm:folder (cmis:folder). In CMIS 1.1 that changed. You can create relationships between documents and folders and items. Unfortunately, in the latest nightly build this does not appear to be implemented. Hopefully that goes in soon!

Summary

The new cmis:item type in CMIS 1.1 is a nice addition to the specification that is useful when you are working with objects that are not documents and do not have a content stream. I showed you some out-of-the-box types you can work with via cmis:item but you can also leverage cmis:item with your custom types as well.

Support for cmis:item requires CMIS 1.1 and either Alfresco in the cloud or a recent nightly build of Alfresco 4.3.

Updated tutorial: Implementing Custom Behaviors in Alfresco

I have published a major revision to my Implementing Custom Behaviors in Alfresco tutorial. I hadn’t really touched it since 2007–behaviors, the ability to bind programming logic to types, aspects, and events in Alfresco, haven’t changed at all since then.

The changes are mainly around using the Alfresco Maven SDK to produce AMPs and the addition of unit tests to the project. I also gave it a bit of a style scrub to make it more consistent with other tutorials.

The tutorial continues with the SomeCo example. In this tutorial you will create the content model and behavior needed to implement the back-end for SomeCo’s five star rating functionality. By the end of this tutorial you will know:

  • What a behavior is
  • How to bind a behavior to specific policies such as onCreateNode and onDeleteNode
  • How to write behaviors in Java as well as server-side JavaScript
  • How to write a unit test that tests your behavior

This tutorial, the source code that accompanies it, and the rest of the tutorials in the Alfresco Developer Series reside on GitHub. If you want to help with improvements, fork the project and send me a pull request.

Next week I hope to publish a major revision of the Introduction to Web Scripts tutorial.

Updated tutorial: Creating Custom Actions in Alfresco

I have published an updated version of the Creating Custom Actions in Alfresco tutorial. Similar to the recently updated Working With Custom Content Types in Alfresco tutorial, this version has been updated to match the refactored code which now assumes you are using the Alfresco Maven SDK to produce AMPs and that you are using Alfresco Share as the user interface. I’ve removed all references to Alfresco Explorer.

The Custom Actions tutorial covers:

  • What is an action
  • How to write your own custom action in Java
  • How to invoke the custom action from a rule or from the Alfresco Share UI
  • Configuring an evaluator to hide the UI action when certain conditions are true
  • Configuring an indicator to show an icon in the document library when documents meet certain conditions
  • Writing and executing unit tests with the Alfresco Maven SDK

If you aren’t familiar with the Alfresco Maven SDK and you need help diving in, take a look at this tutorial.

All of the tutorial source code and text for the Alfresco Developer Series of tutorials is on GitHub. Please fork the project, make improvements, and send me pull requests.

Next on the to-be-updated list is the Custom Behaviors tutorial. I expect that to go live sometime next week.

Updated tutorial: Working with Custom Content Types in Alfresco

The Working with Custom Content Types tutorial has just been given a major revision. I’ve updated it to match the refactored code. Here is a summary of the high-level changes:

  • Instructions now assume you are using the Alfresco Maven SDK. If you haven’t played with the Alfresco Maven SDK yet, check out my recently published tutorial on the subject.
  • Removed all mention of Alfresco Explorer. The tutorial is now exclusively focused on Alfresco Share for the user interface part.
  • Removed all mention of the Alfresco Web Services API. The tutorial is now exclusively focused on CMIS as the preferred API for performing CRUD functions against the Alfresco repository.

The code and the tutorial text reside in GitHub. If you find issues or make improvements, please fork the repository and send me a pull request.

New Tutorial: Getting Started with the Alfresco Maven SDK

I’ve written a new tutorial about Getting Started with the Alfresco Maven SDK. I hope it helps newcomers to Alfresco get started writing customizations quickly. And if you are an experienced Alfresco developer who still uses Ant-based builds, I hope it motivates you to make the switch to Apache Maven.

The Alfresco Maven SDK is the preferred way to bootstrap, manage, and build your Alfresco modules. The cool thing is that you don’t need anything to get started–if you already have a JDK and Apache Maven installed, you are ready to write custom Alfresco modules for the Alfresco repository and Alfresco Share, whether you are using Community Edition or Enterprise Edition.

The tutorial itself is an HTML page on this site, but I wrote it using Markdown. It lives in a GitHub repository, along with my older tutorials on custom content types, actions, behaviors, web scripts, and advanced workflows. Those tutorials have also recently been converted to Markdown and the accompanying source code has been refactored to use the Alfresco Maven SDK and AMPs, but I am still busy revising the tutorial text to match the refactored code.

I hope that by writing these tutorials in Markdown and storing them in GitHub the Alfresco community will be more likely to help me maintain them over time by forking the repository and sending me pull requests.

Happy 5th Birthday, Alfresco Developer Guide!

Birthday Cake by Will ClaytonIt is hard to believe that the Alfresco Developer Guide was published five years ago this month (really, the tail end of October). My goal at the time was to help flatten the learning curve around the Alfresco platform and encourage people still using legacy ECM systems to make the leap. Based on the number of people who come up to me at meetups, conferences, and other events to tell me how much the book helped their projects, their teams, and even their careers, I’d say that goal was met and that makes me very happy.

The product and the company have definitely evolved a lot since 2008. The chapter on WCM is no longer relevant. The section on Single Sign-On is out-of-date. The book was written before Alfresco Share existed. And, at the time, jBPM was the only workflow engine in the product and Solr was not yet on the scene, nor was mobile. Both JCR and the native Web Services APIs have given way to CMIS as the preferred API. And Maven and AMPs are the recommended way to manage dependencies, run builds, and package extensions.

But the fundamentals of content modeling haven’t changed. Rules, actions, and behaviors are still great ways to automate content processing. Web Scripts are vital to any developer’s understanding of Alfresco, including those doing Share customizations. And, though the preferred workflow engine is Activiti rather than jBPM, the basics of how to design and deploy content-centric business processes in Alfresco haven’t changed that much.

So where do we go from here? The book was originally based on a set of tutorials I published here on ecmarchitect. Last year I created second editions of many of the tutorials to catch them up with major advancements in the platform. For example, the custom content types tutorial now includes Share configuration and CMIS. The custom actions tutorial now includes how to write Share UI actions. And the workflow tutorial now assumes Activiti and Alfresco Share rather than jBPM and Alfresco Explorer.

The source code that accompanied the book lives in Google Code, but I recently moved the source code that accompanies the tutorials to GitHub. I’m busy refactoring the tutorial source code to use Maven and AMPs. I’ve also started moving the actual tutorial text to markdown and am checking it in to GitHub so that the community can help me revise it and keep it up-to-date.

I learned a lot writing that first book. One of the lessons is to always work with co-authors. That made a big difference on CMIS and Apache Chemistry in Action. I hope that book helps as many people as the Alfresco Developer Guide did and I look forward to reflecting back on how CMIS has changed on that book’s fifth birthday in 2018.

Alfresco Developer Series tutorial source code now on github

The source code for the tutorials in my Alfresco Developer Series has always been available to download as a zip. But for some reason I never put it in a project where we could collaborate on it. That’s fixed now. The code’s now on github. (Note that the source code that accompanies the Alfresco Developer Guide is on Google Code. I don’t intend to maintain that going forward and will instead focus on these github projects).

As part of that I’ve made sure that the content types, behaviors, actions, web scripts, and workflow tutorial code works on 4.0.d and 4.2.c. The original zips referenced in the tutorial PDF still work with the versions they were written for, of course, but if you grab the source from github, they’ll work on the version they are tagged for.

One thing I’ve realized as part of this is that with the actual tutorials in PDF, keeping the written instructions in sync with the code is tough. Maybe I should convert the tutorial text into markdown or something similar and check that into the source code repo as well. Let me know what you think about that idea.

Next step for the code is to convert from the old Ant-based Alfresco SDK to the new Maven-based SDK.

Alfresco Example: Share Dashlet Part Two–Configuration

In my last post I showed a simple example that illustrates the “repository tier data web script/share tier presentation web script” pattern that is used any time you need to create a dashlet in Alfresco Share that reads data from the Alfresco repository. The example I used is called “Get Latest Document” and it does just that–given a folder path, it reads some basic metadata about the most recently modified document and displays it in a dashlet.

That example read the folder path from an XML configuration file that is included as part of the Share tier web script. But what if you wanted to make it easier to configure the dashlet by allowing a Share user to open up a configuration dialog that includes a folder picker? Luckily, Alfresco Share already includes all of the bits and pieces you need to make this possible–it’s just up to you to wire them together. I’ll show you how to do that in this post.

The code that implements this example lives in a Google Code project. I’ve tagged the prior post’s source code–the “XML configuration” code–as “1.0“. The code that goes along with this post is tagged as “2.0“. So if you are following along make sure you are using the appropriate code set.

I’m using Alfresco 4.0.d Community, WAR-only distribution, Lucene for search, two Tomcats, and MySQL. My project is organized following the Share Extras Sample Dashlet project folder structure.

Here’s the Recipe

The goal is to take the 1.0 version of the Get Latest Document dashlet and make it configurable through the UI instead of an XML configuration file. Recall from the prior post that we have a repository tier web script that returns JSON for the most recently modified document in a specified folder path. To make that folder path configurable, nothing at all needs to change on the repository tier. All of the changes are going to take place on the Share tier.

Here’s what has to be created or changed to make this work:

  1. Modify the dashlet markup to include a configuration link
  2. Create a custom client-side JavaScript component to handle the configuration dialog and the folder picker
  3. Write a new Share-tier web script that persists the configuration data

Not too bad, right? Well let’s get after it then.

Modify the dashlet markup to handle configuration

In a minute I’m going to show you the code for the client-side JavaScript component that listens for configuration clicks. For now, I’ll just point out where that client-side object is instantiated within the dashlet’s markup. It is near the top of get-latest-doc.get.html.ftl:

var getLatestDoc = new SomeCo.dashlet.GetLatestDoc("${el}").setOptions(
{
  "componentId": "${instance.object.id}",
  "siteId": "${page.url.templateArgs.site!""}",
  "title": "${title}",
  "filterPath": "${filterPath}",
  "filterPathView": "${filterPathView}"
}).setMessages(${messages});

Notice the “SomeCo” object. When creating new client-side objects, you definitely want to steer clear of the “Alfresco” object if you can so that your stuff doesn’t collide with Alfresco’s stuff.

Next, I need an “edit” icon in the dashlet’s title bar. I want it to appear only if the user is a site manager. So I’m going to add a little blurb to the get-latest-doc.get.html.ftl view that does this:

var editDashletEvent = new YAHOO.util.CustomEvent("onDashletConfigure");
editDashletEvent.subscribe(getLatestDoc.onConfigGetLatestDocClick,
                           getLatestDoc, true);
new Alfresco.widget.DashletTitleBarActions("${args.htmlid?html}").
  setOptions(
{
  actions:
  [
    <#if userIsSiteManager>
    {
      cssClass: "edit",
      eventOnClick: editDashletEvent,
      tooltip: "${msg("dashlet.edit.tooltip")?js_string}"
    },
    </#if>

The first part of this code hooks a YUI “onDashletConfigure” event to the “onConfigGetLatestDocClick” handler in the custom GetLatestDoc client-side JavaScript object. The second part is a FreeMarker conditional that is checking the value of “userIsSiteManager”. The controller will set that value. I’ll show you that shortly. The rest of the view is unchanged from the 1.0 version.

The dashlet needs access to the custom client-side JavaScript component as well as some of Alfresco’s out-of-the-box components that I will leverage to open a dialog and to present a folder picker. I’ve added these to get-latest-doc.get.head.ftl:

<!-- getLatestDoc -->
<@link rel="stylesheet" type="text/css"
  href="${page.url.context}/res/extension/components/dashlets/get-latest-doc.css" />
<@script type="text/javascript"
  src="${page.url.context}/res/extension/components/dashlets/get-latest-doc.js"></@script>
<!-- Simple Dialog -->
<@script type="text/javascript"
  src="${page.url.context}/modules/simple-dialog.js"></@script>
<!-- Global Folder Select -->
<@link rel="stylesheet" type="text/css"
  href="${page.url.context}/modules/documentlibrary/global-folder.css" />
<@script type="text/javascript"
  src="${page.url.context}/modules/documentlibrary/global-folder.js"></@script>

Now take a look at the dashlet’s controller, get-latest-doc.get.js. The biggest change here is to add a call to the repository to find out if the current user is a site manager:

var userIsSiteManager = false,
json = remote.call("/api/sites/" + page.url.templateArgs.site +
  "/memberships/" + encodeURIComponent(user.name));
if (json.status == 200)
{
  var obj = eval('(' + json + ')');
  if (obj)
  {
    userIsSiteManager = (obj.role == "SiteManager");
  }
}
model.userIsSiteManager = userIsSiteManager;

The rest of the controller is pretty much the same as 1.0, with the minor addition of checking “args” for values that the configuration service is going to pass in. If they don’t get passed in, the values will be read from the config XML as they were in 1.0.

That’s it for the changes to the dashlet. If you wanted to you could deploy at this point, but clicking the edit button would result in JavaScript errors.

Create a custom client-side JavaScript component

Client-side JavaScript for this example lives in source/web/extension/components in a file called dashlets/get-latest-doc.js. The “source/web” part of the path is dictated by the Share Extras sample project folder layout. I used “extension” to keep my client-side static assets separate from Alfresco’s. You might choose something more unique.

I’m not going to go line-by-line–look at the source for the full detail. The first thing worth noting is at the very beginning of the file: It’s a declaration of the “SomeCo” object. The client-side object I define in this file will live in that namespace. If I had other custom client-side objects I’d declare them as part of that namespace as well. I’ve seen a lot of examples that place their custom client-side objects in the “Alfresco” namespace, which is a bad habit. There’s nothing magical about that Alfresco namespace, so why not make it obvious what’s part of the product and what’s a customization?

if (typeof SomeCo == "undefined" || !SomeCo)
{
  var SomeCo = {};
  SomeCo.dashlet = {};
}

Next comes the declaration of the constructor for this new object:

SomeCo.dashlet.GetLatestDoc = function GetLatestDoc_constructor(htmlId)
{
  SomeCo.dashlet.GetLatestDoc.superclass.constructor.call(this,
    "SomeCo.dashlet.GetLatestDoc", htmlId);
  /**
   * Register this component
   */
  Alfresco.util.ComponentManager.register(this);
  /**
   * Load YUI Components
   */
  Alfresco.util.YUILoaderHelper.require(["button", "container",
    "datasource", "datatable", "paginator", "json", "history",
    "tabview"], this.onComponentsLoaded, this);
  return this;
};

After calling the superclass’ constructor, I ask the Alfresco ComponentManager to register the class. Then, I use Alfresco’s YUILoaderHelper to declare the components on which my component depends.

After that, the actual definition of the object begins. My GetLatestDoc object is going to extend Alfresco’s Base object, so I use YAHOO.extend to make that happen:

YAHOO.extend(SomeCo.dashlet.GetLatestDoc, Alfresco.component.Base,
{

What follows are the properties and methods of the GetLatestDoc object. The two big things it takes care of are (1) Responding to the “Configure” click and (2) Displaying the folder picker dialog.

The first method is the onConfigGetLatestDocClick. You’ll remember that from the updates to the view–I hooked up the “configure” link to this method. Here is the declaration followed by specifying the actionUrl. The actionUrl is where the configure form will be posted. In this case it is a web script I’ll walk you through in the next section.

onConfigGetLatestDocClick: function getLatestDoc_onConfigGetLatestDocClick(e)
{
  var actionUrl = Alfresco.constants.URL_SERVICECONTEXT +
    "modules/someco/get-latest-doc/config/" +
    encodeURIComponent(this.options.componentId);

The onConfigGetLatestDocClick method does two things: (a) It defines the dialog that gets displayed when someone configures the dashlet and (b) it defines field validation for the fields on the configure dialog. Here is the dialog definition part:

That templateUrl is where the SimpleDialog module should find the form to use. It looks just like the actionUrl and it is. The actionUrl will be a POST while the templateUrl will be a GET.

The getLatestDoc_onConfig_callback function will be invoked when the configuration form is successfully posted to the config web script. That response object contains the response from that web script, which, in this case, we are returning as JSON.

Here is the part of the method that defines field validation:

This function makes the title mandatory. Note the final two assignments. These are hooking up buttons on the config dialog to events in this client-side component. So, when someone clicks “select path” the folder picker will be launched and when someone clicks “clear path” the selected path will be reset.

Then, the final part of the method simply displays the dialog:

this.configDialog.setOptions(
{
  actionUrl: actionUrl,
  siteId: this.options.siteId,
  containerId: this.options.containerId
}).show();
},

So when this method is invoked, Alfresco’s out-of-the-box SimpleDialog component is used to display a pop-up dialog. The dialog will contain the form that we return in the config’s GET web script, and when the user saves the values, the values will be POSTed to the config web script.

As part of the configuration, the user needs to specify a folder path. Alfresco already ships with a folder picker–there is no need to code one from scratch.  The onSelectFilterPath method sets that up:

This method uses the out-of-the-box DoclibGlobalFolder to present a tabbed dialog of folders for the user to navigate and pick. When someone selects a folder, it throws a “folderSelected” event which this code listens for. When it hears it, it grabs the selected folder and nodeRef to save for later.

I’m not sure why Rik, my partner in crime for this little example, chose to append the selected path to the end of the nodeRef with a pipe. It could easily be stored in its own property.

Now, at this point, a logical question in your mind might be, “SimpleDialog and DoclibGlobalFolder look generally useful. How do I find out more about those and other goodies that might be available to my client-side JavaScript in Share?”. The answer is JSDoc. The Share Extras project has generated the JSDoc for all client-side JavaScript in Alfresco. The index for Alfresco 4.0.d lives here, the doc for DoclibGlobalFolder lives here, and the doc for SimpleDialog lives here.

With this client-side JavaScript in place, the “configure” link can now be clicked, but the SimpleDialog will be looking for a config web script that doesn’t exist yet. That’s the last step.

Write a Share-tier web script to handle config

In the previous section you saw that the SimpleDialog needs two web scripts: One returns a form that is rendered in the dialog. The other is the web script that dialog will POST to. These web scripts are Share tier web scripts, so they live in config/alfresco/site-webscripts. The com/someco package structure is used to keep code separate from other add-ons, and, by convention, web scripts that aren’t surf components go under “modules”. Under that I’m using “getLatestDoc” to group web scripts related to that and “config” below that to identify the purpose of these web scripts.

First, the GET web script. It’s kind of boring. There is no controller at all. The web script consists only of a FreeMarker view, a descriptor, and some properties files to localize the labels on the form. If you look at the view, config-get-latest-doc.get.html.ftl, you’ll see what I mean. It doesn’t even need any client-side JavaScript–the buttons were hooked up to methods on the GetLatestDoc component in the prior step.

Next, the POST web script. The SimpleDialog component will be sending JSON representing the form data to this web script. Because it is sending JSON, the web script controller is named config-get-latest-doc.post.json.js. That extra little “.json” bit gives me access to the form data in a “json” root-scoped object so I don’t have to fool around with eval.

The logic itself is pretty simple:

var c = sitedata.getComponent(url.templateArgs.componentId);
var saveValue = function(name, value)
{
  c.properties[name] = value;
  model[name] = value;
}
saveValue("title", String(json.get("title")));
saveValue("filterPath", String(json.get("filterPath")));
saveValue("filterPathView", String(json.get("filterPath")).split("|")[1]);
c.save();

What’s going on here? First, the controller grabs a handle to a component using a componentId. The component ID was passed in as an argument by the client-side JavaScript component that told the SimpleDialog which action URL to use. The client-side JavaScript component got the component ID when the dashlet’s view (get-latest-doc.get.html.ftl) instantiated it. So this component is actually the web script that renders the Get Latest Document dashlet.

The saveValue function is just a little helper that sets the properties on the component and the model in one call.

So, given the “json” object that is being passed in from the configuration dialog, all that needs to be done is to read those form field values out of the JSON and stick them onto the component properties and the model.

Now, when the dashlet’s web script is invoked, the framework will pass those properties to it via the args array. If the dashlet’s controller sees the values in the args array, it uses those, otherwise, it uses what it finds in the XML configuration.

Deploy and Test

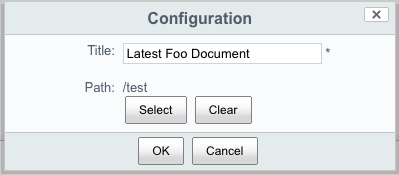
You can deploy the example by running “ant hotcopy-tomcat-jar”. If you already deployed 1.0 of the code and you are running two Tomcats, you won’t have to restart your repository tier, but you will have to restart your Share tier. Then, go into a site and add the dashlet to the site dashboard. If you click the pencil icon on the dashlet’s title bar, you should see the configuration form pop up:

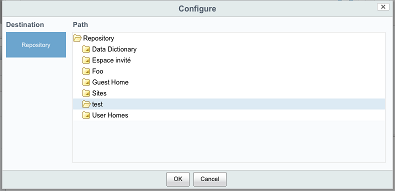
If you then click “Select Path” the folder browser should be displayed:

On clicking “OK” the new configuration values will be persisted, but you’ll have to refresh the page to see them take effect. Of course you could modify the example further to move the rendering of the metadata to the client-side such that when the configuration data is saved it immediately refreshes the dashlet content, but I’ll save that for another time.

Alfresco Example: Share Dashlets that Retrieve Data from the Repository

If you need to learn how to write an Alfresco Share dashlet, hopefully you’ve already worked through the Hello World dashlets in the Share Extras project on Google Code. The rest of the dashlets in that project are either “mash-up” style dashlets that read data from third-party sites or dashlets that work with data from the Alfresco repository tier, but are of moderate to high complexity. What I think is missing is a dashlet that goes one small step beyond Hello World to show how to read and display a simple set of data from the repository tier. In this post I show you how to do just that.

I created the example I’m going to walk you through in response to a question someone posted in the forum. They asked, “How can I write a dashlet that will show basic metadata from the most recently-modified document in a given folder?”. I think this is something we haven’t explained to people–we show Hello World and we show dashlets from the other end of the spectrum, but nothing to illustrate this basic pattern. So I wrote a quick-and-dirty example. Fellow forum user, RikTaminaars, also got in on the act, making the dashlet configurable, which I’ll show in a subsequent post.

In this post, I’ll create the most basic implementation possible. The result is a simple dashlet that reads a path from a configuration file, asks the repository for the most recently modified document in that folder, then displays some basic metadata. In my next post, I’ll add to it by making the folder path configurable within the user interface.

Developer Setup

First, a bit about my setup. I’m running Alfresco 4.0.d Community, WAR distribution, Lucene for search, Tomcat application server, and MySQL for the database. I’m using Eclipse Indigo, but this implementation requires no compiled code. For organizing the project files I used the Sample Dashlet project structure from Share Extras. I’m using the Share Extras Ant build script to deploy my code from my project folder structure to the Alfresco and Share web applications.

When I’m doing Share customizations I use two Tomcats–one for the repository tier and one for the Share tier. This helps me avoid making assumptions about where my Alfresco and Share web applications are running and it speeds up my development because my Share Tomcat restarts very quickly. To get the Share Extras build script to work with a two Tomcats setup, I’ve added the following to a build.properties file in my home directory:

tomcat.home=/opt/apache/tomcat/apache-tomcat-6.0.32
tomcat.share.home=/opt/apache/tomcat81/apache-tomcat-6.0.32
tomcat.share.url=http://localhost:8081

Now the build script will know to put the deployed code in each of my Tomcat servers.

The Data Web Script/Presentation Web Script Pattern

The Alfresco repository runs in a web application called “alfresco” while the Share user interface runs in a separate web application called “share”. Each of these two web applications has its own web script engine. If you aren’t familiar with web scripts, take a look at this tutorial, then come back, or just accept the high-level notion that web scripts are an MVC framework used to bind URLs to code and that web scripts can run on the repository tier as well as the Share tier.

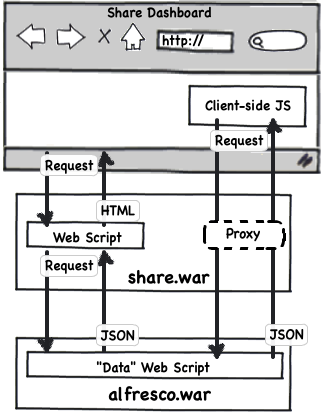
Share dashlets–the “boxes” of content that display in the Share user interface–are just web scripts that return HTML. In fact, everything you see in Share is ultimately a web script. When a dashlet needs to display data from the Alfresco repository, it makes a call over HTTP to invoke a web script running on the repository tier. The repository tier web script responds, usually with JSON. The dashlet gets what it needs from the JSON, then renders outputs HTML to be rendered as part of the page. Because the repository tier web script responds with raw data, you may see these referred to as “data web scripts”.

In the previous paragraph, I was purposefully vague about where the request to the repository tier is made. That’s because there are two options. The first option, and the one we’ll use in this example, is to make the call from the dashlet’s web script controller. This might be called “the server-side option” because once the dashlet’s view is rendered, it has all of the data it needs–no further calls are needed.

The second option is to make AJAX calls from the client browser. To avoid cross-site scripting limitations, these calls typically go through a proxy that lives in the Share application, but their ultimate destination is the repository tier.

Two tier web scripts

You may be wondering about the details of making these remote connections. It’s all taken care of for you. Regardless of whether you make the remote invocation of the repository web script from the Share tier or through AJAX in the browser, all you need to specify is the URL you want to invoke and the framework handles everything else.

Show Me the Code: Repository Tier

Let’s walk through the code. I’ll start with the repository tier. Recall that the requirements are to find the most recently modified document in a given folder and return its metadata. There may be out-of-the-box web scripts that could be leveraged to return the most recently modified document, but this is actually very simple to do and I don’t want to have to worry about those out-of-the-box web scripts changing in some subsequent release, so I’m implementing this myself.

Using the Share Extras project layout, repository tier web scripts reside under config/alfresco/templates/webscripts. The best practice is to place your web script files in a package structure beneath that, so I am using “com/someco/components/dashlets” for my package structure. Yours would be different.

The first thing to think about is what the URL should look like. I want it to be unique and I need it to accept an argument. The argument is the folder path to be searched. For this example, my URL will look like this:

/someco/get-latest-doc?filterPathView={filterPathView}

If you’ve worked with web scripts, you know that a “path” pattern could be followed instead of a “query string” pattern but it doesn’t really matter for this example. The descriptor, get-latest-doc.get.desc.xml, declares the URL and other details about authentication and transaction requirements.

The controller performs the search and populates the model with data. This is a GET, so the controller is named get-latest-doc.get.js. Look at the source for the complete listing–I’ll just hit the high points.

First, I grab a handle to the folder represented by the path argument:

var folder = companyhome.childByNamePath(args.filterPathView);

Then I use the childFileFolders() method to get the most recently modified file and stick that in the model:

var results = folder.childFileFolders(true, false, 'cm:folder', 0, 1, 0, 'cm:modified', false, null);
model.latestDoc = files[0];

Obviously, I could have used a search here, but this method is quite handy. It must be new (thanks, Rik!).

The view then takes the data in the model and returns some of the metadata as JSON:

<#macro dateFormat date>${date?string("dd MMM yyyy HH:mm:ss 'GMT'Z '('zzz')'")}</#macro>
<#escape x as jsonUtils.encodeJSONString(x)>
{
"nodeRef": "${latestDoc.nodeRef}",
"name": "${latestDoc.properties.name}",
"title": "${latestDoc.properties.title!}",
"description": "${latestDoc.properties.description!}",
"created": "<@dateFormat latestDoc.properties.created />",
"modified": "<@dateFormat latestDoc.properties.modified />"
}
</#escape>

Note the exclamation points at the end of the title and description. That will keep the template from blowing up if those values are not set.

That’s all there is to the repository tier. If you want to add additional metadata, custom properties, or data from elsewhere in the repo, it is easy to do that.

At this point you should be able to deploy (run ant hotcopy-tomcat-jar, for example) and test the repository tier web script by pointing your browser to: http://localhost:8080/alfresco/s/someco/get-latest-doc?filterPathView=/Some/Folder/Path

Show Me the Code: Share Tier

Okay, the back-end is ready to return the data I need. Now for the front-end. The Share Extras project structure puts front-end web scripts in config/alfresco/site-webscripts so following a similar pattern as I did for the repository-tier web scripts, I put my share-tier web scripts into the site-webscripts folder under com/someco/components/dashlets.

The descriptor, get-latest-doc.get.desc.xml, declares a URL for the dashlet and specifies the “dashlet” family. This will make the dashlet appear in the “add dashlets” menu for both the global dashboard and the site dashboard.

I want to make the folder path configurable, so I created get-latest-doc.get.config.xml and used it to specify a title for the dashlet and the default folder path. I’ll read in this configuration from the controller.

As I mentioned, we’re doing everything server-side in this example, so the controller needs to call the web script I deployed to the repository tier to retrieve the JSON. Then it can put that object into the model and let the view format it as it sees fit. The controller lives in get-latest-doc.get.js and starts out by reading the configuration XML:

Then it uses the built-in “remote” object to invoke the repository tier web script and puts the result into the model:

Note that the URL starts with my web script’s URL–it includes nothing about where to find the Alfresco repository. That’s because the “end point” is declared in Share’s configuration (to be precise, it is actually Surf configuration, the framework on which Share is built) and the remote object uses the “alfresco” endpoint by default. I don’t see it used very often, but you can actually define your own end points and invoke them using the remote object.

The last part of this example is the HTML markup for the dashlet itself. The first half of get-latest-doc.get.html.ftl is boilerplate that has to do with the dashlet resizer. For this example, the length of the list is static–it will only ever have one entry. So the resizer is kind of overkill. The bottom half is where the markup for the document’s metadata lives:

If you’ve already worked with web scripts, you know that get-latest-doc.get.head.ftl is used to place resources into “<head>”. In this case, that is a CSS file used to style our dashlet and client-side JavaScript used by the resizer. The strings used in the dashlet are localized through the get-latest-doc.get.properties file.

Test It Out

You should be able to test this out yourself by creating a folder anywhere in the repository, adding one or more files to the folder, specifying that folder path in the get-latest-doc.get.config.xml file, and then using “ant deploy hotcopy-tomcat-jar” to deploy the customizations to the alfresco and share web applications. You’ll need to restart Tomcat to pick up the new JAR (both Tomcats if you are running two). Then, login and click “Customize Dashboard” to add the “Get Latest Document” dashlet to your dashboard. It should look something like this:

Screenshot: Get Latest Document Dashlet

Summary

This is a simple example, but it is powerful because it is the same pattern used throughout Share: A dashlet needs data from the repository tier, so its web script controller uses the “remote” object to call a web script on the repository tier. The repository tier web script returns JSON which the Share tier web script then formats into a nice looking dashlet.

In my next post, I’ll show how to make the folder path configurable, so that you can change it at run-time with a folder picker in the Share user interface instead of editing the config XML.

Alfresco tutorial: Advanced Workflows using Activiti

In 2007, I wrote a tutorial on Alfresco’s advanced workflows which I later used as the basis for the workflow chapter in the Alfresco Developer Guide. It showed examples using jBPM and the old Alfresco Explorer web client.

Then, in April of 2011 I posted a short article comparing Alfresco workflows built with jBPM to the same workflows built with Activiti, the new advanced workflow engine embedded in Alfresco 4. The article provided a quick glimpse into the new Activiti engine aimed at those who had heard about the Alfresco-sponsored project.

Today I’m making available the 2nd edition of the advanced workflow tutorial. It combines the SomeCo whitepaper example from 2007 with a few hello world examples to show you how to use the Activiti Process Designer Eclipse plug-in and the Activiti engine to design and run the example workflows, including how to configure your workflows in the Alfresco Share web client.

The accompanying source code builds on the workflow model and associated customizations created in the 2nd editions of the custom content types and custom actions tutorials.

UPDATE 7/18/2013: Thanks to a user on #alfresco who reported a bug in the sample workflows that have a UI. None of those workflows could be started in Alfresco Community Edition 4.2.c. I have corrected the bug. So if you are using 4.2.c, please use this zip instead.

Special thanks go to Joram Barrez and Tijs Rademakers for reviewing the tutorial and providing valuable feedback. Both are on the Activiti team. In fact, Tijs has been working on an Activiti book called Activiti in Action which should be out soon, so keep an eye out for that.

Anyway, take a look and let me know what you think.