Author: Jeff Potts

Using Elasticsearch, Logstash, and Kibana to visualize Apache JMeter test results

In my last blog post I showed how to use Apache JMeter to run a load test against Elasticsearch or anything with a REST API. One of my recommendations was to turn off all of the Listeners so that valuable test client resources are not wasted on aggregating test results. So what’s the best way to analyze your load test results?

Our load test was running against Elasticsearch which just happens to have a pretty nice tool set for ingesting, analyzing, and reporting on any kind of data you might find in a log file. It’s called ELK and it stands for Elasticsearch, Logstash, and Kibana. Elasticsearch is a distributed, scalable search engine and document oriented NoSQL store. Logstash is a log parser that can send log data to various outputs. Kibana is a tool for defining dashboards that contain charts, graphs, and tables based on data stored in Elasticsearch.

It is really quite easy to use ELK to create a dashboard that aggregates and displays Apache JMeter test results in realtime. Here’s how.

Step One: Configure Apache JMeter to Create a CSV File

Another recommendation in my last post was to use the Apache JMeter GUI only for testing and to run your load test from the command line. For example, this runs my test named “Basic Elasticsearch Test.jmx” from the command line and writes the results to results.csv:

/opt/apache/jmeter/apache-jmeter-2.11/bin/jmeter -n -t Basic\ Elasticsearch\ Test.jmx -l ./results.csv

The results.csv file will get fed to Logstash and ultimately Elasticsearch so it can be reported on by Kibana. The Apache JMeter user.properties file is used to specify what gets written to results.csv. Here is a snippet from mine:

(Can’t see the code? Click here.)

Pay attention to that timestamp format. You want your Apache JMeter timestamp to match the default date format in Elasticsearch.

Step Two: Configure and Run Logstash

Next, download and unpack Logstash. It will run on the same machine as your test client box (or on a box with file access to the results.csv file that JMeter is going to create). It also needs to be able to get to Elasticsearch over HTTP.

There are two steps to configuring Logstash. First, Logstash needs to know about the results.csv file and where to send the log data. The second part is that Elasticsearch needs a type mapping so it understands the data types of the incoming JSON that Logstash will be sending to it. Let’s look at the Logstash config first.

The Logstash configuration is kind of funky, but there’s not much to it. Here’s mine:

(Can’t see the code? Click here.)

The “input” part tells Logstash where to find the JMeter results file.

The “if” statement in the “filter” part looks for the header row in the CSV file and discards it if it finds it, otherwise, it tells Logstash what columns are in the CSV.

The “output” part tells Logstash what to do with the data. In this case we’ll use the elasticsearch_http plugin to send the data to Elasticsearch. There is also one that uses the native API but when you use that, you have to use a specific version combination of Logstash and Elasticsearch.

A quick side note: In our case, we were running a load test against an Elasticsearch cluster. We use Marvel to report on the health of that cluster. To avoid affecting production performance, Marvel sends its data to a separate monitoring cluster. Similarly, we don’t want to send a bunch of test result data to the production cluster that is being tested, so we configured Logstash to send its data to the monitoring cluster as well.

That’s all the config that’s needed for this particular exercise.

Here are a couple of Logstash tips. First, if you need to see what’s going on you can add a sysout to the configuration by adding this line between ‘output {‘ and ‘elasticsearch_http {‘ before starting logstash:

stdout { codec => rubydebug }

The second tip is about re-running Logstash and forcing it to re-parse a log file it has already read. Logstash remembers where it is in the log. It does this by writing a “sincedb” file. So if you need to re-parse the results.csv file, clear out your sincedb files (mine live in ~/.sincedb*). You may also have to add “start_position => beginning” to your Logstash config on the line immediately following the path statement.

Okay, Logstash is ready to read the Apache JMeter CSV and send it to Elasticsearch. Now Elasticsearch needs to have an index and a type mapping ready to hold the log data. If you’ve spent any time at all with Elasticsearch you should be familiar with creating a type mapping. In this case, what you want to do is create a type mapping template. That way, Logstash can create an index based on the current date, and it will use the correct type mapping each time.

Here is the type mapping I used:

(Can’t see the code? Click here.)

Now Logstash is configured to read the data and Elasticsearch is ready to persist it. You can test this at this point and verify that the data is going all the way to Elasticsearch. Start up Logstash like this:

/opt/elasticsearch/logstash-1.4.2/bin/logstash -f ./jmeter-results.conf

If it looks happy, go start your load test. Then use Sense (part of Marvel) or a similar tool to inspect your Elasticsearch index.

Step 3: Visualize the Results

Now it is time to visualize all of those test results coming from the load test. To do that, go download and unpack Kibana. I followed a tip in this blog post and unpacked it into $ES_HOME/plugins/kibana/_site on my monitoring cluster but you could use some other HTTP server if you’d rather.

Now open a browser and go to Kibana. You can link to a Logstash dashboard, a sample dashboard, an unconfigured dashboard, or a blank dashboard. Pick one and start playing with it. Once you get the hang of it, create your JMeter Dashboard starting from a blank dashboard. Here’s what our dashboard looked like when it was done:
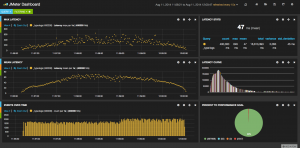
Apache JMeter Results DashboardClick to see the screenshot in all of its glory.

Using Logstash and Kibana we can see, in realtime, the throughput our Apache JMeter test is driving (bottom left) and a few different panels breaking down response latency. You can add whatever makes sense to you and your team. For example, we want all of our responses to come back within 250 ms, so the chart on the bottom right-hand corner shows how we’re doing against that goal for this test run.

One gotcha to be aware of. By default, Kibana looks at the Elasticsearch timestamp. But that’s the time that Logstash indexed the content, not the actual time that the HTTP request came back to Apache JMeter. That time gap could be small if you are running Logstash while your test is running and your machine has sufficient resources, or it could be very large if you wait to parse your test results for some time after the test run. Luckily, the timestamp field that Kibana uses is configurable so make sure all of your graphs are charting the appropriate timestamp field, which is the “time” field that JMeter writes to the CSV file.

Using Apache JMeter to Test Elasticsearch (or any REST API)

I’m helping a client streamline their Web Content Management processes, part of which includes moving from a static publishing model to a dynamic content-as-a-service model. I’ll blog more on that some other time. What I want to talk about today is how we used Apache JMeter to validate that Elasticsearch, which is a core piece of infrastructure in the solution, could handle the load.

Step 1. Find some test data to index with Elasticsearch

Despite being a well-known commerce site that most of my U.S. readers would be familiar with, my client’s site’s content requirements are relatively modest. On go-live, the content service might have 10 or 20 thousand content objects at most. But we wanted to test using a data set that was much larger than that.

We set out to find a real world data set with at least 1 million records, preferably already in JSON, as that’s what Elasticsearch understands natively. Amazon Web Services has a catalog of public data sets. The Enron Email data set looked most promising.

We ended up going with a news database with well over a million articles because the client already had an app that would convert the news articles into JSON and index them in Elasticsearch. By using the Elasticsearch Java API and batching the index operations using its bulk API we were able to index 1.2 million news articles in a matter of minutes.

Step 2: Choosing the Testing Tool & Approach

We looked at a variety of tools for running a load test against a REST API including things like siege, nodeload, Apache ab, and custom scripts. We settled on Apache JMeter because it seemed like the most full-featured option, plus I already had some familiarity with the tool.

For this particular exercise, we wanted to see how hard we could push Elasticsearch while keeping response time within an acceptable window. Once we established our maximum load with a minimal Elasticsearch cluster, we would then prove that we could scale out roughly linearly.

Step 3: Defining the Test in Apache JMeter

JMeter tests are defined in JMX files. The easiest way to create a JMX file is to use the JMeter GUI. Here’s how I defined the basic load test JMX file…

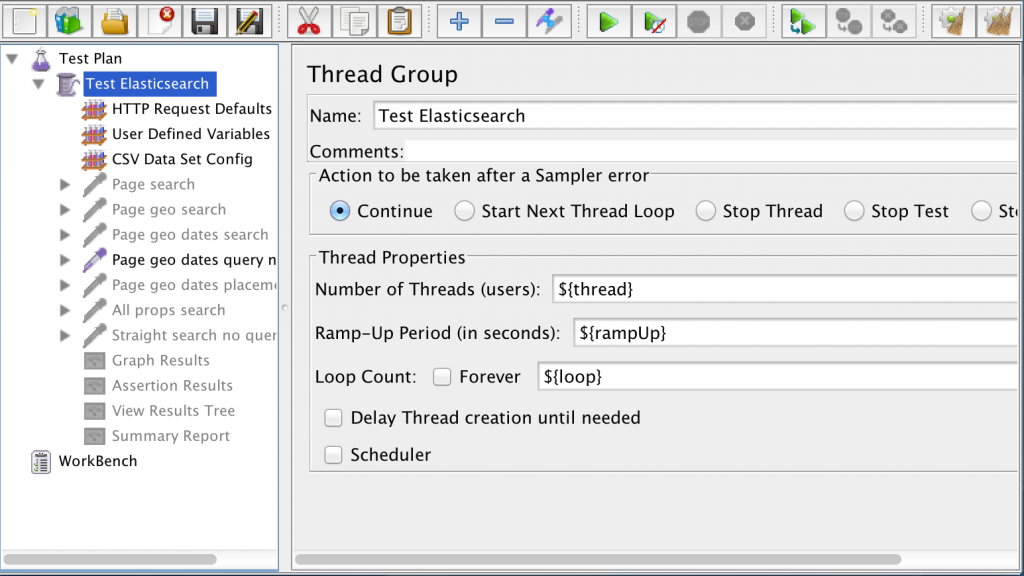
First, I created a thread group. Think of this like a group of test users. The thread group defines how many simultaneous users will be running the test, how fast the ramp-up will be, and how many loops through the test each user will make. You can see by the screenshot below that I used parameters for each of these to make it easier to change the settings through configuration.

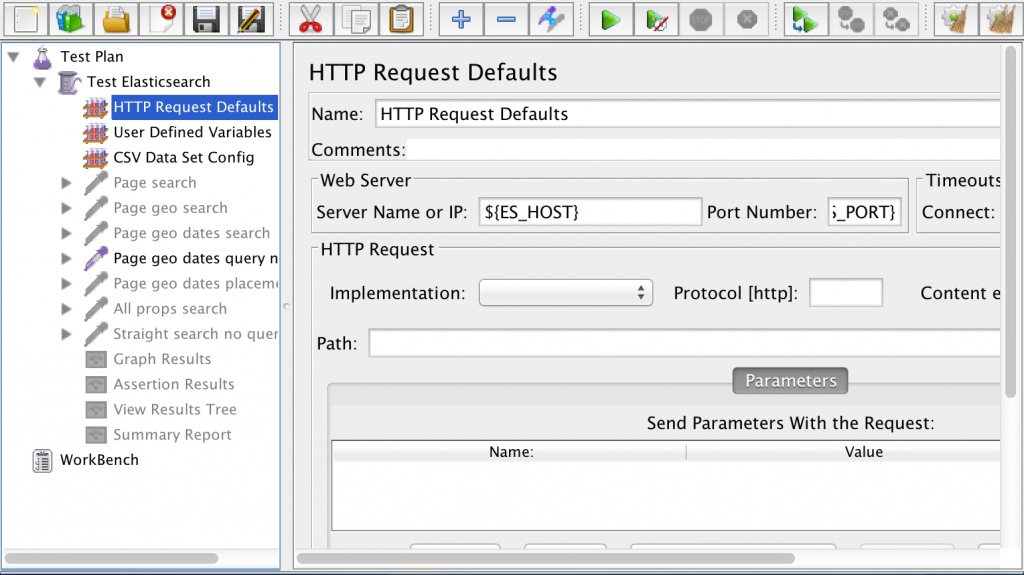
JMeter Thread GroupWithin the thread group I added some HTTP Request Defaults. This defines my Elasticsearch host and port once so I don’t have to repeat myself across every HTTP request that’s part of the test.

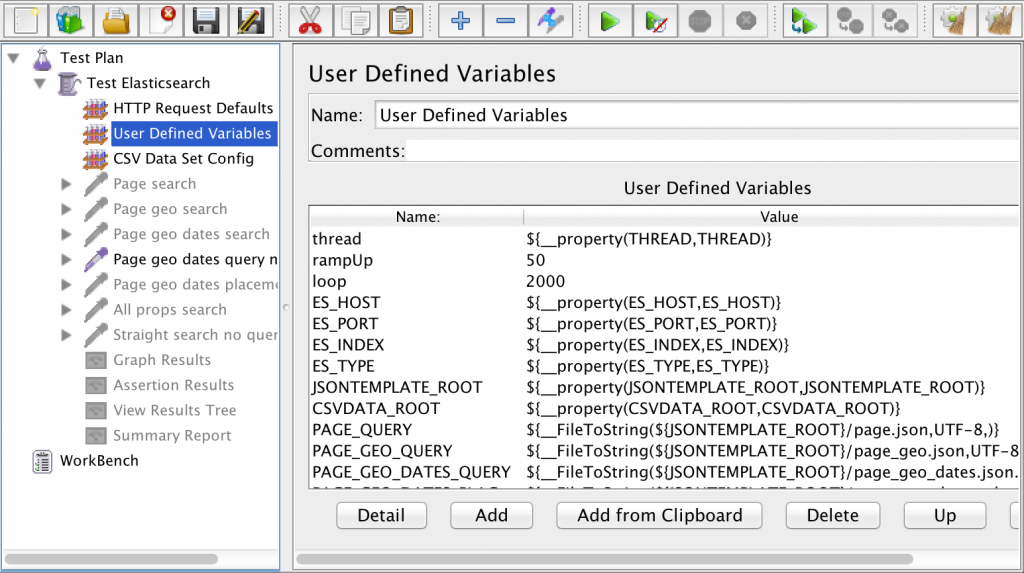
JMeter HTTP Request DefaultsNext are my User Defined Variables. These define values for the variables in my test. Look at the screenshot below:

JMeter User Defined VariablesYou’ll notice that there are three different kinds of variables in this list:

  1. Hard-coded values, like 50 for rampUp and 2000 for loop. These likely won’t change across test runs.
  2. Properties, like thread, ES_HOST, and ES_PORT. These point to properties in my JMeter user.properties file.
  3. FileToString values, like for PAGE_GEO_QUERY. These point to Elasticsearch query templates that live in JSON files on the file system. JMeter is going to read in those templates and use them for the body of HTTP requests. More on the query templates in a minute.

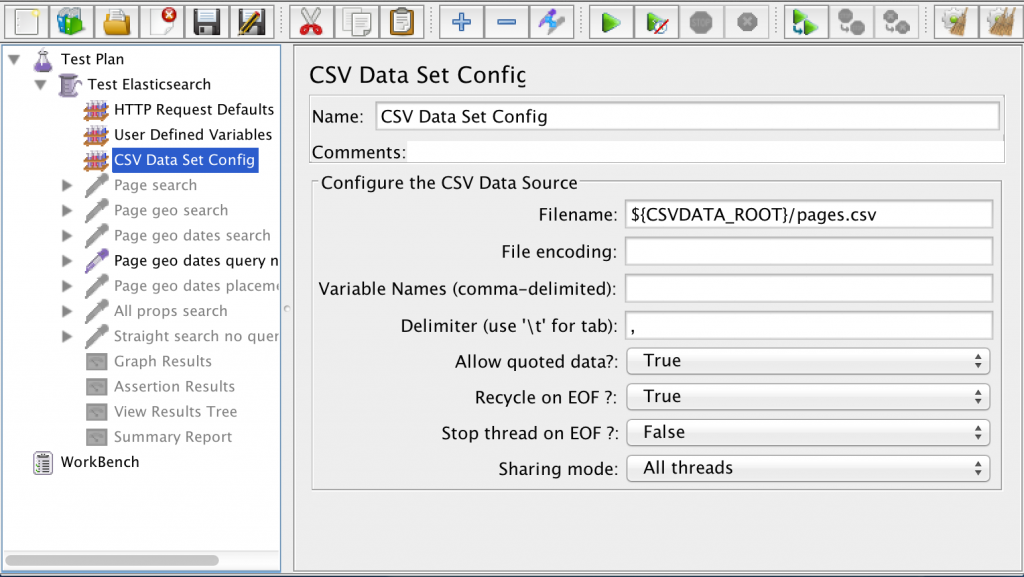
The third configuration item in my test definition is a CSV Data Set Config. I didn’t want my Elasticsearch queries to use the same values on every HTTP request. Instead I wanted that data to be randomized. Rather than asking JMeter to randomize the data, I created a CSV file with randomized data. Reading data from a CSV to use for the test run is less work for JMeter to do and gives me a repeatable, but random, set of data for my tests.

JMeter CSV Data Set ConfigYou can see that the filename is prefaced with “${CSVDATA_ROOT}”, which is a property declared in the User Defined Variables. The value of it resides in my JMeter user.properties file and tells JMeter where to find the CSV data set.

Here is a snippet of my user.properties file:
ES_HOST=127.0.0.1
ES_PORT=9200
ES_INDEX=content-service-content
ES_TYPE=wcmasset
THREAD=200
JSONTEMPLATE_ROOT=/Users/jpotts/Documents/metaversant/clients/swa/code/es-test/tests/jsontemplates
CSVDATA_ROOT=/Users/jpotts/Documents/metaversant/clients/swa/code/es-test/tests/data

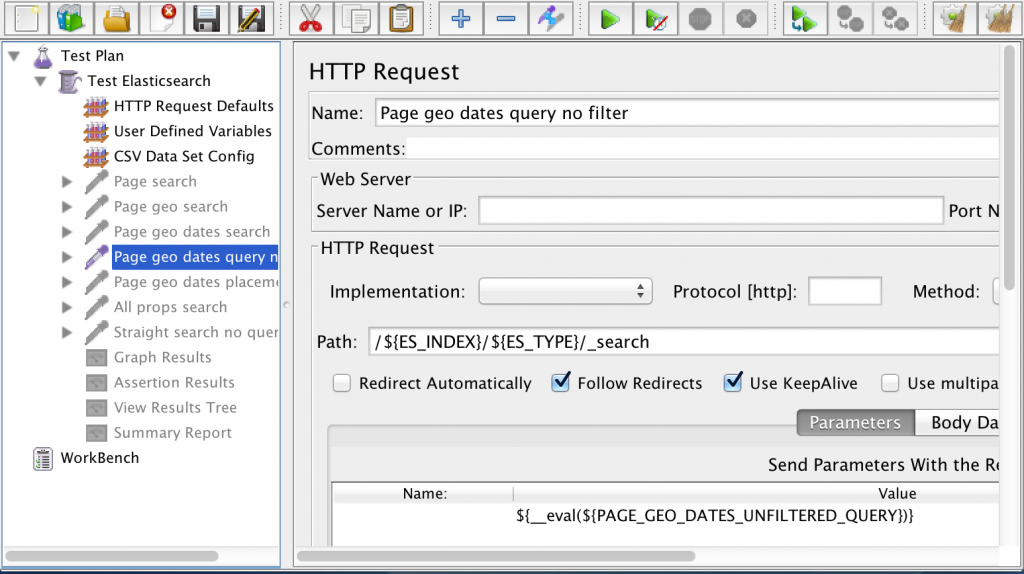
Next comes the actual HTTP requests that will be run against Elasticsearch. I added one HTTP Request Sampler for each Elasticsearch query. I have multiple HTTP Request Samplers defined–I typically leave all but one disabled for the load test depending on the kind of load I’m trying to test.

JMeter HTTP RequestYou can see that I didn’t have to specify the server or port because the HTTP Request Defaults configuration took care of that for me. I specified the path, which is the Elasticsearch URL, and the body of the request, which resides in a variable. In this example, the variable is called PAGE_GEO_DATES_UNFILTERED_QUERY. That variable is defined in User Defined Variables and it points to a FileToString value that resolves to a JSON file containing the Elasticsearch query.

Okay, so what are these query templates? You’ve probably used curl or Sense (part of Marvel) to run Elasticsearch queries. A query template is that same JSON with replacement variables instead of actual values to search for. JMeter will merge the test data from the randomized test data CSV with the replacement variables in the query template, and use the result as the body of the HTTP request.

Here’s an example of a query template that runs a filtered query with four replacement variables used as filter values:

(Can’t see the code? Click here)

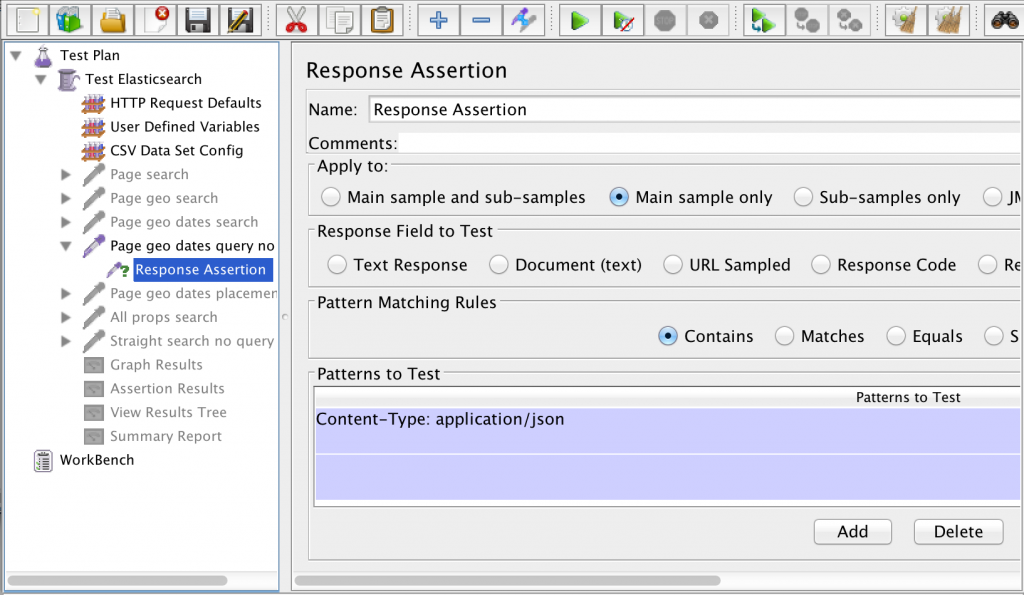
JMeter lets you inspect the response that comes back from the HTTP Request using assertions. However, the more assertions you have, the more work JMeter has to do, so it is recommended that you have as few as possible when doing a load test. In my test, I added a single assertion for each HTTP Request that looks only at the response header to make sure that I am getting back JSON from the server.
JMeter Response AssertionJMeter provides a number of Listeners that summarize the responses coming back from the test. You may find things like the Assertion Results, View Results Tree, and Summary Report very helpful while you are writing and testing your JMX file in the JMeter GUI, but you will want to make sure that all of your Listeners are completely disabled when running your load test for real.

At the end of this step I’ve got a repeatable test that will run 400,000 queries against Elasticsearch (that’s 200 threads x 2,000 loops x 1 enabled HTTP request). Because everything is configurable I can easily make changes as needed. The next step is running the test.

Step 4: Run the test

The first thing you have to deal with before running the test is driving enough traffic to tax your server without over-driving the machine running JMeter or saturating the network. This takes some experimentation. Here are some tips:

  • Don’t run your test using the JMeter GUI. Use the command line instead.
  • Don’t run Elasticsearch on the same machine that runs your JMeter test.
  • As mentioned earlier, use a very simple assertion that does as little as possible, such as checking the response header.
  • Turn off all Listeners. I’ll give you an approach for gathering and visualizing your test results that will blow those away anyway.
  • Don’t exceed the maximum recommended number of threads (users) per test machine, which is 300.
  • Use multiple JMeter client machines to drive a higher concurrent load, if needed.
  • Make sure your Elasticsearch query is sufficient enough to tax the server.

This last point was a gotcha for us. We simply couldn’t run enough parallel JMeter clients to stress the Elasticsearch cluster. The CPU and RAM on the nodes in the Elasticsearch cluster were barely taxed, but the JMeter client machines were max’d out. Increasing the number of threads didn’t help–that just caused the response times JMeter reported to get longer and longer due to the shortage of resources on the client machines.

The problem was that many of our Elasticsearch queries were returning empty result sets. We had indexed 1.2 million news articles with metadata ranges that were too broad. When we randomized our test data and used that test data to create filter queries, the filters were too narrow, resulting in empty result sets. This was neither realistic nor difficult for the Elasticsearch server to process.

Once we fixed that, we were able to drive our desired load with a single test client and we were able to prove to ourselves that for a given load driven by a single JMeter test client we could handle that load with an acceptable response time using an Elasticsearch cluster consisting of a single load-balancing node and two master/data nodes (two replicas in total). We scaled that linearly by adding another 3 nodes to the cluster (one load-balancer and two master/data nodes) and driving it with an additional JMeter client machine.

Visualizing the Results

When you do this kind of testing it doesn’t take long before you want to visualize the test results. Luckily Elasticsearch has a pretty good offering for doing that called ELK (Elasticsearch, Logstash, & Kibana). In my next post I’ll describe how we used ELK to produce a real-time JMeter test results dashboard.

Independent Alfresco community forms to guarantee freely-available open source ECM forever

Something very interesting is afoot in the Alfresco community. A subset of the community has formed an independent organization called The Order of the Bee, aimed at making sure the freely-available open source platform for Enterprise Content Management stays freely-available, forever.

The group of individuals, who hail from all parts of the globe, are customers, partners, independent individuals, and even Alfresco Software employees. Despite varied backgrounds and interests, they all have at least one thing in common: They want to make sure that Alfresco Community Edition stays free and open.

Alfresco has always provided what is essentially an “open core” distribution. The on-premises software ships in two editions: Community Edition is the freely-available software licensed under the LGPLv3 and Enterprise Edition is commercially licensed. But lately there has been growing concern amongst community members that Alfresco Software, the commercial company behind the product, doesn’t always have the best interests of the community in mind. Thus was born The Order of the Bee, a reference to the community keynote I delivered at Alfresco Summit 2013.

The Order began forming about the same time I stepped down as Alfresco’s Chief Community Officer. While the timing is uncanny, and I am a founding member of the Order, that timing was not planned and is coincidental.

Check out the web site to see what the Order is all about. If you feel compelled to participate, be sure to submit the contact form. And follow the group on Twitter.

5 rules you must follow on every Alfresco project

I know that people are often thrown into an Alfresco project having never worked with it before. And I know that the platform is broad and the learning curve is steep. But there are some rules you simply have to follow when you make customizations or you could be creating a costly mess.
The single most important one is to use the extension mechanism. Let me convince you why it’s so important, then I’ll list the rest of the top five rules you must follow when customizing Alfresco.

All-too-often, people jump right in to hacking the files that are part of the distributed WARs. I see examples of it in the forums and other community channels and I see it in client projects. Not every once-in-a-while. All. Of. The. Time.

If you’ve stumbled on to this blog post because you are embarking on your first Alfresco project, let this be the one thing you take to heart: The extension mechanism is not optional. You must use it. If you ignore this advice and begin making changes to the files shipped with Alfresco you are entering a world of pain.

The extension points in Alfresco allow you to change just about every aspect of Alfresco Share and the underlying repository without touching a single file shipped with the product. And you can do so in a way that can be repeated as you move from environment to environment or when you need to re-apply your customizations after an upgrade.

“But I am too busy,” you say. “This needs to be done yesterday!”, you say. “I know JavaScript. I’m just going to make some tweaks to these components and that’s it. What’s the big deal?”

Has your Saturday Morning Self ever been really angry at things your Friday Night Self did without giving much consideration to the consequences? That’s what you’re doing when you start making changes to those files directly. Yes, it works, but you’ll be sorry eventually.

As soon as you change one of those files you’ve made it difficult or impossible to reliably set up the same software given a clean WAR. This makes it hard to:

  • Migrate your code, because it is hard to tell what’s changed across the many nooks and crannies of the Alfresco and Share WARs.
  • Determine whether problems you are seeing are Alfresco bugs or your bugs, because you can’t easily remove your customizations to get back to a vanilla distribution.
  • Perform upgrades, because you can’t simply drop in the new WARs and re-apply your customizations.

People ask for best practices around customizing Alfresco. Using the extension mechanism isn’t a “best practice”–it’s a rule. It’s like saying “Don’t cross the foul line” is a “best practice” when bowling. It’s not a best practice, it’s a rule.

So, to repeat, the first rule that you have to abide by is:

  1. Use the extension mechanism. Don’t touch a single file that was shipped inside alfresco.war or share.war. If you think you need to make a customization that requires you to do that I can almost guarantee you are doing it wrong. The official docs explain how to develop extensions.

Rounding out the top five:

  1. Get your own content model. Don’t add to Alfresco’s out-of-the-box content model XML or the examples that ship with the product. And don’t just copy-and-paste other models you find in tutorials. Those are just examples, people!
  2. Get your own namespace. Stay out of Alfresco’s namespace altogether. Don’t put your own web scripts in the existing Alfresco web script package structure. Don’t put your Java classes in Alfresco’s package structure. It’s called a “namespace”. It’s for your name and it keeps your stuff separate from everyone else’s.
  3. Package your customizations as an AMP. Change the structure of the AMP if you want–the tool allows that–but use an AMP. Seriously, I know there are problems with AMPs, but this is what we’re all using these days in the Alfresco world. Ideally you’ll have one for your “repo” tier changes and one for your “share” tier changes. An AMP gives you a nice little bundle you can hand to an Alfresco administrator and simply say, “Apply this AMP” and they’ll know exactly what to do with it.
  4. Create a repeatable build for your project. I don’t care what you use to do this, just use something, anything, to automate your build. If a blindfolded monkey can’t produce a working AMP from your source code you’re not done setting up your project yet. It’s frustrating that this has to be called out, because it should be as natural to a developer as breathing, but, alas, it does.

The Alfresco Maven SDK can really help you with all of these. If you use it to bootstrap your project, and then only make changes to the files in your project, you’re there. If you need help getting started with the Alfresco Maven SDK, read this.

These are the rules. They are non-negotiable. The rest of your code can be on the front page of The Daily WTF but if you stick to these rules at a minimum, you, your team, and everyone that comes after you will lead a much less stressful existence.

You might also be interested in my presentation, “What Every Developer Should Know About Alfresco“. And take a look at the lightning talk Peter Monks gave at last year’s Alfresco Summit which covers advice for building Alfresco modules.


Five new features in Alfresco 5.0 in about five minutes

Hopefully you saw that Alfresco 5.0.a Community Edition was released last week. Kevin Roast did a nice write-up on a few of the new features. I created a screencast based on his write-up. It is embedded below or use this link.

You might want to make the video full-screen and take the settings up to HD.

If you take a peek under the covers you’ll likely see that there are still some deprecated chunks of code hanging around, libraries that still need to be upgraded, and features you might have expected but that aren’t yet implemented. This is still an early release. You should expect several more named releases before Community Edition 5.0 stabilizes.

Use this release as a preview for what’s coming, to test your own add-ons, or to help find and report issues. If you are running Community Edition in production I’d stick with 4.2.f for now.

Alfresco Anti-Patterns: When You Probably Shouldn’t Use Alfresco

There are plenty of write-ups listing what Alfresco can do–I thought it might be instructive to list the things people often try to use Alfresco for but shouldn’t. I’ve got five examples in my list. The first two are common mistakes people make during product selection. The last three are more architectural.

Anti-Pattern #1: Dynamic Web Content Management (like Drupal or WordPress)

I think this is happening less, but every once in-a-while I’ll still see people trying to compare Alfresco to dynamic WCM platforms like Drupal or WordPress. Alfresco has very little in common with systems like these. If you install Alfresco and expect it to serve up a pretty web site out-of-the-box with downloadable themes and tons of modules or widgets you can use to add features to your web site, you’ll be disappointed. This isn’t a shortcoming of the tool, it’s just not what it was built for.

There are plenty of people who use Alfresco to manage assets that are eventually served up to the web. They’ll use Alfresco Share or a custom UI as the “administrative” interface for managing content. Then, they’ll push that content out to some other system on the presentation tier (Saks Fifth Avenue and New York Philharmonic are two examples).

There are partners who have created WCM solutions on top of Alfresco (see Crafter). Solutions like that leverage the power of Alfresco as a content repository and then add in the missing pieces, which are mostly about presentation layer, site building, and content creation.

The bottom-line is if you find yourself comparing out-of-the-box Alfresco to systems like Drupal or Wordress you have made a mistake in your evaluation.

Anti-Pattern #2: Full-featured wiki, portal, blog, forums, or calendar

I’ve encountered several people looking to replace major collaboration systems in their IT footprint with Alfresco. Maybe they’ve decided to use Alfresco for document management, but they want to see what else they might be able to replace. They have a wiki they want to replace, they see Alfresco has a wiki. Problem solved, right? This is where box-checking against a feature list gets you into trouble.

Alfresco is a document management repository with a powerful embedded workflow engine. Alfresco Share, the web client that sits on top of Alfresco, is great for basic document management, processes around documents, and team collaboration.

For teams and projects, Alfresco Share uses a “site” metaphor to keep everything related to that team or project together. Each site has a dashboard. Out-of-the-box “dashlets” can be used to summarize or highlight information stored in the site. Out-of-the-box, everyone sees the same dashboard for a site, which is configured by a site manager. There is no easy way for a power user to specify which dashlets should be restricted to which users or groups of users through the UI like there would be in a portal, for example. So, although dashlets look like “portlets” Alfresco Share doesn’t really have much else in common with portals. If you what you really want is a full-blown portal server you should look at something like Liferay or Exo.

Each site can also be configured with a number of collaborative tools such as discussions, blog, wiki, and calendar. These are more than adequate to facilitate most of what a team, project, or department needs. But none of them individually are going to replace full-featured, standalone systems. If you need the power of a full wiki, install MediaWiki. If you need a blog server, install WordPress. And so on.

Those are two where I see people making adjustments in their expectations early in the product evaluation phase. Now let’s look at a few that may not get uncovered until an architect or developer gets involved…

Anti-Pattern #3: Highly relational solutions

Alfresco relies on three main pillars to deliver its functionality: The file system, a search engine (Lucene or Solr), and a relational database. But you won’t be touching any of those directly. Instead, you’ll work with an abstraction which is simply, “the repository”.

Don’t be misled by the inclusion of a relational database as one of its dependencies. It is there to manage metadata. As you start to customize Alfresco to meet your specific requirements, you’ll define the content model. Alfresco will do the work of reading your content model and storing metadata for instances of those content types in the database.

Objects in the repository can be related to each other through “associations”. These are essentially pointers between one or more objects. There are a couple of challenges with these. First, they cannot easily be queried. You can ask an object for its associations and then you can iterate over those, but you cannot do a traditional “join” across objects.

For example, suppose you have a “whitepaper” object that has an association to one or more “product” objects. You cannot execute a single query that says “Give me all whitepapers containing the word ‘performance’ that are associated with the product named ‘Acme Widget'”.

One way people work around this is to de-normalize their data, then implement code that keeps it in sync. In this example, you could add a multi-value property on the whitepaper object that would store the names of the products a whitepaper is related to. Then you’d be able to run that example query.

If the name stored on the product object changes, your code would trigger an update on all corresponding whitepapers to keep the product name in sync. If you have a small number of such relationships with a reasonable number of objects on either side of the relationship this is fine, but you can see how it might quickly get out-of-hand.

So if your underlying data is highly-relational, don’t try to force it into an Alfresco content model. Instead, move the relational data to a database and use Alfresco only for the content pieces.

Anti-Pattern #4: JSON/XML object store

It’s really common to store chunks of JSON or XML as content in Alfresco. For example, maybe you have some data that isn’t expressed well as name-value pairs. Or maybe the content you need to manage just happens to be in one of those formats. But if that’s all you need to persist in the repository you really ought to be asking yourself why you are using Alfresco when there are many lighter-weight, more scalable technologies that are purpose-built for this.

One limitation of storing JSON or XML as content in Alfresco is that the repository has no semantic understanding of the content. For example, suppose you have a book object that is represented by JSON and you store that JSON as content. It’s likely that the JSON would contain properties like “title”, “author”, or “ISBN”. Out-of-the-box, none of those will be queryable by property. Alfresco will simply attempt to full-text index the content like any other content stream. It doesn’t understand the difference between “title” and “author” because that meaning is embedded in the content itself, not the object. The same is true for XML.

You can work around this by setting up metadata extractors to grab data out of the JSON or XML and store it in properties on the object. Then, you can query the object’s properties through Alfresco. But if all of your objects are similarly-structured it might make more sense to use a document-oriented NoSQL repository or an XML database instead. When you store a JSON document in something like Elasticsearch, Couch, or MongoDB, no extra work is necessary because those systems natively understand JSON.

Anti-Pattern #5: Storing lots of content-less objects

A content-less object is an object that lacks a content stream. It’s common to have one or two types of content-less objects in your Alfresco-based solution because there are usually good reasons to have objects that don’t have a file associated with them. Maybe you are storing some configuration as properties on an object, for example. But if you need to store nothing but content-less objects, you are throwing away many of the benefits you get from a repository like Alfresco that is built specifically for managing file-based content like full-text search, transformations, and file-based protocols.

If you just need to store objects that have properties but no file-based content, you might be better of with a document-oriented NoSQL repository or a key-value store.

Summary

As I mentioned at the start of the post, there are a lot of cases where Alfresco makes sense and you can find many of these around the net. The goal of this post was to list common misconceptions or even misuses of Alfresco that can cost you time and money.

Any time you invest in a platform you’ll find corner cases that the platform wasn’t meant to address and you can often work around those with code. What you don’t want to do, though, is have your entire system be a corner case relative to the platform’s sweet spot. That’s no fun for anybody.

How I successfully studied for the Alfresco Certified Engineer Exam

Back in March I blogged about why I took the Alfresco Certified Administrator exam (post). Today I passed the Alfresco Certified Engineer exam. I took it for the same reasons I took the ACA exam, as outlined in that post, so in this post, I thought I’d share how I studied for the test.

Let me start off with a complaint: There is nowhere I could find that describes which specific version of Alfresco the test covers. This wasn’t that big of a deal for the ACA exam, but for the ACE exam, I felt a little apprehensive not knowing.

I know Alfresco probably doesn’t want to lock the exam version to an Alfresco version. But the blueprint really needs to give people some idea. Ultimately, I decided 4.1 was a safe bet.

I can’t tell you what was on the test, but I can tell you how I studied.

First, review the blueprint

The exam blueprint is the only place that gives you hints as to what’s on the test. If you look at the blueprint, you’ll see that the test is divided into five areas: Architectural Core, Repository Customization, Web Scripting, UI Customization, and Alfresco API.

The blueprint breaks down each of those five areas into topics, but they are still pretty broad. Some of them helped me figure out what to review and some of them didn’t. For example, under Architectural Core, topics like “Repository”, “Subsystems”, and “Database” were too vague to be that helpful in guiding my study plans.

Next, identify your focus areas

Looking at the blueprint, most of those topics have been in the product since the early days and haven’t changed much. I figured I could take the test cold and pass those. But Share Configuration and Customization has changed here and there between releases. With a lot of different ways to do things, and ample opportunity for testing around minutiae, I figured this would be where I’d need to spend most of my study time. I also wanted to spend time reviewing the various API’s listed under Architectural Core because I typically just look those up rather than commit the details to memory.

To validate where I thought my focus areas should be I took the sample test on the blueprint page, which was helpful.

Now, study

For Architectural Core, I spent most of my time reviewing the list of public services in the Foundation API found in Appendix A of the Alfresco Developer Guide, the JavaScript API (also in Appendix A as well as the official documentation), and the Freemarker Templating API documentation.

For the Repository Customization I figured I had most of that down cold and just spent a little time reviewing Activiti BPM XML and associated workflow content models. The workflow tutorial on this site is one place with sample workflows to review and obviously the out-of-the-box workflows are also good examples.

According to the blueprint, the UI Customization section is now focused entirely on Alfresco Share, so I didn’t spend any time reviewing Alfresco Explorer customization. Instead, I read through the Share Configuration and Share Customization sections of the documentation. There are now tutorials on Share Customization in the Alfresco docs so I went through those again just to make sure everything was fresh. The Share configuration examples in my custom content types tutorial are another resource.

The Alfresco API section consists of questions about the Alfresco REST API and CMIS. This is only 5% of the test so I spent no time reviewing this. I also ignored Web Scripts, figuring my existing knowledge was good enough.

After studying the resources in my focus areas I took the sample test once more. It’s always the same set of questions, so taking it repeatedly isn’t a great way to prove your readiness, but at least you know you won’t miss those questions if they show up on the real test.

Feel ready? Go for it

If you get paid to work with Alfresco, you really ought to take this exam (and the ACA exam). Obviously, what I’ve reviewed here is a study plan for someone who has significant experience with the platform doing real world projects. If you are new to Alfresco you’ll have to adjust your plan and preparation time accordingly. Better yet, get a few projects under your belt first. I think it would be tough for someone with no practical experience to pass the test with any amount of study time, which is the whole point.

So there you go, that’s how I studied. Your mileage will vary based on what your focus areas need to be. Now go hit the books!

New tutorial on Share customization with Alfresco Aikau

Alfresco community member, Ole Hejlskov (ohej on IRC), has just published a wonderful tutorial on customizing Alfresco Share with the new Alfresco Aikau framework.

You may have seen one of Dave Draper’s recent blog posts introducing the new framework. Ole’s tutorial is the next step you should take in order to understand the framework and how it can be used to make tweaks or additions to Alfresco Share.

I was happy to see Ole follow my example for the format and publication of his tutorial and that he’s made both the tutorial itself and the source code available on GitHub for anyone that wants to make improvements.

Thanks for the hard work and the great tutorial, Ole!

Five steps you can use to figure out how anything in Alfresco Share really works

A forums user recently asked how to use the “quick share” feature from their own code. The implementation is easy to figure out, but I thought illustrating the steps you should use to dig into it would be instructive, because it is the same general pattern you would follow to learn how anything works in Alfresco.

What is Quick Share?

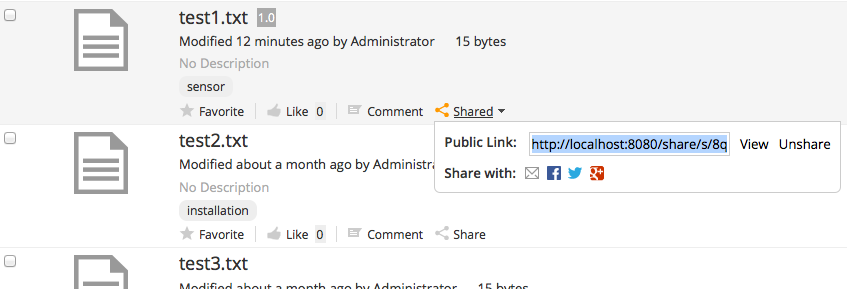
Quick Share makes it easy for end-users to share any document with anyone whether or not that person is a member of a site or has specific permissions on a document. Clicking the “Share” link in the document library or document details displays a dialog with a shortcut URL that will allow anyone to see a preview of the document. If that person also has access to the document, they can optionally download the document as well.

The Quick Share feature in Alfresco Share


How does this work behind-the-scenes? Let me show you how to figure that out. These steps can be used to demystify any Share-based functionality you need to learn more about.

Step 1: Determine the call Share makes to the repository

Share is just a front-end web application. It always talks to the repository via HTTP. Step 1 is to take advantage of that. Use Firebug or a similar browser-based client-side debugging tool to watch the network traffic between Share and the repository. If you turn that on you’ll see that when you click “Share” the browser makes a POST to:

http://localhost:8080/share/proxy/alfresco/api/internal/shared/share/workspace/SpacesStore/f70e2505-5002-42b7-a71b-2e09aca0c2d0

What comes back is JSON representing the quick share ID:

{
"sharedId": "oD9wUfV_SPS9eG-CFEpwbQ"
}

The first part of that URL, “/share/proxy/” is the Share proxy. It simply forwards the request on to the repository tier. In this case that’s a web script residing at “/alfresco/api/internal/shared/share”. The rest of the URL is the node reference of the node being shared.

As a side-note, unsharing works similarly. Share sends a DELETE to http://localhost:8080/share/proxy/alfresco/api/internal/shared/unshare/oD9wUfV_SPS9eG-CFEpwbQ

That returns JSON with the return flag:

{
"success" : true
}

So now you know how Share interacts with the repository. The next step is to dig into the repository tier implementation.

Step 2: Look at the repository web script

Now that you know the repository web script URL you can go to the web script console, http://localhost:8080/alfresco/s/index, to learn more about the web script. I find searching by URI to be easiest. Here’s the web script in the list:

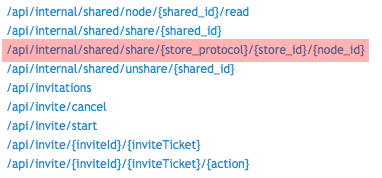
web-script-index

Clicking on that link shows high-level information about the web script. Make note of this web script’s lifecycle–it is set to “internal”. That means you shouldn’t call it from your own applications or customizations. If you do, you may be creating a future maintenance headache because the web script may change without warning.

In this case, we don’t want to call the web script, we want to know what the web script is doing. Clicking on the web script ID will tell you more about how it is implemented. Here’s the URL where you’ll end up:

http://localhost:8080/alfresco/s/script/org/alfresco/repository/quickshare/share.post

This page is really helpful because it shows you the details about the web script implementation, including its views and controllers.

Web Script Implementation Details

In this case, the web script uses a Java controller implemented in the following class:
org.alfresco.repo.web.scripts.quickshare.ShareContentPost

The next step is to dig into the web script implementation.

Step 3: Read the source code for the implementation

If you search through your Alfresco source code you’ll find ShareContentPost.java. It’s a very simple web script. Here’s the line that does the work:

QuickShareDTO dto = quickShareService.shareContent(nodeRef);

Cool, so there is a QuickShareService. I’m going to make a time-saving leap here which is to assume that anything named like FooService is likely defined as a Spring bean that I can inject in my own code.

Step 4: Find the QuickShareService bean

If you’re going to write some Java code that leverages the QuickShareService you’ll probably want to see the Spring bean configuration for that bean. To find that, go into $TOMCAT_HOME/webapps/alfresco/WEB-INF/classes/alfresco and do a grep for QuickShareService. You’ll see that it is defined in quickshare-services-context.xml.

Now you have a Spring bean ID you can use as a dependency in your code.

Step 5: Understand the content model

You might choose to do this in an earlier step, but if you haven’t already, you should use the node browser in Share to see what happens to a node when it is shared just in case you need to make use of any of that information. By doing that you’ll see that a shared node has an aspect called qshare:shared. When it gets shared, the qshare:sharedId and qshare:sharedBy properties get set. In this example, the QuickShareService handles that for you–you shouldn’t have to set those manually. But it is good to know those properties are there in case you need them.

If you needed to learn more about the content model you could grep for that aspect ID, qshare:shared, in $TOMCAT_HOME/webapps/alfresco/WEB-INF/classes/alfresco/model to figure out where the model XML is.

Now you have everything you need to make use of this functionality in your own code. For example, if you wanted to create a rule action that automatically shared everything matching a certain criteria, you could easily do that by injecting the QuickShareService into your action and then calling the shareContent() method (see my actions tutorial).

This example covered the Alfresco Quick Share feature in the Alfresco Share web client, but you can use these steps to dig into any functionality in Alfresco Share that you need to deconstruct.

I’m leaving Alfresco, remaining part of the community

After much contemplation about what’s best for the Alfresco community, the company, and my own happiness, I’ve decided to leave the company. My last day as Chief Community Officer will be Friday, June 6.

With all of the changes the company has seen over the last year or so I know there are some who will suspect that something nefarious is underfoot. I want to be really clear about this: It was my decision to leave, I’m excited about this change, and I hope you’ll be excited for me too.

If it’s all good, why leave?

Ultimately,  I’m leaving because I miss delivering content-centric solutions to clients. When I took the position three years ago, I thought that the part of my role that requires me to help flatten the learning curve for people would satisfy my creative and technical itch. It did partially, but it wasn’t enough.

Of course, there have been changes I haven’t always agreed with–until you are your own boss that will always be true. But the primary reason I’m leaving is because I need to be building stuff again.

What does this mean for the Alfresco Community?

The company remains committed to the Alfresco community and there are no major changes planned that I am aware of. I know whomever takes over my responsibilities will continue with the important work as beekeeper.

I intend to continue making contributions to the community just as I did before I joined the company. In fact, having me back in the field means more real world implementations to draw on that I can write about, speak about, and share with others.

My personal mission to take down legacy ECM with open source hasn’t changed. I think many of you are aligned with me on that mission, and this move allows us to continue the fight side-by-side.

What does this mean for Alfresco Summit?

I’m proud of what I was able to accomplish with the annual DevCon/Alfresco Summit conference. It was fun growing that so much year-over-year while maintaining the integrity and feel of the event. But I’m no event planner. And the bigger it grew the more time it required. Last year we actually made the decision to take if off my hands. I’ve been helping with programming content for Alfresco Summit 2014 but 2013 was the last one I was primarily responsible for, which makes the transition pretty seamless. (This year’s conference promises to be better than ever, and you should totally sign up if you haven’t done that yet).

What’s next?

For these next two weeks, I’m completely focused on getting everything transitioned smoothly. I’ll share more about what’s next for me after June 6, but I’m sure it will be surprising to absolutely no one.

Until then, please know that I have truly enjoyed my time serving as the leader of this wonderful community. I know there is work left to do but, man, we got so much done!

Perhaps more importantly, I have established what I hope will be life-long friendships, both in the community and inside the company, with people all over the world. The best thing about this change is that I know those will continue, regardless.