Tag: Example

Alfresco Developer Series tutorial source code now on github

The source code for the tutorials in my Alfresco Developer Series has always been available to download as a zip. But for some reason I never put it in a project where we could collaborate on it. That’s fixed now. The code’s now on github. (Note that the source code that accompanies the Alfresco Developer Guide is on Google Code. I don’t intend to maintain that going forward and will instead focus on these github projects).

As part of that I’ve made sure that the content types, behaviors, actions, web scripts, and workflow tutorial code works on 4.0.d and 4.2.c. The original zips referenced in the tutorial PDF still work with the versions they were written for, of course, but if you grab the source from github, they’ll work on the version they are tagged for.

One thing I’ve realized as part of this is that with the actual tutorials in PDF, keeping the written instructions in sync with the code is tough. Maybe I should convert the tutorial text into markdown or something similar and check that into the source code repo as well. Let me know what you think about that idea.

Next step for the code is to convert from the old Ant-based Alfresco SDK to the new Maven-based SDK.

Alfresco Example: Share Dashlet Part Two–Configuration

In my last post I showed a simple example that illustrates the “repository tier data web script/share tier presentation web script” pattern that is used any time you need to create a dashlet in Alfresco Share that reads data from the Alfresco repository. The example I used is called “Get Latest Document” and it does just that–given a folder path, it reads some basic metadata about the most recently modified document and displays it in a dashlet.

That example read the folder path from an XML configuration file that is included as part of the Share tier web script. But what if you wanted to make it easier to configure the dashlet by allowing a Share user to open up a configuration dialog that includes a folder picker? Luckily, Alfresco Share already includes all of the bits and pieces you need to make this possible–it’s just up to you to wire them together. I’ll show you how to do that in this post.

The code that implements this example lives in a Google Code project. I’ve tagged the prior post’s source code–the “XML configuration” code–as “1.0“. The code that goes along with this post is tagged as “2.0“. So if you are following along make sure you are using the appropriate code set.

I’m using Alfresco 4.0.d Community, WAR-only distribution, Lucene for search, two Tomcats, and MySQL. My project is organized following the Share Extras Sample Dashlet project folder structure.

Here’s the Recipe

The goal is to take the 1.0 version of the Get Latest Document dashlet and make it configurable through the UI instead of an XML configuration file. Recall from the prior post that we have a repository tier web script that returns JSON for the most recently modified document in a specified folder path. To make that folder path configurable, nothing at all needs to change on the repository tier. All of the changes are going to take place on the Share tier.

Here’s what has to be created or changed to make this work:

  1. Modify the dashlet markup to include a configuration link
  2. Create a custom client-side JavaScript component to handle the configuration dialog and the folder picker
  3. Write a new Share-tier web script that persists the configuration data

Not too bad, right? Well let’s get after it then.

Modify the dashlet markup to handle configuration

In a minute I’m going to show you the code for the client-side JavaScript component that listens for configuration clicks. For now, I’ll just point out where that client-side object is instantiated within the dashlet’s markup. It is near the top of get-latest-doc.get.html.ftl:

var getLatestDoc = new SomeCo.dashlet.GetLatestDoc("${el}").setOptions(
{
  "componentId": "${instance.object.id}",
  "siteId": "${page.url.templateArgs.site!""}",
  "title": "${title}",
  "filterPath": "${filterPath}",
  "filterPathView": "${filterPathView}"
}).setMessages(${messages});

Notice the “SomeCo” object. When creating new client-side objects, you definitely want to steer clear of the “Alfresco” object if you can so that your stuff doesn’t collide with Alfresco’s stuff.

Next, I need an “edit” icon in the dashlet’s title bar. I want it to appear only if the user is a site manager. So I’m going to add a little blurb to the get-latest-doc.get.html.ftl view that does this:

var editDashletEvent = new YAHOO.util.CustomEvent("onDashletConfigure");
editDashletEvent.subscribe(getLatestDoc.onConfigGetLatestDocClick,
                           getLatestDoc, true);
new Alfresco.widget.DashletTitleBarActions("${args.htmlid?html}").
  setOptions(
{
  actions:
  [
    <#if userIsSiteManager>
    {
      cssClass: "edit",
      eventOnClick: editDashletEvent,
      tooltip: "${msg("dashlet.edit.tooltip")?js_string}"
    },
    </#if>

The first part of this code hooks a YUI “onDashletConfigure” event to the “onConfigGetLatestDocClick” handler in the custom GetLatestDoc client-side JavaScript object. The second part is a FreeMarker conditional that is checking the value of “userIsSiteManager”. The controller will set that value. I’ll show you that shortly. The rest of the view is unchanged from the 1.0 version.

The dashlet needs access to the custom client-side JavaScript component as well as some of Alfresco’s out-of-the-box components that I will leverage to open a dialog and to present a folder picker. I’ve added these to get-latest-doc.get.head.ftl:

<!-- getLatestDoc -->
<@link rel="stylesheet" type="text/css"
  href="${page.url.context}/res/extension/components/dashlets/get-latest-doc.css" />
<@script type="text/javascript"
  src="${page.url.context}/res/extension/components/dashlets/get-latest-doc.js"></@script>
<!-- Simple Dialog -->
<@script type="text/javascript"
  src="${page.url.context}/modules/simple-dialog.js"></@script>
<!-- Global Folder Select -->
<@link rel="stylesheet" type="text/css"
  href="${page.url.context}/modules/documentlibrary/global-folder.css" />
<@script type="text/javascript"
  src="${page.url.context}/modules/documentlibrary/global-folder.js"></@script>

Now take a look at the dashlet’s controller, get-latest-doc.get.js. The biggest change here is to add a call to the repository to find out if the current user is a site manager:

var userIsSiteManager = false,
json = remote.call("/api/sites/" + page.url.templateArgs.site +
  "/memberships/" + encodeURIComponent(user.name));
if (json.status == 200)
{
  var obj = eval('(' + json + ')');
  if (obj)
  {
    userIsSiteManager = (obj.role == "SiteManager");
  }
}
model.userIsSiteManager = userIsSiteManager;

The rest of the controller is pretty much the same as 1.0, with the minor addition of checking “args” for values that the configuration service is going to pass in. If they don’t get passed in, the values will be read from the config XML as they were in 1.0.

That’s it for the changes to the dashlet. If you wanted to you could deploy at this point, but clicking the edit button would result in JavaScript errors.

Create a custom client-side JavaScript component

Client-side JavaScript for this example lives in source/web/extension/components in a file called dashlets/get-latest-doc.js. The “source/web” part of the path is dictated by the Share Extras sample project folder layout. I used “extension” to keep my client-side static assets separate from Alfresco’s. You might choose something more unique.

I’m not going to go line-by-line–look at the source for the full detail. The first thing worth noting is at the very beginning of the file: It’s a declaration of the “SomeCo” object. The client-side object I define in this file will live in that namespace. If I had other custom client-side objects I’d declare them as part of that namespace as well. I’ve seen a lot of examples that place their custom client-side objects in the “Alfresco” namespace, which is a bad habit. There’s nothing magical about that Alfresco namespace, so why not make it obvious what’s part of the product and what’s a customization?

if (typeof SomeCo == "undefined" || !SomeCo)
{
  var SomeCo = {};
  SomeCo.dashlet = {};
}

Next comes the declaration of the constructor for this new object:

SomeCo.dashlet.GetLatestDoc = function GetLatestDoc_constructor(htmlId)
{
  SomeCo.dashlet.GetLatestDoc.superclass.constructor.call(this,
    "SomeCo.dashlet.GetLatestDoc", htmlId);
  /**
   * Register this component
   */
  Alfresco.util.ComponentManager.register(this);
  /**
   * Load YUI Components
   */
  Alfresco.util.YUILoaderHelper.require(["button", "container",
    "datasource", "datatable", "paginator", "json", "history",
    "tabview"], this.onComponentsLoaded, this);
  return this;
};

After calling the superclass’ constructor, I ask the Alfresco ComponentManager to register the class. Then, I use Alfresco’s YUILoaderHelper to declare the components on which my component depends.

After that, the actual definition of the object begins. My GetLatestDoc object is going to extend Alfresco’s Base object, so I use YAHOO.extend to make that happen:

YAHOO.extend(SomeCo.dashlet.GetLatestDoc, Alfresco.component.Base,
{

What follows are the properties and methods of the GetLatestDoc object. The two big things it takes care of are (1) Responding to the “Configure” click and (2) Displaying the folder picker dialog.

The first method is the onConfigGetLatestDocClick. You’ll remember that from the updates to the view–I hooked up the “configure” link to this method. Here is the declaration followed by specifying the actionUrl. The actionUrl is where the configure form will be posted. In this case it is a web script I’ll walk you through in the next section.

onConfigGetLatestDocClick: function getLatestDoc_onConfigGetLatestDocClick(e)
{
  var actionUrl = Alfresco.constants.URL_SERVICECONTEXT +
    "modules/someco/get-latest-doc/config/" +
    encodeURIComponent(this.options.componentId);

The onConfigGetLatestDocClick method does two things: (a) It defines the dialog that gets displayed when someone configures the dashlet and (b) it defines field validation for the fields on the configure dialog. Here is the dialog definition part:

That templateUrl is where the SimpleDialog module should find the form to use. It looks just like the actionUrl and it is. The actionUrl will be a POST while the templateUrl will be a GET.

The getLatestDoc_onConfig_callback function will be invoked when the configuration form is successfully posted to the config web script. That response object contains the response from that web script, which, in this case, we are returning as JSON.

Here is the part of the method that defines field validation:

This function makes the title mandatory. Note the final two assignments. These are hooking up buttons on the config dialog to events in this client-side component. So, when someone clicks “select path” the folder picker will be launched and when someone clicks “clear path” the selected path will be reset.

Then, the final part of the method simply displays the dialog:

this.configDialog.setOptions(
{
  actionUrl: actionUrl,
  siteId: this.options.siteId,
  containerId: this.options.containerId
}).show();
},

So when this method is invoked, Alfresco’s out-of-the-box SimpleDialog component is used to display a pop-up dialog. The dialog will contain the form that we return in the config’s GET web script, and when the user saves the values, the values will be POSTed to the config web script.

As part of the configuration, the user needs to specify a folder path. Alfresco already ships with a folder picker–there is no need to code one from scratch.  The onSelectFilterPath method sets that up:

This method uses the out-of-the-box DoclibGlobalFolder to present a tabbed dialog of folders for the user to navigate and pick. When someone selects a folder, it throws a “folderSelected” event which this code listens for. When it hears it, it grabs the selected folder and nodeRef to save for later.

I’m not sure why Rik, my partner in crime for this little example, chose to append the selected path to the end of the nodeRef with a pipe. It could easily be stored in its own property.

Now, at this point, a logical question in your mind might be, “SimpleDialog and DoclibGlobalFolder look generally useful. How do I find out more about those and other goodies that might be available to my client-side JavaScript in Share?”. The answer is JSDoc. The Share Extras project has generated the JSDoc for all client-side JavaScript in Alfresco. The index for Alfresco 4.0.d lives here, the doc for DoclibGlobalFolder lives here, and the doc for SimpleDialog lives here.

With this client-side JavaScript in place, the “configure” link can now be clicked, but the SimpleDialog will be looking for a config web script that doesn’t exist yet. That’s the last step.

Write a Share-tier web script to handle config

In the previous section you saw that the SimpleDialog needs two web scripts: One returns a form that is rendered in the dialog. The other is the web script that dialog will POST to. These web scripts are Share tier web scripts, so they live in config/alfresco/site-webscripts. The com/someco package structure is used to keep code separate from other add-ons, and, by convention, web scripts that aren’t surf components go under “modules”. Under that I’m using “getLatestDoc” to group web scripts related to that and “config” below that to identify the purpose of these web scripts.

First, the GET web script. It’s kind of boring. There is no controller at all. The web script consists only of a FreeMarker view, a descriptor, and some properties files to localize the labels on the form. If you look at the view, config-get-latest-doc.get.html.ftl, you’ll see what I mean. It doesn’t even need any client-side JavaScript–the buttons were hooked up to methods on the GetLatestDoc component in the prior step.

Next, the POST web script. The SimpleDialog component will be sending JSON representing the form data to this web script. Because it is sending JSON, the web script controller is named config-get-latest-doc.post.json.js. That extra little “.json” bit gives me access to the form data in a “json” root-scoped object so I don’t have to fool around with eval.

The logic itself is pretty simple:

var c = sitedata.getComponent(url.templateArgs.componentId);
var saveValue = function(name, value)
{
  c.properties[name] = value;
  model[name] = value;
}
saveValue("title", String(json.get("title")));
saveValue("filterPath", String(json.get("filterPath")));
saveValue("filterPathView", String(json.get("filterPath")).split("|")[1]);
c.save();

What’s going on here? First, the controller grabs a handle to a component using a componentId. The component ID was passed in as an argument by the client-side JavaScript component that told the SimpleDialog which action URL to use. The client-side JavaScript component got the component ID when the dashlet’s view (get-latest-doc.get.html.ftl) instantiated it. So this component is actually the web script that renders the Get Latest Document dashlet.

The saveValue function is just a little helper that sets the properties on the component and the model in one call.

So, given the “json” object that is being passed in from the configuration dialog, all that needs to be done is to read those form field values out of the JSON and stick them onto the component properties and the model.

Now, when the dashlet’s web script is invoked, the framework will pass those properties to it via the args array. If the dashlet’s controller sees the values in the args array, it uses those, otherwise, it uses what it finds in the XML configuration.

Deploy and Test

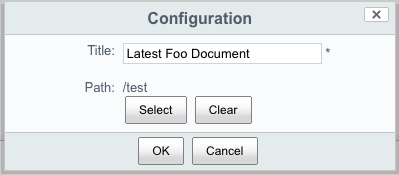
You can deploy the example by running “ant hotcopy-tomcat-jar”. If you already deployed 1.0 of the code and you are running two Tomcats, you won’t have to restart your repository tier, but you will have to restart your Share tier. Then, go into a site and add the dashlet to the site dashboard. If you click the pencil icon on the dashlet’s title bar, you should see the configuration form pop up:
If you then click “Select Path” the folder browser should be displayed:
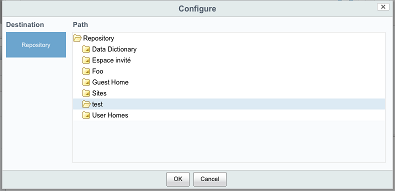
On clicking “OK” the new configuration values will be persisted, but you’ll have to refresh the page to see them take effect. Of course you could modify the example further to move the rendering of the metadata to the client-side such that when the configuration data is saved it immediately refreshes the dashlet content, but I’ll save that for another time.

Alfresco Example: Share Dashlets that Retrieve Data from the Repository

If you need to learn how to write an Alfresco Share dashlet, hopefully you’ve already worked through the Hello World dashlets in the Share Extras project on Google Code. The rest of the dashlets in that project are either “mash-up” style dashlets that read data from third-party sites or dashlets that work with data from the Alfresco repository tier, but are of moderate to high complexity. What I think is missing is a dashlet that goes one small step beyond Hello World to show how to read and display a simple set of data from the repository tier. In this post I show you how to do just that.

I created the example I’m going to walk you through in response to a question someone posted in the forum. They asked, “How can I write a dashlet that will show basic metadata from the most recently-modified document in a given folder?”. I think this is something we haven’t explained to people–we show Hello World and we show dashlets from the other end of the spectrum, but nothing to illustrate this basic pattern. So I wrote a quick-and-dirty example. Fellow forum user, RikTaminaars, also got in on the act, making the dashlet configurable, which I’ll show in a subsequent post.

In this post, I’ll create the most basic implementation possible. The result is a simple dashlet that reads a path from a configuration file, asks the repository for the most recently modified document in that folder, then displays some basic metadata. In my next post, I’ll add to it by making the folder path configurable within the user interface.

Developer Setup

First, a bit about my setup. I’m running Alfresco 4.0.d Community, WAR distribution, Lucene for search, Tomcat application server, and MySQL for the database. I’m using Eclipse Indigo, but this implementation requires no compiled code. For organizing the project files I used the Sample Dashlet project structure from Share Extras. I’m using the Share Extras Ant build script to deploy my code from my project folder structure to the Alfresco and Share web applications.

When I’m doing Share customizations I use two Tomcats–one for the repository tier and one for the Share tier. This helps me avoid making assumptions about where my Alfresco and Share web applications are running and it speeds up my development because my Share Tomcat restarts very quickly. To get the Share Extras build script to work with a two Tomcats setup, I’ve added the following to a build.properties file in my home directory:

tomcat.home=/opt/apache/tomcat/apache-tomcat-6.0.32
tomcat.share.home=/opt/apache/tomcat81/apache-tomcat-6.0.32
tomcat.share.url=http://localhost:8081

Now the build script will know to put the deployed code in each of my Tomcat servers.

The Data Web Script/Presentation Web Script Pattern

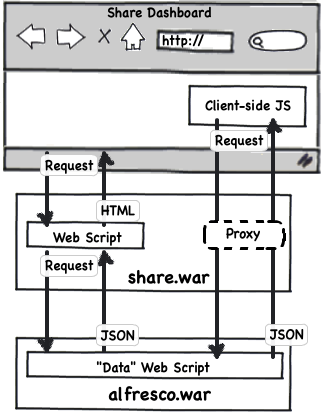
The Alfresco repository runs in a web application called “alfresco” while the Share user interface runs in a separate web application called “share”. Each of these two web applications has its own web script engine. If you aren’t familiar with web scripts, take a look at this tutorial, then come back, or just accept the high-level notion that web scripts are an MVC framework used to bind URLs to code and that web scripts can run on the repository tier as well as the Share tier.

Share dashlets–the “boxes” of content that display in the Share user interface–are just web scripts that return HTML. In fact, everything you see in Share is ultimately a web script. When a dashlet needs to display data from the Alfresco repository, it makes a call over HTTP to invoke a web script running on the repository tier. The repository tier web script responds, usually with JSON. The dashlet gets what it needs from the JSON, then renders outputs HTML to be rendered as part of the page. Because the repository tier web script responds with raw data, you may see these referred to as “data web scripts”.

In the previous paragraph, I was purposefully vague about where the request to the repository tier is made. That’s because there are two options. The first option, and the one we’ll use in this example, is to make the call from the dashlet’s web script controller. This might be called “the server-side option” because once the dashlet’s view is rendered, it has all of the data it needs–no further calls are needed.

The second option is to make AJAX calls from the client browser. To avoid cross-site scripting limitations, these calls typically go through a proxy that lives in the Share application, but their ultimate destination is the repository tier.

Two tier web scripts

You may be wondering about the details of making these remote connections. It’s all taken care of for you. Regardless of whether you make the remote invocation of the repository web script from the Share tier or through AJAX in the browser, all you need to specify is the URL you want to invoke and the framework handles everything else.

Show Me the Code: Repository Tier

Let’s walk through the code. I’ll start with the repository tier. Recall that the requirements are to find the most recently modified document in a given folder and return its metadata. There may be out-of-the-box web scripts that could be leveraged to return the most recently modified document, but this is actually very simple to do and I don’t want to have to worry about those out-of-the-box web scripts changing in some subsequent release, so I’m implementing this myself.

Using the Share Extras project layout, repository tier web scripts reside under config/alfresco/templates/webscripts. The best practice is to place your web script files in a package structure beneath that, so I am using “com/someco/components/dashlets” for my package structure. Yours would be different.

The first thing to think about is what the URL should look like. I want it to be unique and I need it to accept an argument. The argument is the folder path to be searched. For this example, my URL will look like this:

/someco/get-latest-doc?filterPathView={filterPathView}

If you’ve worked with web scripts, you know that a “path” pattern could be followed instead of a “query string” pattern but it doesn’t really matter for this example. The descriptor, get-latest-doc.get.desc.xml, declares the URL and other details about authentication and transaction requirements.

The controller performs the search and populates the model with data. This is a GET, so the controller is named get-latest-doc.get.js. Look at the source for the complete listing–I’ll just hit the high points.

First, I grab a handle to the folder represented by the path argument:

var folder = companyhome.childByNamePath(args.filterPathView);

Then I use the childFileFolders() method to get the most recently modified file and stick that in the model:

var results = folder.childFileFolders(true, false, 'cm:folder', 0, 1, 0, 'cm:modified', false, null);
model.latestDoc = files[0];

Obviously, I could have used a search here, but this method is quite handy. It must be new (thanks, Rik!).

The view then takes the data in the model and returns some of the metadata as JSON:

<#macro dateFormat date>${date?string("dd MMM yyyy HH:mm:ss 'GMT'Z '('zzz')'")}</#macro>
<#escape x as jsonUtils.encodeJSONString(x)>
{
"nodeRef": "${latestDoc.nodeRef}",
"name": "${latestDoc.properties.name}",
"title": "${latestDoc.properties.title!}",
"description": "${latestDoc.properties.description!}",
"created": "<@dateFormat latestDoc.properties.created />",
"modified": "<@dateFormat latestDoc.properties.modified />"
}
</#escape>

Note the exclamation points at the end of the title and description. That will keep the template from blowing up if those values are not set.

That’s all there is to the repository tier. If you want to add additional metadata, custom properties, or data from elsewhere in the repo, it is easy to do that.

At this point you should be able to deploy (run ant hotcopy-tomcat-jar, for example) and test the repository tier web script by pointing your browser to: http://localhost:8080/alfresco/s/someco/get-latest-doc?filterPathView=/Some/Folder/Path

Show Me the Code: Share Tier

Okay, the back-end is ready to return the data I need. Now for the front-end. The Share Extras project structure puts front-end web scripts in config/alfresco/site-webscripts so following a similar pattern as I did for the repository-tier web scripts, I put my share-tier web scripts into the site-webscripts folder under com/someco/components/dashlets.

The descriptor, get-latest-doc.get.desc.xml, declares a URL for the dashlet and specifies the “dashlet” family. This will make the dashlet appear in the “add dashlets” menu for both the global dashboard and the site dashboard.

I want to make the folder path configurable, so I created get-latest-doc.get.config.xml and used it to specify a title for the dashlet and the default folder path. I’ll read in this configuration from the controller.

As I mentioned, we’re doing everything server-side in this example, so the controller needs to call the web script I deployed to the repository tier to retrieve the JSON. Then it can put that object into the model and let the view format it as it sees fit. The controller lives in get-latest-doc.get.js and starts out by reading the configuration XML:

Then it uses the built-in “remote” object to invoke the repository tier web script and puts the result into the model:

Note that the URL starts with my web script’s URL–it includes nothing about where to find the Alfresco repository. That’s because the “end point” is declared in Share’s configuration (to be precise, it is actually Surf configuration, the framework on which Share is built) and the remote object uses the “alfresco” endpoint by default. I don’t see it used very often, but you can actually define your own end points and invoke them using the remote object.

The last part of this example is the HTML markup for the dashlet itself. The first half of get-latest-doc.get.html.ftl is boilerplate that has to do with the dashlet resizer. For this example, the length of the list is static–it will only ever have one entry. So the resizer is kind of overkill. The bottom half is where the markup for the document’s metadata lives:

If you’ve already worked with web scripts, you know that get-latest-doc.get.head.ftl is used to place resources into “<head>”. In this case, that is a CSS file used to style our dashlet and client-side JavaScript used by the resizer. The strings used in the dashlet are localized through the get-latest-doc.get.properties file.

Test It Out

You should be able to test this out yourself by creating a folder anywhere in the repository, adding one or more files to the folder, specifying that folder path in the get-latest-doc.get.config.xml file, and then using “ant deploy hotcopy-tomcat-jar” to deploy the customizations to the alfresco and share web applications. You’ll need to restart Tomcat to pick up the new JAR (both Tomcats if you are running two). Then, login and click “Customize Dashboard” to add the “Get Latest Document” dashlet to your dashboard. It should look something like this:

Screenshot: Get Latest Document Dashlet

Summary

This is a simple example, but it is powerful because it is the same pattern used throughout Share: A dashlet needs data from the repository tier, so its web script controller uses the “remote” object to call a web script on the repository tier. The repository tier web script returns JSON which the Share tier web script then formats into a nice looking dashlet.

In my next post, I’ll show how to make the folder path configurable, so that you can change it at run-time with a folder picker in the Share user interface instead of editing the config XML.

Tip: How to move an Alfresco category

Alfresco has a category hierarchy that can be used to categorize content. Unlike tags, which are not in a hierarchy and can be created by anyone, categories must be managed by an administrator. But even an administrator cannot move a category from one parent to another through the user interface. When it is time to reorganize your categories, how do you do it?

It’s actually pretty easy to do this with code. Your first thought might be, “Well, a category is a node and server-side JavaScript can work with nodes, so I’ll just write a quick script to do the move,” and who could blame you–that’s a well-reasoned line of thinking. But if you look at the source for the current JavaScript API ScriptNode object’s “move” method, you’ll see that it assumes that the association it is creating is “cm:contains”. Categories are associated with an association called “cm:subcategories”, not “cm:contains”. So, at least in this release, JavaScript can’t help us.

Luckily, Alfresco’s Java API is up to the task. When you call the NodeService’s moveNode method you have full control over the new relationship that gets created.

For stuff like this it is often handy to whip up a little Java-backed web script. All the web script needs is the source node reference that needs to be moved and a target node reference to move the source node reference to. Here’s the class with debug and parameter checking removed:

public class MoveCategory extends DeclarativeWebScript {

  // Dependencies
  private NodeService nodeService;

  @Override
  protected Map<String, Object> executeImpl(WebScriptRequest req, Status status) {

    final String sourceNodeRefString = req.getParameter("sourceNodeRef");
    final String targetNodeRefString = req.getParameter("targetNodeRef");

    // snag the nodes
    NodeRef sourceNodeRef = new NodeRef(sourceNodeRefString);
    String sourceName = (String) nodeService.getProperty(
                                   sourceNodeRef,
                                   ContentModel.PROP_NAME);
    NodeRef targetNodeRef = new NodeRef(targetNodeRefString);
    String targetName = (String) nodeService.getProperty(
                                   targetNodeRef,
                                   ContentModel.PROP_NAME);

    // move the source node to the target
    nodeService.moveNode(sourceNodeRef,
                         targetNodeRef,
                         ContentModel.ASSOC_SUBCATEGORIES,
                         QName.createQName(
                           NamespaceService.CONTENT_MODEL_1_0_URI,
                           sourceName));

    // set up the model
    Map<String, Object> model = new HashMap<String, Object>();
    model.put("sourceNodeRef", sourceNodeRefString);
    model.put("sourceName", sourceName);
    model.put("targetNodeRef", targetNodeRefString);
    model.put("targetName", targetName);

    return model;
  }

  public void setNodeService(NodeService nodeService) {
    this.nodeService = nodeService;
  }

}

If you need to see how to wire up the web script with Spring configuration, or you want to see the rest of the web script files (like the descriptor & view), you can take a look at this zipped up Eclipse project.

I should mention that in my web script descriptor, I configured the web script to require an authenticated user, but I set it to run as admin. That gives non-admin users the ability to move categories around using this web script. You may or may not want to do that.

Also, because this is just an example, I’m using the zip overlay method of deployment. For production, you should be using AMPs.

For more Java-backed web script examples, see this wiki page. And if you would prefer to use Maven to develop your Java-backed web scripts, take a look at this project on Google Code.

Trying out Activiti: Examples that leverage Alfresco’s new workflow engine

I’ve been playing with Activiti. It’s an open source, BPMN 2.0 compliant business process engine. The project is sponsored by Alfresco, who hired Tom Baeyens and Joram Barrez, the founders of jBPM, to create the Apache-licensed engine (take a look at the rest of Activiti’s all-star cast).

The first thing I did was head over to Activiti’s site and read through the user guide. I followed the tutorial and got a standalone instance of Activiti going with very little fuss. The concepts and terminology aren’t terribly different from jBPM, so if you’ve used jBPM, you’ll be familiar with the basics of Activiti in no time. The user guide is well-written so I urge everyone to start there.

Last week, Alfresco released a preview release of their Community product, labeled 3.4.e. This release, which I stress is only for preview purposes, was made available to let everyone get a first look at Alfresco’s integration of Activiti. If you watched the screencast showing an Alfresco workflow based on Activiti you may have thought, “Gee, that looks just like a jBPM-based workflow,” and you’re right–from a user standpoint, it is nearly identical. The difference, of course, is how the processes are described and the underlying implementation that executes the processes.

The screencast showed that the end users won’t see much of a change. That’s good, but I was anxious to find out how big a deal this transition will be from a developer’s perspective. The 3.4.e release gave me the perfect opportunity to dig in. I decided to take the examples from the Advanced Workflow chapter in the Alfresco Developer Guide (2008, Packt) and make them work with Alfresco’s embedded Activiti engine in 3.4.e. In this post, I’ll talk about how that went and I’ll give you the code so you can try it out yourself.

The code that accompanies this blog post includes the same set of four workflows implemented both in jBPM and Activiti as well as a readme that explains how to install and run everything. I’ll let you inspect that to see what the exact differences are rather than go over them here. Instead, I’ll spend the rest of the post covering the major differences in general.

Before we go any further, I guess we should have a quick terminology discussion. First, in jBPM, everything is a node. Specialized node types do different things like joins, splits, decisions, wait-states, sub-processes, and enclose tasks that get assigned to humans. In Activiti (and really, in BPMN) there are essentially events (start, stop, timer), tasks, and gateways. Of course, I’m simplifying greatly here–you should read the spec and the Activiti user guide. The important thing to note for people coming from jBPM is that in Activiti a “task” might be something a human does (“userTask”) or it could be automated (“scriptTask”, “serviceTask”, etc.). In jBPM connections between nodes are called “transitions” while in Activiti they are called “sequenceFlows”.

Designing Processes

I use Eclipse, so the first step was to get the Activiti BPMN 2.0 Designer plug-in working. Installation is well-documented on the Activiti wiki and it installs just like any other Eclipse plug-in, so it went fairly smooth. I had some sort of dependency conflict that I had to deal with, but nothing major.

All in all, designing processes in Activiti works just like it does in jBPM. The tool is different, but you’re still laying out a business process graphically, connecting steps in the workflow, and setting properties on those objects.

There are some known issues with the Designer that made creating and editing processes painful at times. I’m not going to call every one of those out in this post because this is a preview release–I expected to work through a few bumps. I will warn you of a few to hopefully save you some time:

  • You cannot save the diagram until it is syntactically correct. This means the BPMN 2.0 XML will not get generated until the diagram is correct. On a new process, when the editor complains about the diagram, you’d kind of like to just drop in to the XML source and fix what needs fixing. If that’s what you want to do, you have to open the .activiti file in the XML editor, make the change, re-open in the diagram, and then make a change and save to force the generation of the BPMN 2.0 XML.
  • You cannot change things like IDs, names, form keys, and task assignment in the BPMN 2.0 XML. You have to change these in the Activiti diagram. If you change the BPMN 2.0 XML the settings in the Activiti diagram will overwrite the BPMN XML. This doesn’t sound like a big deal until you come across the next issue.
  • There is a known problem enabling the properties for an object in the diagram: clicking an object in the diagram doesn’t refresh the properties view. I worked around it by first clicking some other tab in the properties view, then double-clicking on the object (and sometimes repeating that) until the properties view refreshed with the appropriate property set.

Again, I didn’t expect everything to be fully functional, so I am not complaining. I just want you to have your expectations properly set when you play with this on your own.

I should mention that the overall look-and-feel of the Activiti Designer seems a lot crisper and more visually appealing than the JBoss Graphical Process Designer (GPD) Eclipse plug-in. As an example, I loved the alignment helper rules. And I liked that you can bend sequence flows.

Adding Business Logic to Processes

My goal was to take four Alfresco jBPM processes and port them to Activiti. The first three are variations on Hello World. The fourth is a more real-life process that is used to review and approve whitepapers. In the book, the Publish Whitepaper workflow uses an action to set properties on the approved whitepaper. And I show how to combine a wait state with a mail action and a web script to allow third parties without direct access to Alfresco to participate in a workflow. For the initial cut at this exercise, I skipped all of that. For now, I really wanted to focus on the basics of the workflow engine. But the state idea and the web script interaction are interesting so I’ll do that later and will provide the update in a future blog post.

Challenge 1: Alfresco JavaScript in automated steps

The first problem I came to was how to handle workflow steps that have no human intervention. In jBPM those steps are implemented as nodes. Alfresco JavaScript can live inside events within the node or on transitions between nodes. Tasks assigned to users are typically enclosed in a task-node. In Activiti, tasks assigned to users are called userTasks. All of Alfresco’s sample Activiti workflows consist entirely of userTasks. But Activiti includes several node types that aren’t user tasks: a scriptTask uses JavaScript or Groovy to implement its logic and a serviceTask delegates to a Java class. My helloWorld processes consist entirely of automated steps, so a scriptTask sounded good to me. The problem was that scriptTask uses Activiti’s JavaScript implementation, not Alfresco’s JavaScript. So doing something simple like invoking the “logger” root object doesn’t work in a scriptTask.

Fine, I thought, I’ll use one of Alfresco’s listener classes to wrap my logger call and stick that listener in the scriptTask. But that didn’t work either because in the current release Alfresco’s listener classes don’t fully implement the interface necessary to run in a scriptTask.

After confirming these issues with the Activiti guys I decided I’d put my Alfresco JavaScript in listeners either on a userTask or on a sequenceFlow (we called those “transitions” in jBPM) depending on what I needed to do. Hopefully at some point we’ll be able to use scriptTask for Alfresco JavaScript because there are times when you need automated steps in your process that can deal with the Alfresco JavaScript root objects you’re used to.

Challenge 2: Processes without user tasks

As I mentioned, my overly simple Hello World examples are nothing but automated steps. I could implement those without userTasks by placing my Alfresco JavaScript on sequenceFlows. But Alfresco complained when I tried to run workflows that didn’t contain at least one user task. I didn’t debug this, and it is possible I could have worked through it, but I decided for now, the Activiti versions of my Hello World examples would all have at least one userTask.

Challenge 3: Known issue causes iBatis exceptions

In 3.4.e, there is a known issue in which user tasks will cause read-only iBatis exceptions unless you set the due date and priority. Search my examples for “ACT-765” to find the workaround.

Challenge 4: Letting a user pick between multiple output paths

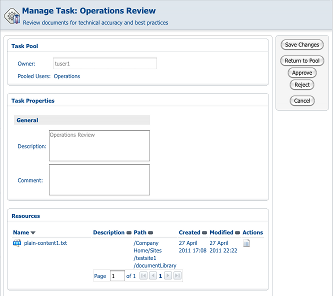
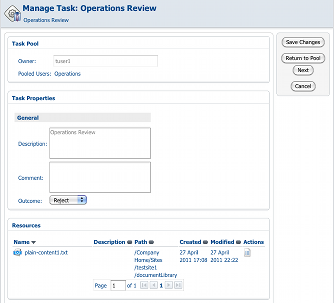
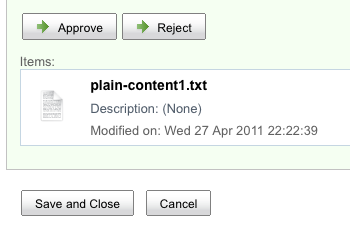
Suppose you have a task in which a human must decide whether to “Approve” or “Reject”. In Alfresco jBPM, you’d simply have two transitions and you’d set the label for those transitions in a properties bundle. In Alfresco Activiti that is handled a bit differently. Instead of having two transitions leaving the task, you have a single transition to an “exclusive gateway” (called a “decision”, in polite company). The task presents the “outcome” options–in this case “Approve” and “Reject”–to the user in a dropdown, as if it were any other piece of metadata on the task. Once the user picks an outcome and completes the task, the exclusive gateway checks the outcome value and takes the appropriate sequence flow. This difference will impact your business process logic, your workflow content model, and your end user experience so it is a significant difference.

For comparison, here’s what this looks like in the Alfresco Explorer UI for jBPM (click to enlarge):

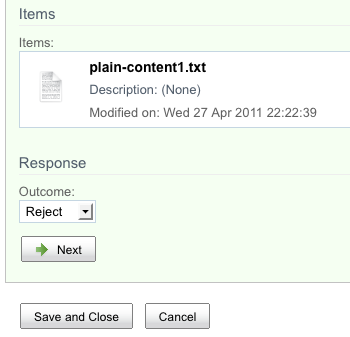
And here is what it looks like in the Alfresco Explorer UI for Activiti (click to enlarge):

So in Explorer, with jBPM, the user can just click “Approve” or “Reject” while in Activiti, the user must make a dropdown selection and then click “Next”.

Here is the same task managed through the Alfresco Share UI for jBPM:

Versus Alfresco Share for Activiti:

Similar to the Explorer differences, in Share, with jBPM, the user gets a set of buttons while with Activiti, the user makes a dropdown selection.

One open question I have about this is how to localize the transition steps for Activiti workflows if the steps are stored as constraints in the content model. On a past client project we implemented a Share-based customization to localize constraint list items but our approach won’t work in Explorer. Maybe the Activiti guys can help me out on that one.

Exposing Process to the Alfresco User Interface

And that brings us to user interface configuration. Overall, the process is exactly the same. First, you work on your process definition, then you create a workflow content model. Once the workflow content model is in place, you expose it to the user interface through the normal Alfresco user interface configuration approach. For the Explorer client that means web-client-config-custom. For the Share client that means share-config-custom. Labels, workflow titles, and workflow descriptions are localized via properties bundles.

One minor difference is that in jBPM, task names are identical to corresponding type names in your workflow content model. In Activiti, a userTask has an attribute called “activiti:formKey” that is used to map the task to the appropriate content type in the workflow content model.

Assigning Tasks to Users and Groups

The out-of-the-box workflows for both jBPM and Activiti show how to use pickers to let workflow initiators assign users and groups to workflows. My example workflows use hardcoded references rather than pickers so that you’ll have an example of both approaches. In my Hello World examples, I assign the userTask to the workflow initiator. This is done by using the “activiti:assignee” attribute on userTask, like this:

<userTask id="usertask3" name="User Task" activiti:assignee="${initiator.properties.userName}" activiti:formKey="bpm:task">

If you need to use a more complex expression there’s a longer form that uses a “humanPerformer” tag. See the User Guide.

In the Publish Whitepaper example I use pooled group assignment by using the “activiti:candidateGroups” attribute on userTask, like this:

<userTask id="usertask7" name="Operations Review" activiti:candidateGroups="GROUP_Operations" activiti:formKey="scwf:activitiOperationsReview">

Again, if you need to, there’s a longer form that uses a “potentialOwner” tag.

In my jBPM examples I use swimlanes for task assignment. I didn’t get a chance to use the equivalent in Activiti.

Deploying Processes

In standalone Activiti there are multiple options for deploying process definitions to the engine, including uploading a BAR (Business Archive) file into the running engine. I couldn’t find the equivalent of that in Alfresco’s embedded Activiti implementation or the equivalent of the jBPM deployer servlet, so for this exercise I used Spring configuration for both Activiti and jBPM processes. I hope by the time the code goes into Enterprise there will be a dynamic deployment option because that’s really helpful during development.

Workflow Console

Alfresco’s workflow console is a critical tool for anyone doing anything with advanced workflow. It has always been a puzzle to me as to why the workflow console (along with others) can only be navigated to directly using an unpublished URL. That head-scratcher still remains, but rest assured, all of your favorite console commands now work for both jBPM and Activiti workflows.

Summary

I hope this post has given you a small taste of the new Activiti engine embedded in Alfresco. I haven’t spent any time talking about the higher level benefits to Activiti. And there are many more details and features I didn’t have time to go into. My goal was to give all of you who have experience with Alfresco jBPM some start at getting your head around the new option for advanced workflow.

If you haven’t done so, grab a copy of Alfresco 3.4.e, download these examples, and play around. The zip is an Eclipse project that will deploy the workflows and associated configuration to your Alfresco and Share web applications via ant. The included readme file has step-by-step directions for running through each jBPM and Activiti example.

It is entirely possible that I’ve done something boneheaded. If so, do let me know so that all of us can benefit.

Resources

Alfresco Developer Guide source reorg and 3.2 Community update

[UPDATE: Added a link to the source code that works with 3.2 Enterprise]

I originally wrote the Alfresco Developer Guide source code for Alfresco 2.2 Enterprise and Alfresco 3 Labs. The code was pretty much the same regardless of which one you were running. For things that did happen to be different, I handled those with separate projects: one for community-specific stuff and one for enterprise-specific stuff. This was pretty much limited to minor web script differences for the “client extensions” projects and LDAP configuration differences for the “server extension” project.

With the release of 3.2 Community, I realized:

  • The number of different flavors of Alfresco any given reader might be running are going up, not down. Who knows when 2.2 Enterprise will be sunset.
  • It is no longer as easy as “Enterprise” versus “Labs/Community” because multiple releases of the same flavor are prevalent (2.2E, 3.0E, and 3.1E, for example).
  • Tagging my code in Subversion by Chapter alone is no longer enough–I need to tag by Chapter and by Alfresco version.
  • Sending the publisher the code one chapter at-a-time and expecting them to manage updates and deciding how to organize all of the chapter code was a bad idea.

So, I’ve done some work to make this better (reorg the projects, restructure the download files). I’ve also tested the example code from each chapter against the latest service packs for all releases since 2.2 Enterprise. That includes making some small updates to get the examples running on 3.2 Community.

You can now download either all of the source for every version I tested against, or, download the source that works for a specific version. It may take the official download site at Packt a while to get the new files, so here are links to download them from my site:

Alfresco Developer Guide example source code for…

  • Alfresco 2.2 Enterprise (~5.3 MB, Download)
  • Alfresco 3.0 Labs (~5.6 MB, Download)
  • Alfresco 3.0 Enterprise (~5.7 MB, Download)
  • Alfresco 3.1 Enterprise (~5.6 MB, Download)
  • Alfresco 3.2 Community (~5.7 MB, Download)
  • Alfresco 3.2 Enterprise (~5.9 MB, Download)
  • All of the above, combined (~28.1 MB, Download)

Hopefully this makes it easier for you to grab only what you need and makes it clear that each Eclipse project contains only what’s needed to work with that version of Alfresco. Deployment is easier too. Most of the time, it’s just the “someco-client-extensions” project that you deploy.

Now that I’ve got everything structured like I want it, as new versions of Alfresco are released, it should be much easier to keep up.