Category: Apache Chemistry

Seven Options for Scripting Against Alfresco

It is often necessary to perform bulk operations against the data in your Alfresco repository. Frequently, writing a quick script, rather than a full application, is the best approach. Sometimes those scripts need to be scheduled, like with a cron job, or given to power users to run ad hoc.

The good news is that there are many options available depending on what you need to do and personal preference.

All of these options can be used to develop full-blown applications, but the focus in this post is on how well each option works specifically for the scripting use case.

JavaScript Console
License: Apache 2.0
Link: https://github.com/share-extras/js-console
Install: Repo and Share AMPs, requires restart

The JavaScript Console provides a user interface within Share to interactively run server-side scripts that leverage the Alfresco JavaScript API. The UI features syntax highlighting and code completion.

This is a must-have tool for both developers and administrators. It is the fastest way to perform bulk tasks or to test out JavaScript logic before using it in something harder to debug or change, such as in the controller of a web script. I install this on every server I touch. I suppose that, eventually, as Share falls out of favor, this will be less of a go-to option, but, for now, it is essential.

The JavaScript Console is only available to administrators, so this is not an option if you are developing something that will be invoked by non-admins.

Apache Chemistry CMIS Workbench
License: Apache 2.0
Link: https://chemistry.apache.org/java/developing/tools/dev-tools-workbench.html
Install: On your own desktop, no server config/restart required

The Apache Chemistry CMIS Workbench is a desktop application that uses pure CMIS calls to communicate with the repository. It contains a lot of useful features such as a CMIS Query Language console, a node browser, a data dictionary browser, and a Groovy console. The Groovy console is similar to the JavaScript console in that it can be used to quickly script repetitive tasks, but instead of JavaScript it uses Apache Groovy. If you aren’t familiar with Groovy but you know Java, you can use Java in the Groovy console–Groovy is a JVM language and is happy to interpret your Java syntax.

This tool is particularly useful if you are writing code that leverages CMIS. If you can do it in the Workbench you can be confident you can do it from your CMIS-based application. However, it is also useful when you just need to execute some repetitive tasks, especially if the server in question does not have the JavaScript Console installed.

Unlike the JavaScript Console, however, you are limited by what is supported in the CMIS specification. For example, you cannot manage users, groups, or workflows, just to name a few. It is pretty much limited to documents, folders, and items (content-less objects). Custom content models, however, are fully-supported.

The Swing-based UI of the workbench has a face only a mother could love so this is definitely not something you’d put in the hands of typical end-users.

Apache Chemistry cmislib (Python client)
License: Apache 2.0
Link: https://chemistry.apache.org/python/cmislib.html
Install: Client library, no server config/restart required

If what you need to do is covered by the CMIS specification but you prefer Python, then Apache Chemistry cmislib might be a good choice. It is a client library that you can use from your own Python scripts and applications. For example, if I need to generate a bunch of folders or documents, I’ll often just write a quick Python script to do it.

The library has the same limitation as the Workbench in that it only makes CMIS calls, but if that’s all you need it should work well. The current release requires Python 2.7 but a new release that supports Python 3.x is being tested now.

If you are giving the script to power users who might want to make tweaks this can be a good choice if they already have Python installed.

Apache Chemistry OpenCMIS (Java client)
License: Apache 2.0
Link: https://chemistry.apache.org/java/opencmis.html
Install: Client library, no server config/restart required

Rounding out my CMIS-related recommendations is Apache Chemistry OpenCMIS. Like cmislib, it is a client library, but this one is written in Java and is much more mature and more widely-used. For quick scripts you can use Groovy on the command-line to make CMIS calls against Alfresco via OpenCMIS. Often, I already have my Java IDE open anyway, so it can be just as quick to write a little runnable Java class that uses OpenCMIS to carry out some tasks.

I use Groovy scripts and OpenCMIS when I want to automate tasks that power users are going to run from the command-line that they may want to tweak, but who do not have Python installed.

When a single script needs to perform operations that are a mix of CMIS and non-CMIS, I use Groovy’s HTTP client to call the Alfresco REST API (more on that, below).

Alfresco Web Script Framework
License: LGPL v3
Link: https://docs.alfresco.com/5.2/concepts/ws-framework.html
Install: For quick scripts, copy to Data Dictionary

Strictly speaking, web scripts weren’t built to be a “quick scripting” option, but they’ll work in a pinch. Basically, you just write a web script that does what you need it to do, but instead of packaging the web script into an AMP like you would for a production extension, you deploy the web script to the running repository by copying the web script related files into the Data Dictionary’s Web Scripts folder. The next step is to refresh the web scripts via the web script console. After that the web script can be invoked in a browser, via CuRL, or Postman.

Just like the JavaScript Console, you are limited to what the Alfresco JavaScript API can do, but that is definitely a broader set of capabilities than a CMIS-based solution.

Files in the Data Dictionary can only be edited by administrators, so if the folks running this script need to make changes and aren’t administrators, this won’t work. You can always build that flexibility into the web script and let them control various options by what they pass to the web script.

For more information on Web Scripts, see the documentation link above or check out my tutorial.

Alfresco Client-side JavaScript API
License: Apache 2.0
Link: https://github.com/Alfresco/alfresco-js-api
Install: Node Package Manager

A relatively new kid on the block is the Alfresco Client-side JavaScript API, aka, alfresco-js, which is part of the Alfresco Developer Framework (ADF). Of course you can use it to develop custom user interfaces in your favorite JavaScript framework, but you can also use it for quick scripting needs. For example, you could write a Node.js script and run it from the command-line.

The alfresco-js library relies on the Alfresco REST API that was created in 5.2, so if you need to work with an older Alfresco version, this isn’t an option. The alfresco-js library and the REST API are both under active development, so there could be gaps and some instability, but it is still worth taking a look, especially if you are already invested in the Node.js and NPM ecosystem.

Alfresco Content Services REST API (And others)
License: LGPL v3
Link: https://api-explorer.alfresco.com
Install: Your favorite REST client

Last, but not least, is the Alfresco Content Services REST API. If none of the other options in this list appeal to you, grab your favorite REST client or import your preferred scripting language’s HTTP client library, head over to the Alfresco API Explorer, and get busy.

As mentioned above in the alfresco-js description, this option relies on Alfresco 5.2 or higher (5.2.d Community Edition, distributed as 201612).

If the Alfresco Content Services REST API doesn’t have what you need or you aren’t yet running 5.2 or higher, you could always hit the CMIS browser (JSON) binding, the CMIS atompub (XML) binding, out-of-the-box web scripts, or custom web scripts.

Depending on what you need to do, using a lower-level REST API may not be the fastest option in terms of development time because instead of working with higher-level wrapper classes it is up to you to issue the REST calls and parse the responses.

Summary

Hopefully you see some options in the above list that will work for you and your environment. I definitely recommend you get a few of these in place now (especially the JavaScript Console) because if you ever need them in a hurry (oh, if this keyboard could talk!), you’ll want to have a quick scripting option you are comfortable and proficient with.

Photo Credit: Quality Quick Cleaning by GmanViz, by-nc-nd 2.0

Apache Chemistry cmislib 0.6.0 released

It has been far too long since our last Apache Chemistry cmislib release, but we finally managed to get one out. The new release, 0.6.0, features support for the browser binding as well as many fixes contributed by the community.

If you make no changes to your code the library will continue to use the Atom Pub binding, by default. But, the browser binding, which communicates with CMIS 1.1-compliant repositories using HTML forms and JSON, is often preferable because it may be more performant than the XML-based Atom Pub binding.

To use the new browser binding, import it, then pass it to the CmisClient constructor, like this:

from cmislib.browser.binding import BrowserBinding
client = CmisClient('http://localhost:8081/chemistry/browser',
   'admin',
   'admin',
   binding=BrowserBinding())

From there everything works like it always has.

For more information, please see the docs. If you have issues, please file a Jira with as much detail as possible, including the vendor and version of the repository you are working with. And if you have a fix, include that in your Jira. Contributions are welcome!


Deal of the Day: 50%-off CMIS & Apache Chemistry in Action

The book I mueller_cover150co-authored with Florian Mueller (SAP) and Jay Brown (IBM), CMIS and Apache Chemistry in Action, is 50% off today (January 30). Use code dotd013014au when you checkout.
If you are doing anything with CMIS, whether that is with Alfresco or some other CMIS-compliant Enterprise Content Management server, like Nuxeo, SharePoint, FileNet, or Documentum, you should really take a look at this book. It provides Java, Python, PHP, and .NET examples including a working web application.

CMIS example: Uploading multiple files to a CMIS repository

In my previous post on CMIS, I introduced the Content Management Interoperability Services (CMIS) specification and the Apache Chemistry project. You learned that CMIS gives you a language-neutral, vendor-independent way to perform CRUD functions against any CMIS-compliant server using a standard API. I showed a simple CMIS query being executed from a Groovy script running in the OpenCMIS Workbench.

Now I’d like to get a little more detailed and show a simple use case: I’ll use the OpenCMIS client library for Java to upload some files from my local machine to a CMIS repository. In my case, that repository is Alfresco 4.2.c Community Edition running locally, but this code should work with any CMIS-compliant server from vendors like IBM, EMC, Microsoft, Nuxeo, and so on. I’ll include the relevant snippets, but if you want to follow along, the full source code for this example lives here. I use that example to show the same code working against Alfresco in the cloud and Alfresco on-premise. If you are running against on-premise only or some other CMIS server, it has a few dependencies that won’t be relevant to you.

LoadFiles.java is a runnable Java class. The main method simply calls doExample(). That method grabs a session, gets a handle to the destination folder for the files on the local machine, and then, for each file in the local machine’s directory, it creates a hashmap of metadata values, then uploads each file and its associated metadata to the repository. Let’s look at each of these pieces in turn.

Get a Session

The first thing you need is a session. I have a getCmisSession() method that knows how to get one, and it looks like this:

SessionFactory factory = SessionFactoryImpl.newInstance();
Map parameter = new HashMap();

// connection settings
parameter.put(SessionParameter.ATOMPUB_URL, ATOMPUB_URL);
parameter.put(SessionParameter.BINDING_TYPE, BindingType.ATOMPUB.value());
parameter.put(SessionParameter.AUTH_HTTP_BASIC, "true");
parameter.put(SessionParameter.USER, USER_NAME);
parameter.put(SessionParameter.PASSWORD, PASSWORD);

List repositories = factory.getRepositories(parameter);

return repositories.get(0).createSession();

As you can see, establishing a session is as simple as providing the username, password, binding, and service URL. The binding is the protocol we’re going to use to talk to the server. In CMIS 1.0, usually the best choice is the Atom Pub binding because it is faster than the Web Services binding, the only other alternative. CMIS 1.1 adds a browser binding that is based on HTML forms and JSON but I won’t cover that here.

The other parameter that gets set is the service URL. This is server-specific. For Alfresco 4.x or higher, the CMIS 1.0 Atom Pub URL is http://localhost:8080/alfresco/cmisatom.

The last thing the method does is return a session for a specific repository. CMIS servers can serve more than one repository. In Alfresco’s case, there is only ever one, so it is safe to return the first one in the list.

Get the Target Folder

Okay, we’ve got a session with the CMIS server’s repository. The repository is a hierarchical tree of objects (folders and documents) similar to a local file system. The class is configured with a parent folder path and the name of a new folder that should be created in that parent folder. So the first thing we need to do is get a reference to the parent folder. My example getParentFolder() method just grabs the folder by path, like this:

Folder folder = (Folder) cmisSession.getObjectByPath(FOLDER_PATH);
return folder;

Now, given the parent folder and the name of a new folder, the createFolder() method attempts to create the new folder to hold our files:

Folder subFolder = null;
try {
  subFolder = (Folder) cmisSession.getObjectByPath(parentFolder.getPath() + "/" + folderName);
  System.out.println("Folder already existed!");
} catch (CmisObjectNotFoundException onfe) {
  Map props = new HashMap();
  props.put("cmis:objectTypeId",  "cmis:folder");
  props.put("cmis:name", folderName);
  subFolder = parentFolder.createFolder(props);
  String subFolderId = subFolder.getId();
  System.out.println("Created new folder: " + subFolderId);
}
return subFolder;

The folder is either going to already exist, in which case we’ll just grab it and return it, or it will need to be created. We can test the existence of the folder by trying to fetch it by path, and if it throws a CmisObjectNotFoundException, we’ll create it.

Look at the Map that is getting set up to hold the properties of the folder. The minimum required properties that need to be passed in are the type of folder to be created (“cmis:folder”) and the name of the folder to create. You might choose to extend your server’s content model with your own folder types. In this example, the out-of-the-box “cmis:folder” type is fine.

Set Up the Properties For Each New Document

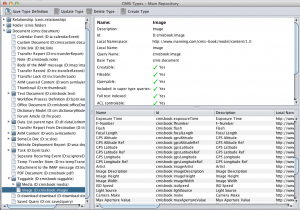
Just like when the folder was created, every file we upload to the repository will have its own set of metadata. To make it interesting, though, we’ll provide more than just the type of document we want to create and the name of the document. In my example, I’m using a content model we created for the CMIS & Apache Chemistry in Action book. It contains several types. One of which is called “cmisbook:image”. The image type has attributes you’d expect that would be part of an image, like height, width, focal length, camera make, ISO speed, etc. In fact, if you use the OpenCMIS Workbench, you can inspect the type definition for cmisbook:image. Here’s a screenshot (click to enlarge):

OpenCMIS Workbench, Type Inspector

Two of the properties I’m going to work with in this example are the latitude and longitude. Alfresco will automatically extract metadata like this when you add files to the repository. In fact, Alfresco already has a “geographic aspect” out-of-the-box that can be used to extract and store lat and long. But we wanted this content model to work with any CMIS repository and not all repositories support aspects (CMIS 1.1 call these “secondary types”) so the content model used in the book defines lat and long on the cmisbook:image type.

Because not all repositories know how to extract metadata, we’re going to use Apache Tika to do it in our client app.

The getProperties() method does this work. It returns a Map of properties that consists of the type of the object we want to create (“cmisbook:image”), the name of the object (the file name being uploaded), and the latitude and longitude. Here’s what that code looks like:

Map props = new HashMap();

String fileName = file.getName();
System.out.println("File: " + fileName);
InputStream stream = new FileInputStream(file);
try {
  Metadata metadata = new Metadata();
  ContentHandler handler = new DefaultHandler();
  Parser parser = new JpegParser();
  ParseContext context = new ParseContext();

  metadata.set(Metadata.CONTENT_TYPE, FILE_TYPE);

  parser.parse(stream, handler, metadata, context);
  String lat = metadata.get("geo:lat");
  String lon = metadata.get("geo:long");
  stream.close();

  // create a map of properties
  props.put("cmis:objectTypeId",  objectTypeId);
  props.put("cmis:name", fileName);
  if (lat != null && lon != null) {
    System.out.println("LAT:" + lat);
    System.out.println("LON:" + lon);
    props.put("cmisbook:gpsLatitude", BigDecimal.valueOf(Float.parseFloat(lat)));
    props.put("cmisbook:gpsLongitude", BigDecimal.valueOf(Float.parseFloat(lon)));
  }
} catch (TikaException te) {
  System.out.println("Caught tika exception, skipping");
} catch (SAXException se) {
  System.out.println("Caught SAXException, skipping");
} finally {
  if (stream != null) {
    stream.close();
  }
}
return props;

Now we have everything we need to upload the file to the repository: a session, the target folder, and a map of properties for each object being uploaded. All that’s left to do is upload the file.

Upload the File

The first thing the createDocument() method does is to make sure that we have a Map with the minimal set of metadata, which is the object type and the name. It’s conceivable that things didn’t go well in the getProperties() method, and if that is the case, this bit of code makes sure everything is in place:


String fileName = file.getName();

// create a map of properties if one wasn't passed in
if (props == null) {
  props = new HashMap<String, Object>();
}

// Add the object type ID if it wasn't already
if (props.get("cmis:objectTypeId") == null) {
  props.put("cmis:objectTypeId",  "cmis:document");
}

// Add the name if it wasn't already
if (props.get("cmis:name") == null) {
  props.put("cmis:name", fileName);
}

Next we use the file and the object factory on the CMIS session to set up a ContentStream object:

ContentStream contentStream = cmisSession.getObjectFactory().
  createContentStream(
    fileName,
    file.length(),
    fileType,
    new FileInputStream(file)
  );

And finally, the file can be uploaded.

Document document = null;
try {
  document = parentFolder.createDocument(props, contentStream, null);
  System.out.println("Created new document: " + document.getId());
} catch (CmisContentAlreadyExistsException ccaee) {
  document = (Document) cmisSession.getObjectByPath(parentFolder.getPath() + "/" + fileName);
  System.out.println("Document already exists: " + fileName);
}
return document;

Similar to the folder creating logic earlier, it could be that the document already exists, so we use the same find-or-create pattern here.

When I run this locally using a folder that contains five pics I snapped in Berlin, the output looks like this:

Created new folder: workspace://SpacesStore/2f576635-5058-4053-9a61-dad68939fdd2
File: augustiner.jpg
LAT:52.51387
LON:13.39111
Created new document: workspace://SpacesStore/b19755e1-74a2-4c1e-9eb5-a5bfd2c0ebd7;1.0
File: berlin_cathedral.jpg
LAT:52.51897
LON:13.39936
Created new document: workspace://SpacesStore/34aa7b80-9f09-4c07-a040-9aee94debf80;1.0
File: brandenburg.jpg
LAT:52.51622
LON:13.37783
Created new document: workspace://SpacesStore/6c02f8f6-accc-4997-be5c-601bc7131247;1.0
File: gendarmenmarkt.jpg
LAT:52.51361
LON:13.39278
Created new document: workspace://SpacesStore/44ff28e7-782a-46c3-b388-453fd8495472;1.0
File: old_museum.jpg
LAT:52.52039
LON:13.39926
Created new document: workspace://SpacesStore/03a85605-4a66-4f94-b423-82502efbca4a;1.0

Now Run Against Another Vendor’s Repo

What’s kind of cool, and what I think really demonstrates the great thing about CMIS, is that you can run this class against any CMIS repository, virtually unchanged. To demonstrate this, I’ll fire up the Apache Chemistry InMemory Repository we ship with the source code that accompanies the book because it is already configured with a custom content model that includes “cmisbook:image”. As the name suggests, this repository is a reference CMIS server available from Apache Chemistry that runs entirely in-memory.

To run the class against the Apache Chemistry InMemory Repository, we have to change the service URL and the content type ID, like this:

//public static final String CONTENT_TYPE = "D:cmisbook:image";
public static final String CONTENT_TYPE = "cmisbook:image";

//public static final String ATOMPUB_URL = ALFRESCO_API_URL + "alfresco/cmisatom";
public static final String ATOMPUB_URL = ALFRESCO_API_URL + "inmemory/atom";

And when I run the class, my photos get uploaded to a completely different repository implementation.

That’s It!

That’s a simple example, I know, but it illustrates fetching objects, creating new objects, including those of custom types, setting metadata, and handling exceptions all through an industry-standard API. There is a lot more to CMIS and OpenCMIS, in particular. I invite you to learn more by diving in to CMIS & Apache Chemistry in Action!

Announcement: Apache Chemistry cmislib 0.5.1 now available

The Apache Chemistry project is pleased to announce that cmislib 0.5.1 is now available (home, docs). Developers can use cmislib to write Python applications against any CMIS-compliant repository such as Alfresco, SharePoint, Nuxeo, and FileNet. You can download the client library from the Apache Chemistry cmislib home page or use Setup Tools to install the library quickly and easily.

This release features support for renditions, so if your repository supports things like thumbnails, you can retrieve a list of those for a given object. The new release also supports passing in arbitrary HTTP headers. That is one way to enable authentication scenarios beyond basic authentication such as OAuth2, which is the authentication mechanism Alfresco in the Cloud uses.

If you are brand new to CMIS, here are a few links to get you started:

In addition, I’ve been working on an Apache Chemistry and CMIS in Action book with Jay Brown and Florian Mueller. The book is available now through Manning’s early-access program.

The Public Alfresco API is Now Live: How to Get Started

At JavaOne this morning, Alfresco announced the general availability of the public Alfresco API. The public Alfresco API allows developers to create custom applications (desktop, mobile, or cloud) that persist content to Alfresco in the Cloud. The API includes CMIS plus some Alfresco REST calls that provide functionality CMIS does not cover.

Eventually, this public, versioned API will work against Alfresco in the Cloud as well as Alfresco running on-premise. For now, it is only for Alfresco in the Cloud, although the CMIS calls will work against both. (For example, on my flight to California I worked on an example using CMIS and my local repository. When I got to the hotel, I added in the OAuth authentication and my example worked against Alfresco in the Cloud).

To use the Alfresco API, all you have to do is become a registered developer at http://developer.alfresco.com. Once you’ve verified your email address, you can add applications to your profile. Each application has a unique authentication key and a secret. OAuth2 is used to handle authentication.

Once you have your authentication key and secret, you can start making calls against the API. Calls that hit the Alfresco REST part of the API return JSON. Calls that leverage CMIS return AtomPub XML. If you already know how to make CMIS calls, you already know how to use the Alfresco API–just grab the latest version of your favorite CMIS client, like OpenCMIS or cmislib, and pass in the authorization header. I believe you must use the 0.8.0-SNAPSHOT of OpenCMIS. If you are using cmislib, you’ll definitely need 0.5.1dev.

Here are some resources to help you get started:

If you want to discuss the public Alfresco API, use this forum and any of our other normal community channels like #alfresco on IRC or the Alfresco Technical Discussion Google Group.

Of course we’ll be talking about the API at DevCon in both Berlin and San Jose this November, so don’t forget to register!

Also, Peter Monks and I will be doing this month’s Tech Talk Live on the new API, so if you weren’t lucky enough to be in San Francisco for our session at JavaOne or our booth, you can catch the details there as well.

cmislib extension supports Alfresco aspects

I can’t believe I didn’t know about this sooner. It completely passed me by. Patrice Collardez created an extension for cmislib that gives it the capability to work with aspects. Patrice’s version works with cmislib 0.4.1. I cloned it and made the updates necessary for it to work with cmislib 0.5.

What this means is that you can now use Python and cmislib to work with Alfresco aspects. Patrice’s extension adds “addAspect”, “removeAspect” and “getAspects” to Document and Folder objects. It also allows you to call getProperties and updateProperties on Folders and Documents even when those properties are defined in an aspect.

Check it out:

properties = {}
properties['cmis:objectTypeId'] = "D:sc:whitepaper"
properties['cmis:name'] = fileName

docText = "This is a sample " + TYPE + " document called " + NAME

doc = folder.createDocumentFromString(fileName, properties, contentString=docText, contentType="text/plain")

# Add two custom aspects and set aspect-related properties
doc.addAspect('P:sc:webable')
doc.addAspect('P:sc:productRelated')
props = {}
props['sc:isActive'] = True
props['sc:published'] = datetime.datetime(2007, 4, 1)
props['sc:product'] = 'SomePortal'
props['sc:version'] = '1.1'
doc.updateProperties(props)

Also, if you saw the webinar yesterday you know I showed some Python examples in the shell, but I then switched over to some OpenCMIS Java examples in Eclipse that I included in the custom content types tutorial. I didn’t want my fellow Pythonistas to feel neglected, so I ported those OpenCMIS examples to Python. Grab them here.

The examples assume you also have Patrice’s extension installed (my clone if you are using cmislib 0.5). If you don’t want to use Patrice’s extension for some reason, just comment out the “import cmislibalf” statement as well as the lines in the createTestDoc method that deal with aspects and aspect-defined properties. You should then be able to run the examples in straight cmislib.

If you don’t have cmislib you can install it by typing “easy_install cmislib”.

Webinar: Getting Started with CMIS

If you are brand new to CMIS or have heard about it but aren’t sure how to get started, you might want to join me in a free webinar on Thursday, January 26 at 15:00 GMT. I’m going to give a brief intro to the Content Management Interoperability Services (CMIS) standard and then I’m going to jump right in to examples that leverage Apache Chemistry OpenCMIS (Java), Apache Chemistry cmislib (Python), and Groovy (via the OpenCMIS Workbench).

UPDATED on 1/26 to fix webinar link (thanks, Alessandro). See comments for a link to webinar recording and slides.

Apache Chemistry cmislib 0.4 incubating now available

Apache Chemistry LogoThe Apache Chemistry development team is pleased to announce that the 0.4 incubating release of cmislib, the Python client API for CMIS, is now available for download. You may have to use one of the backup servers until the mirrors fully update. Alternatively, you can use easy_install to install cmislib by typing “easy_install cmislib”.

This release has various fixes and enhancements that the community has contributed since cmislib joined the Apache Chemistry project with its 0.3 release. If you are using Alfresco, you might be interested in an enhancement in cmislib 0.4 that makes it possible to use ticket-based authentication instead of basic auth.

For those who haven’t used it, cmislib makes it easy to work with CMIS-compliant repositories from Python.