Tag: Alfresco Customization

Alfresco Developer Series Tutorials Updated for SDK 4.2/ACS 7.0

Today I spent some time updating the Alfresco Developer Series Tutorials for SDK 4.2 and Alfresco 7.0.

Most of my clients are still running 5.2 or 6.x at this point because 7.0 is still very new, but I’ve seen some questions on Stack Overflow and the Alfresco Forums asking questions about 7.0 so I figured it was time to get them upgraded.

Nothing really changed other than the reference to the newer SDK and Alfresco versions.

Creating custom Alfresco admin console panels

A common requirement for an Alfresco installation is the need to update configuration on customizations at runtime. One way to handle this is to add your own custom admin console panels to the out-of-the-box Alfresco admin console.

For example, suppose that at our company there is a system that manages data about our projects. Maybe it has a REST API that returns a list of projects. And, maybe we want to do something with that data from Alfresco.

It would be a good idea to centralize the logic that invokes the project API in a service class. The service class will need to know the URL of the project API. We could hardcode the project API URL, but then we’d have to build and deploy if it ever needs to be changed. We could put it in the alfresco-global.properties file and read it from there, which is a little better, but not great.

Alfresco already has an admin console that it uses to display and, in the case of Enterprise Edition, manage settings at runtime. This post shows how to add your own admin console panel to update settings of your custom service classes at runtime whether you use Enterprise or Community Edition.

This example uses a basic API built using Node and Express that returns a list of project names and IDs. In the real world your API won’t likely be part of the project–we use this “fake” API here as a convenient stand-in for demonstration purposes.

On the Alfresco side, we’ll create a UI action that gets the project list from the API and displays the projects in a dialog. It doesn’t really matter what we do with the data because the point of this example is to show how to make the API endpoint configurable via the admin console.

When you’re done, you’ll be able to invoke the API from Share and then change the API endpoint via the Alfresco admin console, and see that change reflected immediately on subsequent invocations from Share.

Ready? Let’s do it.

Steps

This code is available in GitHub. Each of the steps below is tagged. After you clone the repository you can switch between steps by doing git checkout step1 or git checkout step2 etc.

If you are going to follow along, clone the project:

git clone https://github.com/jpotts/alfresco-custom-admin.git

Then, checkout step0:

git checkout step0

The code now reflects an empty project created from the Alfresco SDK. At this point it is configured to use Community Edition. We’ll optionally switch over to Enterprise Edition in a while when the implementation steps become edition-specific.

The first three steps are about setting up the fake API as a Docker container, implementing a repo tier web script to fetch project data from the API, and then implementing a simple UI action that displays the project data in a Share dialog.

Once those steps are complete the path diverges: one step shows how to implement the custom admin console in Enterprise Edition and the other shows how to do it in Community Edition.

Step 1: Add a simple API to return project data

If you are following along:

git checkout step1

We want an API that returns a list of projects as JSON. A really easy way to do that is with Node.js and Express. So, we’ll add a new container to our Docker setup so that when we run Alfresco locally it will launch the fake API app.

Now we have a new Maven module called fake-projects-api that will build a Docker image that has the Node.js app. All we need to do is add it to the docker-compose.yml file that was bootstrapped when we created the project so that Docker Compose will create and run a container for the API alongside the containers for ACS, Share, and the others.

  • docker/docker-compose.yml. This is the original docker-compose.yml file provided by the Alfresco SDK, updated to include the new projects API.

If you want to test the API, run ./run.sh build_start then invoke this URL in your browser:

http://localhost:3000/projects

The API returns a list of project names and IDs as JSON.

Step 2: Add a service class and web script

If you are following along:

git checkout step2

At this point Alfresco is running and a Node.js app is running. The Node.js app represents our other enterprise API that we need to integrate with. In this step we’ll wire the two together by creating a repository tier web script that invokes the API and returns the list of projects. The web script won’t actually have the logic to call the API. Instead, we’ll put that in a service class to centralize the logic and make it easier to call from other places if needed.

I’ll create two model classes to make it easier to work with the JSON API response:

The service has the logic that actually invokes the API, and the web script calls that:

I’ll put the default value for the project service API URL in the alfresco-global.properties file. The web script Spring context can read it from there and inject it into the Project Service class.

Now you can run ./run.sh build_start from the root of the project source and after everything starts up, invoke the web script:

http://localhost:8080/alfresco/s/ecmarchitect/projects

To get a list of project names and IDs back as JSON.

[
    {
        "projectId": "A001",
        "projectName": "Some Project"
    },
    {
        "projectId": "A002",
        "projectName": "Some Other Project"
    },
    {
        "projectId": "A003",
        "projectName": "Yet Another Project"
    },
    {
        "projectId": "A004",
        "projectName": "Pilot Project"
    },
    {
        "projectId": "A005",
        "projectName": "Pet Project"
    }
]

Next, let’s add a small customization to Share that will invoke this API.

Step 3: Add a UI action that invokes the repo tier web script

If you are following along:

git checkout step3

The Share part of this example is not really important, but it is nice to have it just to verify that everything is working as we expect.

Let’s add a UI action that invokes client-side JavaScript. The client-side JavaScript will call the repo tier web script and display the results in a Share dialog.

If nothing is running, do a ./run.sh build_start to start everything up. If everything is still running from the previous step, run ./run.sh reload_share.

You should now be able to log in to Share, navigate to a document, and from either the document library or document details page click “Get Projects” to show the dialog with the list of project information retrieved from the API.
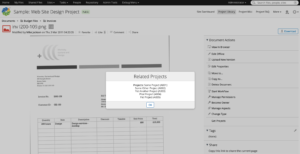
UI action showing API results

Enterprise Edition or Community Edition?

You now have a fake API, a repo web script that invokes it, and a Share UI action that calls the repo web script. Now it is time to add an admin console panel that can be used to configure the projects API URL at runtime.

Exactly how you do this differs between Enterprise Edition and Community Edition. It’s a bit easier with Enterprise Edition because the Enterprise Edition admin console supports JMX and it has a framework of sorts for displaying and modifying JMX-managed beans. In that case, we just add some JMX annotations to our service class and it becomes very easy to configure an admin panel that can get and set attributes on the JMX bean.

To see how that works, continue reading the next section, Step 4a.

If you are using Community Edition, it’s a bit more work because the admin console framework in Community Edition isn’t the same as the one in Enterprise Edition that relies heavily on JMX. But we can still add an admin console panel that will function just like the one in Enterprise Edition, from an end-user’s perspective.

To see how that works, skip the next section, Step 4a, and continue reading Step 4b.

Step 4a: Add the custom admin console panel to Enterprise Edition

If you are following along:

git checkout step4a

Up to this point, our project has been running Community Edition. If you are reading this section you’ve decided to move forward with Enterprise Edition, so the first change is to update the root pom.xml to change editions:

Of course you’ll need credentials for the private artifacts directory as well as quay.io for the Enterprise Docker image. I am assuming you already know where to put the credentials in your Maven and Docker authentication setup.

Next, the project service we created earlier needs some JMX annotations and the service-context.xml file needs a few additional JMX-related beans:

At this point, you could change the projects API URL at runtime using a JMX tool like JConsole or JMXTerm. But our goal is to create a custom admin panel. Admin console panels are just web scripts, so we’ll add a GET web script that renders the panel:

Be careful here. The path to the web script is important. It dictates where the panel shows up in the admin console. In this case, the important part of the path is “admin/ecmarchitect-tools”. That establishes a new section (“ecmarchitect-tools”) that we could use to group multiple panels. If we were to just use “admin” this new panel would show up in the “root” list of admin console panels, as a sibling to “System Summary”. It’s probably better to group them as I’ve done here.

Enterprise Edition comes with JMX support, and that makes it very easy to add our JMX managed beans to the admin console. Look at the web script controller. It’s just:

Admin.initModel(
    "ecmarchitect:name=Projects",
    ["ProjectsApiUrl"],
    "ecmarchitect-projects"
);

The initModel method of Admin takes care of everything for us. We just pass in three arguments:

  • The name of the bean. This value matches up with what’s in the “ecmarchitect-projects_MBeanExporter” Spring bean in service-context.xml.
  • An array of managed attributes. In this simple example there’s just one, ProjectsApiUrl, which is derived from the getter/setter method in the project service class.
  • The doc in admin-common.lib.js says this is the “ID of the current console tool” but it did not seem to matter what I put here, so I used values from my JMX bean to make a unique string, “ecmarchitect-projects”.

The freemaker view for this web script is also pretty succinct because the Enterprise Edition admin console framework does a lot of the work for us:

<#include "/org/alfresco/enterprise/repository/admin/admin-template.ftl" />
<@page title=msg("project-api-settings-console.title") readonly=false>
    <div class="column-full">
        <@section label=msg("project-api-settings-console.column") />
        <#-- Example - Retrieve keys - which are attribute names - use to index into attribute hash -->
        <#-- You can index directly by attribute name e.g. <@control attribute=attributes["Subject"] /> -->
        <#list attributes?keys as a>
            <@control attribute=attributes[a] />
        </#list>
    </div>
</@page>

This is all boilerplate with the exception of the message properties keys.

Since the last step, you’ve changed the Alfresco edition, so now you need to start fresh:

  1. Run ./run.sh purge to destroy and remove the existing containers.
  2. Run ./run.sh build_start to do a clean build and start up fresh containers.

Once everything comes up you can test your work:

  1. Log in to the admin console and click TBD to see the new admin console panel. The projects API URL is already set because the default value
    from the alfresco-global.properties file was injected into the Project Service class.
  2. Go ahead and change the URL to a bad value, then click Save.
  3. Now go into Share and try out the UI action. It should fail.
  4. Go back into the admin console and change the URL to the correct value, which is http://fake-projects-api:3000/projects, then click Save.
  5. Now go back into Share and try the UI action again. It should display the project data successfully.
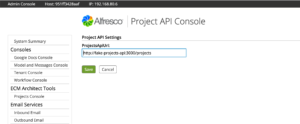
Custom admin console panel in Enterprise Edition

If you only care about Enterprise Edition, you’re done. You can make changes to the projects API URL at runtime via the admin console.

Note that if you deploy what we’ve built so far to a multi-node cluster, each node will have its own copy of the projects API URL and when you make a change to the URL on one node, it will not propagate to the other nodes. In a future blog post I’ll show to address that with a replicating cache.

If you want to see how much work Enterprise Edition saved you, or you just realized you read the wrong section, read on to see how to implement the same admin console panel in Community Edition.

Step 4b: Add the custom admin console panel to Community Edition

If you are following along:

git checkout step4b

Our Enterprise Edition friends turned the Project Service class into a JMX-managed bean, then took advantage of the pre-existing framework for admin console panels to create a panel that can get and set managed attributes. We aren’t so lucky, but it isn’t the end of the world. We can still have the exact same functionality, we just have to do a bit more work. That’s how it goes with Community Edition, right?

We’ll need a web script that establishes the admin console panel and renders a form with the current value of the projects API URL:

Assuming you skipped the Enterprise Edition section (Step 4a) I’ll reiterate what I said there about paths. The path to the web script is important. It dictates where the panel shows up in the admin console. In this case, the important part of the path is “admin/ecmarchitect-tools”. That establishes a new section (“ecmarchitect-tools”) that we could use to group multiple panels. If we were to just use “admin” this new panel would show up in the “root” list of admin console panels, as a sibling to “System Summary”.

These are the same file paths and names as the Enterprise Edition example, but the web script controller and the freemarker view are different.

The web script controller has to grab the project service bean from the Spring context so it can get the current value of the projects API URL and add it to the model:

ctxt = Packages.org.springframework.web.context.ContextLoader.getCurrentWebApplicationContext();
projectService = ctxt.getBean('project-service', Packages.com.ecmarchitect.alfresco.examples.projects.services.ProjectService);
model.projectsApiUrl = projectService.getProjectsApiUrl();

The remaining calls take advantage of the out-of-the-box Admin component:

model.tools = Admin.getConsoleTools("api-settings");
model.metadata = Admin.getServerMetaData();

The freemarker view is a bit more involved. Rather than relying on Alfresco to build the form, we’ve got to do it ourselves:

<#include "/org/alfresco/repository/admin/admin-template.ftl" />
<@page title=msg("project-api-settings-console.title") readonly=true>
    <link rel="stylesheet" type="text/css" href="${url.context}/alfresco-custom-admin/css/api-settings.css" />
    <script type="text/javascript" src="${url.context}/alfresco-custom-admin/js/api-settings.js"></script>
    <div id="message" class="message hidden">Successfully saved values.
        <a href="#" onclick="this.parentElement.classList.add('hidden');" title="Close">[X]</a>
    </div>
    <form id="api-settings-form">
        <div class="column-full">
            <h2>${msg("project-api-settings-console.column")}</h2>
            <div class="section">
            </div>
            <div class="control text">
                <span class="label">ProjectsApiUrl:</span>
                <span class="value"><input id="projectsApiUrl" name="ecmarchitect:name=Projects|ProjectsApiUrl" value="${projectsApiUrl}" maxlength="255" tabindex="0"/></span>
            </div>
        </div>
        <div class="submission buttons">
            <input type="button" value="Save" onclick="ECMArchAdmin.saveSettings()"/>
        </div>
    </form>
</@page>

In the call to the page macro, readonly is set to true because I don’t want Alfresco trying to create its own form–I’m going to handle it.

Next there are some references to stylesheets and a small JavaScript file which I’ll cover shortly.

Then there is a DIV that starts out as hidden. This will show itself after successfully saving the settings.

After that is a simple form. The form has an input for the projects API URL and a save button that invokes a function in the client-side JavaScript file to do the save. The client-side JavaScript file is:

We could have posted the form to a web script using the form’s action, but I thought it would be nicer to use AJAX instead. That gave me a chance to display a success message using the same style that’s used in the Enterprise Edition case, so the look-and-feel is a lot closer.

Note that in Community Edition, the out-of-the-box Admin object actually has a request method, but it does not set the content-type header properly when it makes the request, which breaks the automatic JSON handling in the POST web script. To fix this, I copied the request function into api-settings.js and set the header properly.

As mentioned earlier, the save button invokes a client-side function called ECMArchAdmin.saveSettings. The function POSTs JSON to a web script, which is responsible for actually saving the settings. Here’s the web script:

Similar to the GET web script, the POST web script controller gets the project service from the Spring context, then grabs the projects API URL from the JSON that was POSTed, and invokes the project service setter.

var obj = JSON.parse(json.toString());
var projectsApiUrl = obj.projectsApiUrl;

ctxt = Packages.org.springframework.web.context.ContextLoader.getCurrentWebApplicationContext();
projectService = ctxt.getBean('project-service', Packages.com.ecmarchitect.alfresco.examples.projects.services.ProjectService);
projectService.setProjectsApiUrl(projectsApiUrl);

model.projectsApiUrl = projectsApiUrl;

If you came to this step from Step 3 and everything is still running, you can do ./run.sh reload_acs to rebuild and restart the ACS container. Otherwise, run ./run.sh build_start to start everything up.

Once everything is up-and-running, you can test your work:

  1. log in to the admin console and click TBD to see the new admin console panel. The projects API URL is already set because the default value
    from the alfresco-global.properties file was injected into the Project Service class.
  2. Go ahead and change the URL to a bad value, then click Save.
  3. Now go into Share and try out the UI action. It should fail.
  4. Go back into the admin console and change the URL to the correct value, which is http://fake-projects-api:3000/projects, then click Save.
  5. Now go back into Share and try the UI action again. It should display the project data successfully.
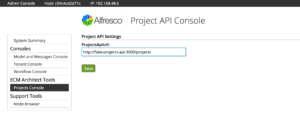
Custom admin console panel in community edition

There you have it. You now know how to create your own custom admin console panels so that you can change properties on your Alfresco customizations at runtime. You saw that if you are using Enterprise Edition, it’s a little bit easier, because you can take advantage of JMX, whereas with Community Edition you have to render the form yourself and then write your own POST web script to call setters on your service class with updated data.

If you need to do more elaborate work on the admin console, take a look at the Order of the Bee Support Tools Add-On for further examples. It was really helpful to me when working on the Community Edition version of this example. And, if you are running Community Edition, you really ought to install that Add-On and maybe even get involved in helping maintain that project.

Photo credit: Data Center, Cushing Memorial Library, CC BY-NC-ND 2.0

Display a chart in Alfresco Share: Part Two

In Part One, you saw how to create an Alfresco Share dashlet that uses out-of-the-box Aikau widgets to chart data. In that example, the data came from a repository tier web script.

In this blog post, Part Two, you’ll see how to fetch the data from an external API called from the Share tier. The external API could be anything, but for this example we’ll implement it with Spring Boot. We’ll add a Docker module to the project so that the Spring Boot application will run in a container alongside the Alfresco and Share containers that are part of all Alfresco SDK projects. Finally, we’ll secure the external API so that only authenticated Alfresco users can invoke it.

Steps

This code is available in GitHub. Just like Part One, each of the steps below is tagged. After you clone the repository you can switch between steps by doing git checkout step4 or git checkout step5 etc. I’m starting with “Step 4” because Part One covered steps 1 – 3.

If you are going to follow along, and you haven’t already, clone the project:

git clone https://github.com/jpotts/alfresco-share-chart-example.git

Step 4: Add an external REST API with Spring Boot

If you are following along:

git checkout step4

The existing code invokes a web script in the repository tier that returns sales data. A more likely case is that the sales data comes from a REST API running external to Alfresco. In this step we’ll build a small Spring Boot application that simulates the external sales data API. To make things simple, we’ll add the new application as an additional module to the alfresco-share-chart-example project.

Switch to the root of the alfresco-share-chart-example project and create a new directory named alfresco-chart-example-api.

Within that, add a new pom.xml file that pulls in the Spring Boot dependency:

There are many ways to organize a Spring Boot app. I like to create separate files for my application, model, controllers, and services:

We’ll set the application port to 8000 in the application.properties file:

Test by switching into alfresco-chart-example-api and running mvn clean install. Then, run java -jar target/alfresco-chart-example-api-1.0-SNAPSHOT.jar. Once the app comes up you should be able to invoke:

http://localhost:8000/api/salesData

And see the JSON response.

Use ctl+c to stop the application.

Step 5: Create a Docker module for the example API

If you are following along:

git checkout step5

The Alfresco SDK uses Docker to run Alfresco and Alfresco Share, so we’ll do the same. To do that, create a new module directory called alfresco-chart-example-api-docker.

Within that, add a new pom.xml file. This pom.xml pulls in the application created in the previous step as a dependency so that it can be easily copied to the Docker image.

Now add a Dockerfile that builds the image. There are a lot of ways you can deploy Spring Boot apps with Docker. In this example, we’ll just use an Alpine Linux image with the JDK, and launch the Spring Boot app directly from the JAR, just like you did when you tested the app in the previous step.

When we start Alfresco with the run.sh script that is included with the SDK it builds the Alfresco containers, starts them up, and networks them together using Docker Compose. Our container should be included in that, so we’ll update the Docker Compose file that already exists off the root of the project source code and add corresponding tasks to the run scripts:

Finally, make sure to add the two new module directories to the root pom.xml:

Test by changing to the alfresco-chart-example-api-docker directory and running mvn clean install. Then, switch to the root of the project source and run ./run.sh reload_api or run.bat reload_api. This should cause a Docker container to start up with the Spring Boot application running. Again, you should be able to invoke:

http://localhost:8000/api/salesData

And see the JSON response.

Run ./run.sh stop or run.bat stop to stop the container.

At this point you should be able to do ./run.sh build_start or run.bat build_start to start up Alfresco, Alfresco Share, and the Spring Boot Example API, all at once.

Step 6: Update Share to fetch data from the API

If you are following along:

git checkout step6

Now Alfresco, Share, and the API are running, but the Share chart dashlet is still pulling its data from the repository tier web script. It’s time to update the dashlet to instead pull its data from the Spring Boot example API.

First, create a web script that the chart dashlet will call to get its data. This is similar to the one we created in the repository tier in Part One, but this one is going into the Share tier. You could run this in the repository tier, but putting it in the Share tier saves us one hop.

The web script calls the external API and returns the data in the format that the dashlet is expecting. To make that call, we’re using a built-in root-scoped object called “remote” that is able to call external REST APIs:

var connector = remote.connect("example-api");
var dataString = connector.get("/api/salesData?ticket=" + ticket);

That connector ID, “example-api”, refers to Share configuration that includes the actual host that is being connected to:

In this example, the API is running as a Docker container, so the endpoint-url refers to the Docker Compose service name:

<endpoint-url>http://alfresco-chart-example-api:8000</endpoint-url>

Finally, the CustomReportService we created in Part One is still referring to the repository tier web script. It needs to be updated to instead call the new Share tier web script:

You’ve made changes to Alfresco Share, so do ./run.sh reload_share or run.bat reload_share to rebuild and run the Share container. When it comes back up, go to Share at http://localhost:8180/share, log in, and go to the test site that has your chart dashlet.

The chart dashlet should now display data coming from the Spring Boot API.

Step 7: Secure the API to only allow requests from authenticated Alfresco users

If you are following along:

git checkout step7

The Alfresco Share sales summary dashlet is now pulling data from an external REST API. If you don’t mind that anyone can fetch that data from the REST API at any time, there is no need to go any further. In this example, let’s assume that only authenticated Alfresco users should be allowed to retrieve data from the REST API. How can we modify the API and the web script that calls it to meet that requirement?

First, let’s add a new service to alfresco-chart-example-api that knows how to validate Alfresco tickets:

The service uses the Alfresco 5.2 public REST API to ask Alfresco if the ticket is valid.

With that in place, the SalesDataController can be updated to validate the ticket before returning a response:

If you do a run.sh reload_api or run.bat reload_api at this point and try to invoke http://localhost:8000/api/salesData you should see a 401 returned, which is exactly what we want–if you don’t have a valid ticket you cannot invoke the sales data API.

To test a successful call, use curl to grab a ticket:

jpotts@Metaversant alfresco-share-chart-example % curl -X POST -H 'content-type: application/json' http://localhost:8080/alfresco/s/api/login -d'{"username":"admin", "password":"admin"}'
{
    "data":
    {
        "ticket":"TICKET_01b44089022f98740c3eb27009f49e787f9fb213"
    }
}

And then pass the ticket to the sales data API and the response should be successful:

jpotts@Metaversant alfresco-share-chart-example % curl "http://localhost:8000/api/salesData?ticket=TICKET_01b44089022f98740c3eb27009f49e787f9fb213"
[{"region":"North","amount":125},{"region":"South","amount":125},{"region":"East","amount":125},{"region":"West","amount":125}]

So far, so good.

The last step is to modify the Share tier web script that fetches the sales data from the API to pass along the ticket. One gotcha here is that Share does not have direct access to the ticket, so we’ll first add a tiny repository tier web script that returns the ticket:

And then we can modify the Share tier web script to fetch the ticket from the repository tier and pass it along to the sales data API:

The controller uses the same “remote” root-scoped object it used previously, but it relies on the default connector, which is the Alfresco repository web script connector, to fetch the ticket:

// Need to get the user's ticket from the repo
var ticketString = remote.call("/custom/ticket");
var ticketResponse = jsonUtils.toObject(ticketString);
var ticket = ticketResponse.ticket;

// Get the sales data from the API
var connector = remote.connect("example-api");
var dataString = connector.get("/api/salesData?ticket=" + ticket);

You’ve now made changes to both the repository tier and the share tier. Either reload each one with ./run.sh reload_acs and ./run.sh reload_share or do a ./run.sh stop to stop all the running containers followed by a ./run.sh build_start to start everything back up.

That’s it. You’ve now got an external API that returns data only to authenticated Alfresco users and a Share dashlet that displays that data in a pie chart.

Display a chart in Alfresco Share: Part One

The other day a customer asked how much trouble it would be to chart some data in an Alfresco Share dashlet. The data comes from a non-Alfresco REST API.

The answer is that it is relatively easy to do. That’s because Alfresco Share ships with some basic out-of-the-box chart widgets called BarChart, DonutChart, and PieChart. You may have seen examples of dashlets that use PieChart if you’ve ever added the Site Content Breakdown or Site Contributor Breakdown dashlets to your Share dashboard.

In this blog post, I’ll show you how to make your own chart dashlets by shamelessly stealing Erik Winlöf’s code that implements the Site Content Breakdown dashlet and modifying it for our own purposes to show sales data, by region, in a dashlet. In part one, the data is fetched from a repository tier web script. In part two, the data comes from a Spring Boot app.

Steps

This code is available in GitHub. Each of the steps below is tagged. After you clone the repository you can switch between steps by doing git checkout step1 or git checkout step2 etc.

If you are going to follow along, clone the project:

git clone https://github.com/jpotts/alfresco-share-chart-example.git

Then, checkout step0:

git checkout step0

And startup the project using Docker and Docker Compose:

./run.sh build_start

This will start up Alfresco using Docker with no customizations made at this point.

Step 1: Add a simple API to return the data to chart

If you are following along:

git checkout step1

If Alfresco is already running:

./run.sh reload_acs

We want to build a dashlet that can chart data fetched from an API source. So, to start, we’ll add a repository tier web script that returns data as JSON. Once the chart is working we can swap that out to an external data source.

The files that make up the web script are:

With the web script in place, invoking http://localhost:8080/alfresco/s/custom/data will return a JSON response with sales broken down by region, like this:

     {
         "resultset": [
           [
                 "West", 125
             ],
             [
                 "North", 75
             ],
             [
                 "East", 250
             ],
             [
                 "South", 150
             ]
         ],
         "metadata": [
             {
                 "colIndex": 0,
                 "colType": "String",
                 "colName": "name"
             },
             {
                 "colIndex": 1,
                 "colType": "Numeric",
                 "colName": "sum"
             }
         ]
     }

The format of the JSON is what the chart component expects–it includes a resultset property, with a list of data values, and a metadata property, which describes the data types found in the result set.

If you need exact steps on how to create a web script, see my webscripts tutorial.

Step 2: Add a dashlet

If you are following along:

git checkout step2

If Alfresco is already running:

./run.sh reload_share

In this step, add a dashlet. Share supports the old “Surf” way to add dashlets as well as the newer “Aikau” way to add a dashlet. Because we’re going to use an Aikau widget for the chart, we’ll use the Aikau approach for the dashlet.

Dashlets are implemented using web scripts, so we’ll need a descriptor, controller, and view template:

This is an Aikau dashlet, so in addition to the dashlet web script, we need an Aikau widget, implemented in client-side JavaScript, that sets up the dashlet:

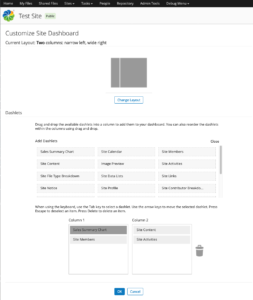
Now log in to Share at http://localhost:8180/share, create a test site, and customize the site’s dashboard to add the newly-created dashlet.

Customize dashlet page

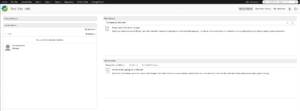
It doesn’t have anything in it yet because we need to define a service to fetch the data and a widget to display it. That’s the next step.

An empty dashlet

Step 3: Add a widget and a service

If you are following along:

git checkout step3

If Alfresco is already running:

./run.sh reload_share

The last step is to add an Aikau service to fetch the data and an Aikau widget to display the data fetched by the service. The widget will use the out-of-the-box pie chart widget to display the chart.

First, we write an Aikau service to fetch the data from the API and publish it to a topic:

Then, we write an Aikau widget that subscribes to the topic and renders the chart using the PieChart widget:

The dashlet controller we implemented earlier needs to be updated to refer to the new service:

And the Aikau dashlet code needs to be updated to point to the new widget:

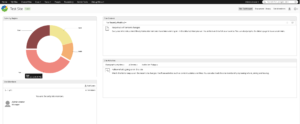
Now when the dashlet renders, it fetches the data from the repository tier web script and presents it in a pie chart.

Hovering over each slice in the pie chart produces and overlay with the detailed data.

Share dashlet with a pie chart that pulls data from a REST API

Part Two Preview

In Part Two, we’ll create a little Spring Boot application that the dashlet will call to fetch its data instead of fetching it from the repository tier. The Spring Boot app will authenticate the request using the authenticated Alfresco user’s ticket, so that only authenticated Alfresco users can fetch the data from the API.

Alfresco User Interface Options Revisited

Alfresco has been working hard on its new Application Development Framework (ADF), which consists of a client-side JavaScript API and a set of Angular components (see “Alfresco embraces Angular: Now what?“).

Alfresco says the ADF is now ready for production use (as of the 2.0 release) and they’ve also been iterating on an Example Content Application that shows how to use the ADF to build a general document management application.

Many of my clients are watching the ADF closely. Some are dabbling with Proofs-of-Concept, but few have started building their own ADF-based applications. One reason is purely practical–the ADF requires release 5.2 or higher, so an upgrade (or two) stands in the way of production ADF use.

The other reason is more strategic, and it centers around whether or not a customer should expect a content services platform vendor to provide a user interface, and, if so, what kind, or whether that should be the client’s responsibility. This is still being worked through, both internally and externally (see “Future of Alfresco Share Remains Foggy After DevCon“). Alfresco has been very open about their plans and has been gathering input from customers so we’ll see how it plays out.

Customers that require user interface customizations today may feel stuck–extensive Share customizations don’t make sense at this point, ADF requires 5.2, and, even if that’s not the problem, the amount of work required to assemble a solution using the framework and to maintain it going forward may not make sense, especially if what is needed is just vanilla document management with some UI tweaks. (I’m not saying “Don’t use ADF”–I’ve been lobbying for it since 2010. I’m just saying it might not make sense for everyone, for all use cases).

Nine years ago (yikes!) I wrote a post called “Alfresco User Interface: What Are My Options?“. It’s probably time to revise the list. If you need to provide custom functionality on top of Alfresco today, here are your options:

Use the ADF

If you are running 5.2 or higher, clearly, this is what Alfresco would recommend. It ships with components based on Angular, which I’ve been using for a while now and I really like. But, if Angular isn’t an option for you, you can leverage the client-side JavaScript library that is part of the ADF and use React or whatever you want.

And you don’t have to start with a blank app–you can use the Example Content Application as a starting point, if it’s close to what you need, or just as a learning tool if it isn’t.

Advantages:

  • Ready-to-use components save you a lot of work
  • Components and client-side JavaScript API supported by Alfresco
  • Angular is a popular framework, so there should be a lot of developers who can help
  • Client-side JavaScript API lets you use something other than Angular if needed
  • Heavy focus by Alfresco engineering means that new components and features are being added frequently

Considerations:

  • Requires Alfresco 5.2 or higher
  • While the components are extensible, you must stick to the extension points and not customize at the component source code level, unless you want to fork the framework (or at least that component) and maintain it going forward
  • Angular components are styled with Google Material Design which may or may not be aligned with your look-and-feel standards
  • If what you really need is Share with a certain set of customizations, it may be more work to re-build Share-like functionality using ADF components, at least in its current state

Use Your Own Framework

I’ve done several projects with custom, non-ADF Angular components hitting an API layer implemented with Spring Boot. The API layer talks to Alfresco via CMIS, the Alfresco REST API, custom web scripts, or some combination. The API layer also talks to other systems, which is important because these apps are rarely just about Alfresco alone.

I’ve been using Angular but you can obviously use whatever front-end you want. You don’t have to hit an API layer–you can hit Alfresco directly from your client-side JavaScript–the architecture, the tools, and the entire stack is up to you.

The nice thing about this approach is that it works with older versions of Alfresco. And the application only includes exactly what you need to meet end-user requirements. Of course, you have to build all of it yourself and maintain it going forward.

Advantages:

  • Total flexibility in the toolset and architecture
  • Meets your exact requirements

Considerations:

  • Custom code has to be written, debugged, and maintained
  • If you choose an esoteric or short-lived framework, you may be re-writing the application sooner than planned

Use a Commercial Front-end

I’ve seen some very slick commercial front-ends of late. If your main problem is presenting a compelling user interface for finding content, take a look at Alfred Finder from Xenit. It’s got some really impressive features for building and saving queries and a blazing fast user interface. Finder, as the name implies, is read-only. If you need to create content you’ll have to talk to Xenit about a customization or use something different.

For something more specific to case management, take a look at the OpenContent Management Suite from TSG. TSG has removed the hierarchical folder metaphor entirely. Instead, content just goes where it needs to go based on user role, the type of content, and the task at hand. The focus here is on end-user productivity where end-users are most likely case workers, records managers, or similar. (Despite TSG’s proclivity to use “Open” in its branding, this is not an open source solution. You must be a paying TSG consulting customer to use it and to see the source).

If your use case centers around forms, take a look at FormFactor. This isn’t a full replacement front-end like the previous two, but a lot of the customizations people do are really there to support custom data capture, so I’m including it because it might eliminate the need to do any customizations at all. FormFactor allows non-technical end-users to build and publish electronic forms via drag-and-drop, all within the existing Alfresco user interface. The demo I saw was built on top of Share. I’ve asked FormFactor via Twitter whether they will be able to support ADF-based clients as well but have not yet heard back.

Advantages:

  • Commercial add-ons offer shorter time-to-value
  • Maintained by a vendor
  • Functionality leverages the collective feedback of the vendor’s customers

Considerations:

  • May involve up-front license cost and/or annual maintenance fees
  • Commercial products are often shipped as-is, with a close, but not exact, fit to your requirements
  • Support SLA’s can differ widely from vendor-to-vendor
  • Generally speaking, working with your procurement department may not be considered one of the simple joys of life

Customizing Share is Not a Long-Term Option

Despite the announcement that parts of Share are being deprecated and the recommendation for all custom development to use ADF (announcement), I expect the Alfresco Share client to be around for quite a while. The transition to whatever comes after Share is likely to be lengthy and orderly. No timeframe has been announced, but my guess is this will be measured in years, not months.

So if you have a custom action here or there, or you want to remove a few features to streamline a bit, you should do so.  However, if you’ve got major Share renovations in mind, like stripping it down to the studs and knocking out a load-bearing wall or two, you are going to spend a small fortune on what will someday be throwaway work. Instead of doing that, think carefully about using one of the alternative approaches I’ve outlined in this post.

UPDATE: I changed all occurrences of “AngularJS” in this post to “Angular” to make it clear that what Alfresco uses (and what I’ve been using on my own projects) is the newer version of Angular that used to be known as “Angular2” but is now referred to just as “Angular”.

Photo Credit: wireframe, ipad, pencil & notes by Baldiri, CC-BY 2.0

Spring Cleaning: Alfresco Developer Series Tutorials Get an Update

Over the weekend I completed a major update to the Alfresco Developer Series Alfresco Tutorials. The improvements are aimed at making it easier on new learners by simplifying each tutorial’s project structure and by making that structure and the module naming match the default structure and naming conventions used by version 3.0.1 of the SDK.

I made the following improvements across all tutorials:

  1. Upgrade all projects to Alfresco SDK 3.0.1. This was easy–it was a one line change because the tutorials were already at 3.0.0.
  2. Refactored all projects to use the “all-in-one” archetype. This was a bit more painful, but it needed to be done. More on this in a minute.
  3. Removed the old “common” projects, which were there because I needed JARs of certain common classes so they could be used as dependencies across tutorials. With SDK 3.0.x that’s no longer necessary.
  4. Renamed repo tier and share tier modules to match the defaults for SDK 3.0.1. I hate that the repo tier and Share tier modules have “jar” in the name because no one should be building JARs to deploy to their production Alfresco server, but I decided it was less confusing for developers trying to follow along.
  5. Changed all tutorial project module versions to be major.minor instead of major.minor.patch. This is another minor annoyance of the current SDK–the default should be major.minor.patch. But I wanted the tutorials to be consistent with the SDK defaults so what-are-ya-gonna-do.
  6. Refactored old SDK 2.0.x integration tests to be compatible with SDK 3.0.x.

The move to the all-in-one archetype was a big one. I don’t always use the all-in-one archetype, particularly if I know I’m not going to need to make Share customizations. But the tutorials have Share customizations in all but one case.

Another reason to use two projects rather than all-in-one is because using two projects allows you to run the repo on one Tomcat and the Share WAR on another. When focusing on Share development, it’s nice to not have to restart the entire repo just to pick up changes. With JRebel, which I’ve been using for the last year, restarts aren’t necessary as often, so running separate Tomcats is less of a necessity. Plus, one project is easier on the tutorial reader.

The all-in-one setup also gives you an “integration-tests” module. When Alfresco upgraded from SDK 2.x to 3.x, the old way of doing integration tests broke. To run integration-tests in SDK 3.x you really need that integration-tests module, but it is not provided when you use the “platform-jar” archetype. You can add it back, as I recently did for the ACL Templates project, but I didn’t want tutorial readers to have to do that.

In the end, I figured it was worth restructuring all of the tutorials to use “all-in-one” for the above reasons and just to simplify the whole thing.

Incidentally, if you aren’t writing integration tests for your add-ons, you really ought to. The SDK comes with samples to get you started. And if you are using JRebel, you can stay productive. You basically just fire up the embedded Tomcat server, which deploys your AMPs (and your integration tests) to the alfresco and share WAR files and starts up the server. Then, you can make changes to your classes and your tests and JRebel will sync those changes without a restart. When you run the integration tests from your IDE, they will look for a running Alfresco instance and remotely invoke your tests for you on the running server.

I still need to port my integration tests to the 3.0.x way of doing things in several of my open source Alfresco add-on projects, but at least the tutorials are taken care of.

These updates were a lot of work, but I continue to get feedback from readers all over the world that the tutorials are helpful (thanks for that, BTW!), so I want them to stay current.

I may have missed a thing or two. As always, if you find something wrong, please create an issue on GitHub, or, better yet, a pull request.

Photo Credit: Cleaning, by Bob Jagendorf

Alfresco Maven SDK: Declaring other AMPs as dependencies

5634268846_9c59682a42_mI’ve seen a few questions about how to configure an Alfresco project to depend on other add-ons when using the Alfresco Maven SDK, so I thought I’d do a quick write-up on that.

When you use the Alfresco Maven SDK Archetypes to bootstrap a project, you can select one of three project types:

  1. alfresco-allinone-archetype: Referred to simply as “All-in-One”, this type, as the name implies, gives you a project that facilitates creating both a repository tier AMP and a Share tier AMP, plus it includes a working Solr installation.
  2. alfresco-amp-archetype: This sets up a project that generates only a repository tier AMP.
  3. share-amp-archetype: This sets up a project that generates only a Share tier AMP.

In my Alfresco Maven SDK Tutorial I use both the alfresco-amp-archetype and the share-amp-archetype but I don’t really talk about the All-in-One archetype at all. The reason is two-fold. First, I think for most beginners, the smaller, more focused archetypes are less confusing. Second, on the vast majority of my client projects, that’s the setup I use. Usually, I feel like the All-in-One archetype is overkill.

However, there is an advantage the All-in-One archetype has over the other two. It is able to pull in other AMPs as dependencies. With the single-purpose archetypes, your goal is simply to build an AMP. You can run integration tests against that AMP using the embedded Tomcat server, but if you want to test the AMP with other AMPs, you have to deal with that manually. Usually I just deploy the AMPs to a test Alfresco installation that already has the other AMPs deployed.

But with the All-in-One archetype, you can declare those other AMPs as dependencies, and Maven will go grab them from a repository and install them into your local test environment using something called an “overlay”.

Here’s an example. Suppose you are developing some customizations that you know will be deployed to an Alfresco server that will be running the following add-ons: Share Site Creators, Share Site Space Templates, Share Login Announcements, and Share Inbound Calendar Invites. You’d like to test your code alongside these add-ons.

One approach would be to go grab the source for each of these projects and build them locally to produce their AMPs (or download pre-built AMPs), then deploy all of those AMPs to a test server, then deploy your custom AMP and test.

But all of those add-ons happen to live on a public Maven artifact repository called Maven Central. So a better alternative might be to simply list those modules as dependencies and let Maven take care of the rest.

Here’s how it works. When you generate an all-in-one project, the structure includes not only folders that contain your repo and Share AMP source, but also folders representing the Alfresco and Share web applications. For example, here are the files and folders in the root folder of a project called “test-allinone-220”:

pom.xml
repo
run.bat
run.sh
runner
share
solr-config
test-allinone-220-repo-amp
test-allinone-220-share-amp

In our example, your custom code for the repo tier would go in test-allinone-220-repo-amp and your Share tier code would go in test-allinone-220-share-amp.

The repo and share directories are used to build the respective WAR files and they each have their own pom.xml. So to add the other add-ons to our setup, first edit repo/pom.xml. You need to add the add-ons as dependencies, like:

<dependency>
    <groupId>com.metaversant</groupId>
    <artifactId>inbound-invites-repo</artifactId>
    <version>1.1.0</version>
    <type>amp</type>
</dependency>
<dependency>
    <groupId>com.metaversant</groupId>
    <artifactId>share-site-space-templates-repo</artifactId>
    <version>1.1.2</version>
    <type>amp</type>
</dependency>
<dependency>
    <groupId>com.metaversant</groupId>
    <artifactId>share-login-ann-repo</artifactId>
    <version>0.0.2</version>
    <type>amp</type>
</dependency>
<dependency>
    <groupId>com.metaversant</groupId>
    <artifactId>share-site-creators-repo</artifactId>
    <version>0.0.5</version>
    <type>amp</type>
</dependency>

Then, add them again to the overlays section (without the “version” element), like this:

<overlay>
    <groupId>com.metaversant</groupId>
    <artifactId>inbound-invites-repo</artifactId>
    <type>amp</type>
</overlay>
<overlay>
    <groupId>com.metaversant</groupId>
    <artifactId>share-site-space-templates-repo</artifactId>
    <type>amp</type>
</overlay>
<overlay>
    <groupId>com.metaversant</groupId>
    <artifactId>share-login-ann-repo</artifactId>
    <type>amp</type>
</overlay>
<overlay>
    <groupId>com.metaversant</groupId>
    <artifactId>share-site-creators-repo</artifactId>
    <type>amp</type>
</overlay>

That covers the Alfresco WAR. Now for the Share WAR, edit share/pom.xml and add the Share tier dependencies, like:

<dependency>
    <groupId>com.metaversant</groupId>
    <artifactId>share-login-ann-share</artifactId>
    <version>0.0.2</version>
    <type>amp</type>
</dependency>
<dependency>
    <groupId>com.metaversant</groupId>
    <artifactId>share-site-creators-share</artifactId>
    <version>0.0.5</version>
    <type>amp</type>
</dependency>

And then the overlays:

<overlay>
    <groupId>com.metaversant</groupId>
    <artifactId>share-login-ann-share</artifactId>
    <type>amp</type>
</overlay>
<overlay>
    <groupId>com.metaversant</groupId>
    <artifactId>share-site-creators-share</artifactId>
    <type>amp</type>
</overlay>

Now you can run the whole thing–your custom AMPs plus all of the dependencies–by running ./run.sh. As part of the build, you should see the dependencies being downloaded from Maven Central. As the server starts up, if you watch the log, you’ll see the modules get initialized. And when you log in, you’ll be able to test all of the functionality together.

When you are ready to deploy to one of your actual server environments, you have a choice. You can either copy all of your AMPs to the amps and amps_share directories, then run bin/apply_amps.sh. Or you can deploy the WAR files that are now sitting under repo/target and share/target. Personally, I think re-applying the AMPs against a fresh WAR on the target server is less confusing and less error-prone, but I’ve seen it done both ways.

If the add-ons you want to depend on are not on a public Maven artifact repository like Maven Central, you can still build them locally, run “mvn install” to install them into your local Maven repository, then depend on them as shown.

Alfresco embraces AngularJS: Now what?

Alfresco plus Angular2In 2009 I wrote a blog post called “Alfresco User Interface: What are my options?”  because people frequently asked for recommendations around that and they still do. Then, in 2010 at the very first Alfresco DevCon, I gave a talk called “Alfresco from an agile framework perspective“. My talk summarized how painful it was to build custom apps on Alfresco by building one simple app twice–once using Share and once using Django–and then comparing the effort it took. Django won, hands down, in terms of level-of-effort and lines of code.

Share was fairly new at the time, and it has improved a lot since 2010 in terms of ease-of-customization. In fact, a few of us met with Alfresco engineering at the conference to give feedback about the Share developer experience and Alfresco listened. The next release of Share had improved extension points. It became much easier to extend or override pieces of Share without massive copying-and-pasting of Alfresco’s code.

But there was another aspect of my talk, which boils down to this: If you are trying to appeal to developers, why are you asking us to learn a new framework? There are already frameworks out there that are extremely popular, have all sorts of tooling, and are well-documented. Use what you want to build Alfresco Share, but what can you do to make it easier for developers to build content-centric applications on Alfresco using tools we already know?

Fast-forward to BeeCon, the community-led Alfresco conference held in Brussels back in April of this year. During that conference, Alfresco announced that it was doing something about this problem: They would create libraries and components to help people create custom apps on top of the platform external to Share. Some of these will be framework agnostic. But after looking at the frameworks out there they realized they cannot deny the popularity of AngularJS, so they also want to provide customizable components that Angular developers can use.

About two weeks ago, we got our first glimpse of what this really means. Alfresco made its alfresco-ng2-components GitHub repo public followed closely by a live streamed hangout where they discussed the vision for the components (YouTube link).

Definitely clone the repo, try it out yourself, and watch that video for context. But let me try to summarize what it means for you…

What is happening to Alfresco Share, Aikau, and Surf?

Alfresco Share is the shipping web client. It is built on top of Aikau and a lower-level framework called Surf. If Alfresco is getting behind Angular, are these going away? No. Both John Newton, Alfresco’s co-founder, and John Sotiropoulos, Alfresco’s new VP of Applications, were emphatic on that point. There are no immediate plans to make any significant changes to the direction of Alfresco Share, Aikau, or Surf. Many people have customized Share–those customizations should remain safe. Plus, a lot of people use Share out-of-the-box. Alfresco still needs a web client and they are their own biggest fans when it comes to Aikau and Surf.

I am customizing Share right now. Should I stop?

No, these components aren’t going to affect you. If you have no reason to build a custom front-end on top of Alfresco, you can safely ignore this announcement. However, if you are customizing Share because you thought it would be easier than writing your own custom application, and your customizations are so significant, that it feels like you are basically re-building an application from the ground-up, with little or no re-use from what Share offers, you may want to keep an eye on this. These components will give you a jumpstart on what otherwise would have been a from-scratch effort.

What exactly is shipping right now?

Alfresco is making an initial set of components available that includes:

  • Login
  • Document list
  • Document viewer
  • Datatable
  • Search
  • Uploader

In addition to the components, Alfresco offers a Yeoman generator to help you bootstrap an Angular2 application that makes use of one or more of these components.

I am writing a custom front-end using Angular right now. Should I stop?

Alfresco is shipping Angular components that can be used to build custom apps on top of Alfresco. And you are doing the same thing. It would seem like you might want to stop and leverage the new components. Before you do that, you need to be aware of two very important caveats.

First, Alfresco is using Angular2 which has very significant differences with Angular. And Angular2 is still shipping as a release candidate. Depending on your appetite for refactoring and risk, you may or may not want to make the switch to Angular2 just yet. Still, I think it was smart for Alfresco to choose Angular2 to avoid making that move later.

The second thing is that the new Alfresco Angular2 components rely on significant enhancements to the Alfresco REST API. Those enhancements are not in any stable version of the product. They are only available starting with 201606 EA (Early Access) release, which includes 5.2.a of the Alfresco platform. There is no way to know when Alfresco 5.2 Community Edition will go to a GA (Generally Available, aka “stable”) release. Which means we also do not know when 5.2 Enterprise Edition will ship.

You should not run any Early Access release of Community Edition in production. Therefore, if you need to be in production any time soon, you will not be able to leverage these components.

This second caveat has caused a fair amount of grumbling amongst the community. There has been some talk about back-porting the new REST API to a stable Alfresco release, but, unfortunately, this cannot be done without changes to the core.

People have been developing custom front-ends on top of Alfresco using Angular and other frameworks for years without making deep changes to the core product. Alfresco didn’t have to do it in this case, but they chose to, because they wanted to clean up the API simultaneously. Basically they chose the “rip the bandage fast” approach, which I understand. However, the impact of this decision is that it will be many, many months before real world feedback on these components makes it into the shipping code. Hopefully, enough people will still be motivated enough to try them out with the EA release.

I want to try the new components, how do I get started?

First, you’ll need a running version of 5.2.a (201606-EA) with CORS enabled. I forked the gui81/alfresco Docker image and upgraded it to 5.2.a with CORS enabled and pushed the result to Docker Hub if you want to use it. Or you can download it from the wiki or Sourceforge.

The GitHub repo has a good readme, so take a look at that. I’m not going to duplicate it here, so follow those directions.

I had good luck installing the Yeoman generator and then just running “yo ng2-alfresco-app”. You’ll get a chance to specify which components you want installed into your new app–I had problems unless I selected all of them.

Yeoman generates the app. NPM is used to run it locally for development purposes. To fire it up, just run “npm start”. Once up, I was able to use the sample app to work with the back-end Alfresco repository, as shown here (click to enlarge):

Alfresco Angular2 Components

It’s probably important to note that what you see running is basically a sample app or sandbox for these components. It’s up to you to write a functional app with all of the features your users need. You’ll incorporate and customize these components as part of your own development effort. You can check the documentation to learn more about how to customize each component.

Alfresco wants your feedback on these components. Don’t be afraid to report issues or submit pull requests on the GitHub repo.

Summary

I am excited to see this from Alfresco. It is too early to use these in production, but once the new REST changes ship in a GA product, you should definitely consider this as a way to jumpstart your custom apps, even if you don’t use Angular. If you’ve been looking for a way to get involved in the Alfresco community, trying these out and giving your feedback is an excellent opportunity to do so.

Quick Hack: Creating default folder structures in Alfresco Share sites

Someone recently asked how to create Alfresco Share sites with a default folder structure. Currently, out-of-the-box, when you create an Alfresco Share site, the document library is empty. This person instead wanted to define a set of folders that would be created in the document library when a new Alfresco Share site is created.

Although this exact functionality is not available out-of-the-box, there is something similar. It’s called a “space template”. Space templates have been in the product since the early days but haven’t yet been exposed to Alfresco Share. In the old Alfrexsco Explorer client you could specify a space template when you created a new folder, and the resulting folder would have the same set of folders and documents that were present in the template.

With a little bit of work using the out-of-the-box extension points we can get Alfresco to use space templates when creating new sites in Share. I’ve created this as an add-on and the code lives on GitHub. I thought it might be instructive to review how it works here.

Approach

The first thing to realize is that a space template isn’t special. It’s just a folder that happens to live in Data Dictionary/Space Templates. In fact, there aren’t any API calls specific to space templates. If you go looking for a createFolderFromTemplate() method on a Folder object you’ll be disappointed. When the Alfresco Explorer client creates a folder from a template, it simply finds the template folder and copies its contents into the newly-created folder.

On the Alfresco Share side, a site isn’t that special either. It’s just a special type of folder. The document library that sits within a Share site is also just a folder, albeit a specially-named folder with an aspect. Normally, the document library folder does not get created until the first user actually opens the site and navigates to the document library.

So all we really need to do is write some code that gets called when a site is created, looks up the space template, and then creates the document library folder with the contents of the space template.

What’s the best way for the code to know which space template to use? One way would be to use a specially-named space template for all Share sites. But using a single space template for all Share sites seems limiting. Alfresco Share already has a mechanism for selecting the “type” of site to create–it’s called a preset. So a better approach is to use the preset’s ID to determine which space template to use.

Code

We need to run some code when a site is created. One way to do this is with a behavior. The behavior is Java code that will be bound to the onCreateNode policy for nodes that are instances of st:site. The init() method does that:

// Create behaviors
this.onCreateNode = new JavaBehaviour(this, "onCreateNode", NotificationFrequency.TRANSACTION_COMMIT);

// Bind behaviors to node policies
this.policyComponent.bindClassBehaviour(QName.createQName(NamespaceService.ALFRESCO_URI, "onCreateNode"), TYPE_SITE, this.onCreateNode);

So any time a node is create that is an instance of st:site, the onCreateNode() method in this class will get called.

The first thing the onCreateNode() method needs to do is find the space template. To keep things simple, I’m going to assume that the space template is named the same thing as the site preset ID, so all I need to do is grab that preset ID and do a Lucene search to find the template:

NodeRef siteFolder = childAssocRef.getChildRef();

if (!nodeService.exists(siteFolder)) {
logger.debug("Site folder doesn't exist yet");
return;
}

//grab the site preset value
String sitePreset = (String) nodeService.getProperty(siteFolder, PROP_SITE_PRESET);

//see if there is a folder in the Space Templates folder of the same name
String query = "+PATH:\"/app:company_home/app:dictionary/app:space_templates/*\" +@cm\\:name:\"" + sitePreset + "\"";
ResultSet rs = searchService.query(StoreRef.STORE_REF_WORKSPACE_SPACESSTORE, SearchService.LANGUAGE_LUCENE, query);

If there aren’t any space templates the method can return, otherwise, the space template should be copied into the site folder as the new document library folder:

documentLibrary = fileFolderService.copy(spaceTemplate, siteFolder, "documentLibrary").getNodeRef();

//add the site container aspect, set the descriptions, set the component ID
Map<QName, Serializable> props = new HashMap<QName, Serializable>();
props.put(ContentModel.PROP_DESCRIPTION, "Document Library");
props.put(PROP_SITE_COMPONENT_ID, "documentLibrary");
nodeService.addAspect(documentLibrary, ASPECT_SITE_CONTAINER, props);

I used the fileFolderService to perform the copy, then I set the properties and aspect on the new document library folder with the values that Alfresco Share expects a document library to have.

I’ve left out some insignificant code bits here and there–you can look at the source if you need to. The project was bootstrapped using the Alfresco Maven SDK and includes a unit test that makes sure the behavior works as expected.

Result

The project creates an AMP file. If you’ve checked out the source you can build the AMP using mvn install. Then you can install the AMP into the Alfresco WAR by placing the AMP in the amps directory and run apply_amps.sh. Alternatively, you can use mvn alfresco:install. After installing the AMP into the Alfresco WAR you can test it out.

Out-of-the-box Alfresco Share has a single site type called “Collaboration Site”. The preset ID for that type of site is “site-dashboard”. You might have additional site types configured in your installation. To set up the template for the default collaboration site, navigate to Data Dictionary/Space Templates and create a folder called “site-dashboard”. Then add whatever folders and documents you want to that folder. Now, anytime a “Collaboration Site” gets created in Alresco Share, the document library will automatically be created with the same folders and documents you’ve set up in your space template.

This was not a mind-blowing, deeply-technical extension to Alfresco. Hopefully, it shows you that, with even a few lines of code, you can easily add useful functionality to Alfresco.

Alfresco Example: Share Dashlets that Retrieve Data from the Repository

If you need to learn how to write an Alfresco Share dashlet, hopefully you’ve already worked through the Hello World dashlets in the Share Extras project on Google Code. The rest of the dashlets in that project are either “mash-up” style dashlets that read data from third-party sites or dashlets that work with data from the Alfresco repository tier, but are of moderate to high complexity. What I think is missing is a dashlet that goes one small step beyond Hello World to show how to read and display a simple set of data from the repository tier. In this post I show you how to do just that.

I created the example I’m going to walk you through in response to a question someone posted in the forum. They asked, “How can I write a dashlet that will show basic metadata from the most recently-modified document in a given folder?”. I think this is something we haven’t explained to people–we show Hello World and we show dashlets from the other end of the spectrum, but nothing to illustrate this basic pattern. So I wrote a quick-and-dirty example. Fellow forum user, RikTaminaars, also got in on the act, making the dashlet configurable, which I’ll show in a subsequent post.

In this post, I’ll create the most basic implementation possible. The result is a simple dashlet that reads a path from a configuration file, asks the repository for the most recently modified document in that folder, then displays some basic metadata. In my next post, I’ll add to it by making the folder path configurable within the user interface.

Developer Setup

First, a bit about my setup. I’m running Alfresco 4.0.d Community, WAR distribution, Lucene for search, Tomcat application server, and MySQL for the database. I’m using Eclipse Indigo, but this implementation requires no compiled code. For organizing the project files I used the Sample Dashlet project structure from Share Extras. I’m using the Share Extras Ant build script to deploy my code from my project folder structure to the Alfresco and Share web applications.

When I’m doing Share customizations I use two Tomcats–one for the repository tier and one for the Share tier. This helps me avoid making assumptions about where my Alfresco and Share web applications are running and it speeds up my development because my Share Tomcat restarts very quickly. To get the Share Extras build script to work with a two Tomcats setup, I’ve added the following to a build.properties file in my home directory:

tomcat.home=/opt/apache/tomcat/apache-tomcat-6.0.32
tomcat.share.home=/opt/apache/tomcat81/apache-tomcat-6.0.32
tomcat.share.url=http://localhost:8081

Now the build script will know to put the deployed code in each of my Tomcat servers.

The Data Web Script/Presentation Web Script Pattern

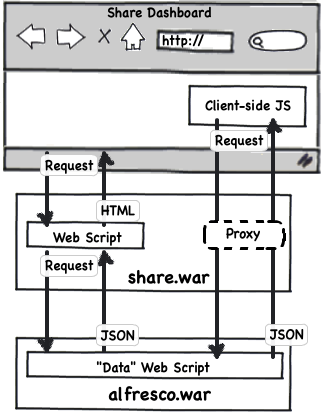
The Alfresco repository runs in a web application called “alfresco” while the Share user interface runs in a separate web application called “share”. Each of these two web applications has its own web script engine. If you aren’t familiar with web scripts, take a look at this tutorial, then come back, or just accept the high-level notion that web scripts are an MVC framework used to bind URLs to code and that web scripts can run on the repository tier as well as the Share tier.

Share dashlets–the “boxes” of content that display in the Share user interface–are just web scripts that return HTML. In fact, everything you see in Share is ultimately a web script. When a dashlet needs to display data from the Alfresco repository, it makes a call over HTTP to invoke a web script running on the repository tier. The repository tier web script responds, usually with JSON. The dashlet gets what it needs from the JSON, then renders outputs HTML to be rendered as part of the page. Because the repository tier web script responds with raw data, you may see these referred to as “data web scripts”.

In the previous paragraph, I was purposefully vague about where the request to the repository tier is made. That’s because there are two options. The first option, and the one we’ll use in this example, is to make the call from the dashlet’s web script controller. This might be called “the server-side option” because once the dashlet’s view is rendered, it has all of the data it needs–no further calls are needed.

The second option is to make AJAX calls from the client browser. To avoid cross-site scripting limitations, these calls typically go through a proxy that lives in the Share application, but their ultimate destination is the repository tier.

Two tier web scripts

You may be wondering about the details of making these remote connections. It’s all taken care of for you. Regardless of whether you make the remote invocation of the repository web script from the Share tier or through AJAX in the browser, all you need to specify is the URL you want to invoke and the framework handles everything else.

Show Me the Code: Repository Tier

Let’s walk through the code. I’ll start with the repository tier. Recall that the requirements are to find the most recently modified document in a given folder and return its metadata. There may be out-of-the-box web scripts that could be leveraged to return the most recently modified document, but this is actually very simple to do and I don’t want to have to worry about those out-of-the-box web scripts changing in some subsequent release, so I’m implementing this myself.

Using the Share Extras project layout, repository tier web scripts reside under config/alfresco/templates/webscripts. The best practice is to place your web script files in a package structure beneath that, so I am using “com/someco/components/dashlets” for my package structure. Yours would be different.

The first thing to think about is what the URL should look like. I want it to be unique and I need it to accept an argument. The argument is the folder path to be searched. For this example, my URL will look like this:

/someco/get-latest-doc?filterPathView={filterPathView}

If you’ve worked with web scripts, you know that a “path” pattern could be followed instead of a “query string” pattern but it doesn’t really matter for this example. The descriptor, get-latest-doc.get.desc.xml, declares the URL and other details about authentication and transaction requirements.

The controller performs the search and populates the model with data. This is a GET, so the controller is named get-latest-doc.get.js. Look at the source for the complete listing–I’ll just hit the high points.

First, I grab a handle to the folder represented by the path argument:

var folder = companyhome.childByNamePath(args.filterPathView);

Then I use the childFileFolders() method to get the most recently modified file and stick that in the model:

var results = folder.childFileFolders(true, false, 'cm:folder', 0, 1, 0, 'cm:modified', false, null);
model.latestDoc = files[0];

Obviously, I could have used a search here, but this method is quite handy. It must be new (thanks, Rik!).

The view then takes the data in the model and returns some of the metadata as JSON:

<#macro dateFormat date>${date?string("dd MMM yyyy HH:mm:ss 'GMT'Z '('zzz')'")}</#macro>
<#escape x as jsonUtils.encodeJSONString(x)>
{
"nodeRef": "${latestDoc.nodeRef}",
"name": "${latestDoc.properties.name}",
"title": "${latestDoc.properties.title!}",
"description": "${latestDoc.properties.description!}",
"created": "<@dateFormat latestDoc.properties.created />",
"modified": "<@dateFormat latestDoc.properties.modified />"
}
</#escape>

Note the exclamation points at the end of the title and description. That will keep the template from blowing up if those values are not set.

That’s all there is to the repository tier. If you want to add additional metadata, custom properties, or data from elsewhere in the repo, it is easy to do that.

At this point you should be able to deploy (run ant hotcopy-tomcat-jar, for example) and test the repository tier web script by pointing your browser to: http://localhost:8080/alfresco/s/someco/get-latest-doc?filterPathView=/Some/Folder/Path

Show Me the Code: Share Tier

Okay, the back-end is ready to return the data I need. Now for the front-end. The Share Extras project structure puts front-end web scripts in config/alfresco/site-webscripts so following a similar pattern as I did for the repository-tier web scripts, I put my share-tier web scripts into the site-webscripts folder under com/someco/components/dashlets.

The descriptor, get-latest-doc.get.desc.xml, declares a URL for the dashlet and specifies the “dashlet” family. This will make the dashlet appear in the “add dashlets” menu for both the global dashboard and the site dashboard.

I want to make the folder path configurable, so I created get-latest-doc.get.config.xml and used it to specify a title for the dashlet and the default folder path. I’ll read in this configuration from the controller.

As I mentioned, we’re doing everything server-side in this example, so the controller needs to call the web script I deployed to the repository tier to retrieve the JSON. Then it can put that object into the model and let the view format it as it sees fit. The controller lives in get-latest-doc.get.js and starts out by reading the configuration XML:

Then it uses the built-in “remote” object to invoke the repository tier web script and puts the result into the model:

Note that the URL starts with my web script’s URL–it includes nothing about where to find the Alfresco repository. That’s because the “end point” is declared in Share’s configuration (to be precise, it is actually Surf configuration, the framework on which Share is built) and the remote object uses the “alfresco” endpoint by default. I don’t see it used very often, but you can actually define your own end points and invoke them using the remote object.

The last part of this example is the HTML markup for the dashlet itself. The first half of get-latest-doc.get.html.ftl is boilerplate that has to do with the dashlet resizer. For this example, the length of the list is static–it will only ever have one entry. So the resizer is kind of overkill. The bottom half is where the markup for the document’s metadata lives:

If you’ve already worked with web scripts, you know that get-latest-doc.get.head.ftl is used to place resources into “<head>”. In this case, that is a CSS file used to style our dashlet and client-side JavaScript used by the resizer. The strings used in the dashlet are localized through the get-latest-doc.get.properties file.

Test It Out

You should be able to test this out yourself by creating a folder anywhere in the repository, adding one or more files to the folder, specifying that folder path in the get-latest-doc.get.config.xml file, and then using “ant deploy hotcopy-tomcat-jar” to deploy the customizations to the alfresco and share web applications. You’ll need to restart Tomcat to pick up the new JAR (both Tomcats if you are running two). Then, login and click “Customize Dashboard” to add the “Get Latest Document” dashlet to your dashboard. It should look something like this:

Screenshot: Get Latest Document Dashlet

Summary

This is a simple example, but it is powerful because it is the same pattern used throughout Share: A dashlet needs data from the repository tier, so its web script controller uses the “remote” object to call a web script on the repository tier. The repository tier web script returns JSON which the Share tier web script then formats into a nice looking dashlet.

In my next post, I’ll show how to make the folder path configurable, so that you can change it at run-time with a folder picker in the Share user interface instead of editing the config XML.