Tag: Alfresco Tutorial

Display a chart in Alfresco Share: Part Two

In Part One, you saw how to create an Alfresco Share dashlet that uses out-of-the-box Aikau widgets to chart data. In that example, the data came from a repository tier web script.

In this blog post, Part Two, you’ll see how to fetch the data from an external API called from the Share tier. The external API could be anything, but for this example we’ll implement it with Spring Boot. We’ll add a Docker module to the project so that the Spring Boot application will run in a container alongside the Alfresco and Share containers that are part of all Alfresco SDK projects. Finally, we’ll secure the external API so that only authenticated Alfresco users can invoke it.

Steps

This code is available in GitHub. Just like Part One, each of the steps below is tagged. After you clone the repository you can switch between steps by doing git checkout step4 or git checkout step5 etc. I’m starting with “Step 4” because Part One covered steps 1 – 3.

If you are going to follow along, and you haven’t already, clone the project:

git clone https://github.com/jpotts/alfresco-share-chart-example.git

Step 4: Add an external REST API with Spring Boot

If you are following along:

git checkout step4

The existing code invokes a web script in the repository tier that returns sales data. A more likely case is that the sales data comes from a REST API running external to Alfresco. In this step we’ll build a small Spring Boot application that simulates the external sales data API. To make things simple, we’ll add the new application as an additional module to the alfresco-share-chart-example project.

Switch to the root of the alfresco-share-chart-example project and create a new directory named alfresco-chart-example-api.

Within that, add a new pom.xml file that pulls in the Spring Boot dependency:

There are many ways to organize a Spring Boot app. I like to create separate files for my application, model, controllers, and services:

We’ll set the application port to 8000 in the application.properties file:

Test by switching into alfresco-chart-example-api and running mvn clean install. Then, run java -jar target/alfresco-chart-example-api-1.0-SNAPSHOT.jar. Once the app comes up you should be able to invoke:

http://localhost:8000/api/salesData

And see the JSON response.

Use ctl+c to stop the application.

Step 5: Create a Docker module for the example API

If you are following along:

git checkout step5

The Alfresco SDK uses Docker to run Alfresco and Alfresco Share, so we’ll do the same. To do that, create a new module directory called alfresco-chart-example-api-docker.

Within that, add a new pom.xml file. This pom.xml pulls in the application created in the previous step as a dependency so that it can be easily copied to the Docker image.

Now add a Dockerfile that builds the image. There are a lot of ways you can deploy Spring Boot apps with Docker. In this example, we’ll just use an Alpine Linux image with the JDK, and launch the Spring Boot app directly from the JAR, just like you did when you tested the app in the previous step.

When we start Alfresco with the run.sh script that is included with the SDK it builds the Alfresco containers, starts them up, and networks them together using Docker Compose. Our container should be included in that, so we’ll update the Docker Compose file that already exists off the root of the project source code and add corresponding tasks to the run scripts:

Finally, make sure to add the two new module directories to the root pom.xml:

Test by changing to the alfresco-chart-example-api-docker directory and running mvn clean install. Then, switch to the root of the project source and run ./run.sh reload_api or run.bat reload_api. This should cause a Docker container to start up with the Spring Boot application running. Again, you should be able to invoke:

http://localhost:8000/api/salesData

And see the JSON response.

Run ./run.sh stop or run.bat stop to stop the container.

At this point you should be able to do ./run.sh build_start or run.bat build_start to start up Alfresco, Alfresco Share, and the Spring Boot Example API, all at once.

Step 6: Update Share to fetch data from the API

If you are following along:

git checkout step6

Now Alfresco, Share, and the API are running, but the Share chart dashlet is still pulling its data from the repository tier web script. It’s time to update the dashlet to instead pull its data from the Spring Boot example API.

First, create a web script that the chart dashlet will call to get its data. This is similar to the one we created in the repository tier in Part One, but this one is going into the Share tier. You could run this in the repository tier, but putting it in the Share tier saves us one hop.

The web script calls the external API and returns the data in the format that the dashlet is expecting. To make that call, we’re using a built-in root-scoped object called “remote” that is able to call external REST APIs:

var connector = remote.connect("example-api");
var dataString = connector.get("/api/salesData?ticket=" + ticket);

That connector ID, “example-api”, refers to Share configuration that includes the actual host that is being connected to:

In this example, the API is running as a Docker container, so the endpoint-url refers to the Docker Compose service name:

<endpoint-url>http://alfresco-chart-example-api:8000</endpoint-url>

Finally, the CustomReportService we created in Part One is still referring to the repository tier web script. It needs to be updated to instead call the new Share tier web script:

You’ve made changes to Alfresco Share, so do ./run.sh reload_share or run.bat reload_share to rebuild and run the Share container. When it comes back up, go to Share at http://localhost:8180/share, log in, and go to the test site that has your chart dashlet.

The chart dashlet should now display data coming from the Spring Boot API.

Step 7: Secure the API to only allow requests from authenticated Alfresco users

If you are following along:

git checkout step7

The Alfresco Share sales summary dashlet is now pulling data from an external REST API. If you don’t mind that anyone can fetch that data from the REST API at any time, there is no need to go any further. In this example, let’s assume that only authenticated Alfresco users should be allowed to retrieve data from the REST API. How can we modify the API and the web script that calls it to meet that requirement?

First, let’s add a new service to alfresco-chart-example-api that knows how to validate Alfresco tickets:

The service uses the Alfresco 5.2 public REST API to ask Alfresco if the ticket is valid.

With that in place, the SalesDataController can be updated to validate the ticket before returning a response:

If you do a run.sh reload_api or run.bat reload_api at this point and try to invoke http://localhost:8000/api/salesData you should see a 401 returned, which is exactly what we want–if you don’t have a valid ticket you cannot invoke the sales data API.

To test a successful call, use curl to grab a ticket:

jpotts@Metaversant alfresco-share-chart-example % curl -X POST -H 'content-type: application/json' http://localhost:8080/alfresco/s/api/login -d'{"username":"admin", "password":"admin"}'
{
    "data":
    {
        "ticket":"TICKET_01b44089022f98740c3eb27009f49e787f9fb213"
    }
}

And then pass the ticket to the sales data API and the response should be successful:

jpotts@Metaversant alfresco-share-chart-example % curl "http://localhost:8000/api/salesData?ticket=TICKET_01b44089022f98740c3eb27009f49e787f9fb213"
[{"region":"North","amount":125},{"region":"South","amount":125},{"region":"East","amount":125},{"region":"West","amount":125}]

So far, so good.

The last step is to modify the Share tier web script that fetches the sales data from the API to pass along the ticket. One gotcha here is that Share does not have direct access to the ticket, so we’ll first add a tiny repository tier web script that returns the ticket:

And then we can modify the Share tier web script to fetch the ticket from the repository tier and pass it along to the sales data API:

The controller uses the same “remote” root-scoped object it used previously, but it relies on the default connector, which is the Alfresco repository web script connector, to fetch the ticket:

// Need to get the user's ticket from the repo
var ticketString = remote.call("/custom/ticket");
var ticketResponse = jsonUtils.toObject(ticketString);
var ticket = ticketResponse.ticket;

// Get the sales data from the API
var connector = remote.connect("example-api");
var dataString = connector.get("/api/salesData?ticket=" + ticket);

You’ve now made changes to both the repository tier and the share tier. Either reload each one with ./run.sh reload_acs and ./run.sh reload_share or do a ./run.sh stop to stop all the running containers followed by a ./run.sh build_start to start everything back up.

That’s it. You’ve now got an external API that returns data only to authenticated Alfresco users and a Share dashlet that displays that data in a pie chart.

Display a chart in Alfresco Share: Part One

The other day a customer asked how much trouble it would be to chart some data in an Alfresco Share dashlet. The data comes from a non-Alfresco REST API.

The answer is that it is relatively easy to do. That’s because Alfresco Share ships with some basic out-of-the-box chart widgets called BarChart, DonutChart, and PieChart. You may have seen examples of dashlets that use PieChart if you’ve ever added the Site Content Breakdown or Site Contributor Breakdown dashlets to your Share dashboard.

In this blog post, I’ll show you how to make your own chart dashlets by shamelessly stealing Erik Winlöf’s code that implements the Site Content Breakdown dashlet and modifying it for our own purposes to show sales data, by region, in a dashlet. In part one, the data is fetched from a repository tier web script. In part two, the data comes from a Spring Boot app.

Steps

This code is available in GitHub. Each of the steps below is tagged. After you clone the repository you can switch between steps by doing git checkout step1 or git checkout step2 etc.

If you are going to follow along, clone the project:

git clone https://github.com/jpotts/alfresco-share-chart-example.git

Then, checkout step0:

git checkout step0

And startup the project using Docker and Docker Compose:

./run.sh build_start

This will start up Alfresco using Docker with no customizations made at this point.

Step 1: Add a simple API to return the data to chart

If you are following along:

git checkout step1

If Alfresco is already running:

./run.sh reload_acs

We want to build a dashlet that can chart data fetched from an API source. So, to start, we’ll add a repository tier web script that returns data as JSON. Once the chart is working we can swap that out to an external data source.

The files that make up the web script are:

With the web script in place, invoking http://localhost:8080/alfresco/s/custom/data will return a JSON response with sales broken down by region, like this:

     {
         "resultset": [
           [
                 "West", 125
             ],
             [
                 "North", 75
             ],
             [
                 "East", 250
             ],
             [
                 "South", 150
             ]
         ],
         "metadata": [
             {
                 "colIndex": 0,
                 "colType": "String",
                 "colName": "name"
             },
             {
                 "colIndex": 1,
                 "colType": "Numeric",
                 "colName": "sum"
             }
         ]
     }

The format of the JSON is what the chart component expects–it includes a resultset property, with a list of data values, and a metadata property, which describes the data types found in the result set.

If you need exact steps on how to create a web script, see my webscripts tutorial.

Step 2: Add a dashlet

If you are following along:

git checkout step2

If Alfresco is already running:

./run.sh reload_share

In this step, add a dashlet. Share supports the old “Surf” way to add dashlets as well as the newer “Aikau” way to add a dashlet. Because we’re going to use an Aikau widget for the chart, we’ll use the Aikau approach for the dashlet.

Dashlets are implemented using web scripts, so we’ll need a descriptor, controller, and view template:

This is an Aikau dashlet, so in addition to the dashlet web script, we need an Aikau widget, implemented in client-side JavaScript, that sets up the dashlet:

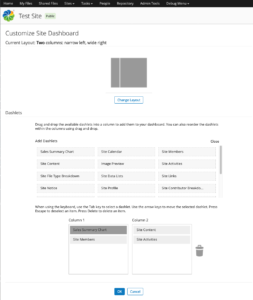
Now log in to Share at http://localhost:8180/share, create a test site, and customize the site’s dashboard to add the newly-created dashlet.

Customize dashlet page

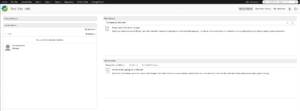
It doesn’t have anything in it yet because we need to define a service to fetch the data and a widget to display it. That’s the next step.

An empty dashlet

Step 3: Add a widget and a service

If you are following along:

git checkout step3

If Alfresco is already running:

./run.sh reload_share

The last step is to add an Aikau service to fetch the data and an Aikau widget to display the data fetched by the service. The widget will use the out-of-the-box pie chart widget to display the chart.

First, we write an Aikau service to fetch the data from the API and publish it to a topic:

Then, we write an Aikau widget that subscribes to the topic and renders the chart using the PieChart widget:

The dashlet controller we implemented earlier needs to be updated to refer to the new service:

And the Aikau dashlet code needs to be updated to point to the new widget:

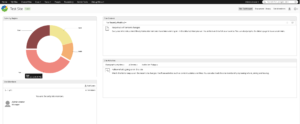
Now when the dashlet renders, it fetches the data from the repository tier web script and presents it in a pie chart.

Hovering over each slice in the pie chart produces and overlay with the detailed data.

Share dashlet with a pie chart that pulls data from a REST API

Part Two Preview

In Part Two, we’ll create a little Spring Boot application that the dashlet will call to fetch its data instead of fetching it from the repository tier. The Spring Boot app will authenticate the request using the authenticated Alfresco user’s ticket, so that only authenticated Alfresco users can fetch the data from the API.

Adding actions to the Alfresco Share Selected Items menu

In a typical Alfresco implementation it is quite common to develop one or more custom actions to encapsulate a set of operations that need to be performed against a folder or document. Custom actions can be called from folder rules, added to the user interface, or called programmatically from web scripts. To learn more about developing custom actions, check out my tutorial on custom actions.

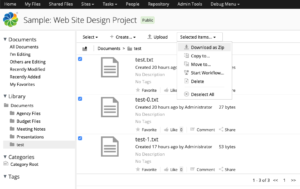
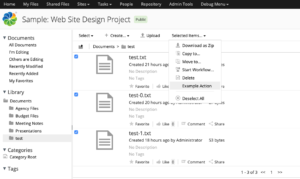
When actions are added to the Share document library or document details page they operate against a single folder or document. But the Share document library also lets users select multiple objects and then run actions against them. Out-of-the-box examples are things like “Download as Zip”, “Copy”, “Move”, “Start Workflow”, and “Delete” as shown in the screenshot below.

Alfresco Share out-of-the-box selected items menu

This blog post explains how you can add your own custom actions to the “Selected Items” menu in Alfresco Share.

First, I’m going to assume that you already have a custom action that works when invoked from a rule or from the UI and you just need it to work from the Selected Items menu. I’ll call mine “Example Action”. It doesn’t do anything exciting except log the node reference of the object the action is run against. Here it is sitting in the list of document actions on the document details page:

Custom action displayed in the Alfresco Share document details actions list

Now the goal is to add Example Action to the “Selected Items” menu so that the action will run against each object the user has selected. If you want to skip right to the working project on GitHub that’s fine, otherwise, read on for a step-by-step…

Step 1: Extend the multi-select configuration

I used a Share extension to add some custom configuration to get Example Action to show up in the document library browse list and the document details page. I’ll add additional config to extend the out-of-the-box “multi-select” list of action links:

<config evaluator="string-compare" condition="DocumentLibrary">
    <multi-select>
        <action type="action-link" id="onExampleAction" label="actions.example-action"></action>
    </multi-select>
</config>

The action label is a property bundle key that has the text I want to appear in the menu. The action ID, onExampleAction, is the name of a client-side JavaScript function to be called when the user selects the menu item.

I’ll implement the onExampleAction function in a file named custom-actions.js. I need to get Share to include that file as a dependency, so I add an additional config block:

<config evaluator="string-compare" condition="DocLibCustom">
    <dependencies>
        <js src="resources/multi-select-demo-share/custom-actions.js"></js>
    </dependencies>
</config>

That’s all I need to change in my Share extension XML file. See the full file on GitHub.

Now let’s look at the client-side JavaScript.

Step 2: Implement the client-side JavaScript

In the previous step I configured Share to add an action to the “Selected Items” menu that invokes the onExampleAction function when clicked and I told it where to find the function. Now I need to implement the function. To do that, I use YUI to fire a “registerAction” event, passing in an object with two properties: one is the name of my action and the other is a function to execute:

(function() {
      YAHOO.Bubbling.fire("registerAction",
          {
              actionName: "onExampleAction",
              fn: function custom_DLTB_onExampleAction(assets) {
                  // Function logic goes here
              }
          });
})();

Note that “onExampleAction” matches whatever I specified as the action ID in the multi-select config. It has nothing to do with the name of the Java class that implements the back-end action executer.

Within that function body you could do whatever you want. Maybe you need to capture some additional data from the user, so you present a modal. Maybe you want to display a progress bar. It’s up to you.

In my case, I just need to send the selected nodes to the back-end. Remember that I already have a working action. Mine is a Java class named ExampleAction that writes a log message with the node reference of the node the action is running against.

It would be nice if I could just somehow call that action and hand it my list of selected node references, but the execute method in the ActionExecuter interface only accepts a single node. Plus, we’re currently sitting in client-side JavaScript delivered by Share that needs to invoke an action in the Alfresco back-end–a completely separate web application. I need a way to asynchronously make an HTTP call to the Alfresco back-end from here.

The solution is to call a custom repository-tier web script with the list of selected node references, and use the web script controller to invoke the action for each of the node references in the list.

Alfresco provides a utility for making asynchronous posts and a constant that has the Share proxy URI. (The Share proxy avoids making the call from the browser all the way back to the Alfresco back-end, which could be running on a different host.) All I have to do is provide the path to the web script and the list of assets:

Alfresco.util.Ajax.jsonPost(
    {
        url: Alfresco.constants.PROXY_URI + "ecmarchitect/example-action-multi",
        responseContentType: "application/json",
        dataObj: assets,
        successMessage: this.msg("message.example-action.success"),
        failureMessage: this.msg("message.example-action.failure"),
        successCallback:
            {
                fn: function exampleSuccess() {
                    console.log("Success");
                },
                scope: this
            },
        failureCallback:
            {
                fn: function exampleFailure() {
                    console.log("Failure");
                },
                scope: this
            }
});

In the above JSON POST I am also setting a success message and a failure message so that the Share user sees feedback after the web script is invoked. Just to show you how it works, I’m also including success and failure callback functions. Mine just write a message to the browser developer console, but you could do whatever you need to, such as display data that came back in the web script response.

You can review the full source of custom-action.js or go on to the next step, which is to implement the web script.

Step 3: Implement the web script

I need a web script that will accept the list of selected nodes and invoke the action for each one. Webscript controllers can be written in either JavaScript or Java (tutorial) but I almost always write them in Java these days.

You can see the full source of ExampleActionMulti.java on GitHub–I am just going to include the relevant snippet here:

Action exampleAction = actionService.createAction("example-action");
JSONArray dataObj = (JSONArray) content;
for (int i = 0; i < dataObj.length(); i++) {
    JSONObject obj = (JSONObject) dataObj.get(i);
    NodeRef nodeRef = new NodeRef((String) obj.get("nodeRef"));
    if (nodeService.exists(nodeRef)) {
        actionService.executeAction(exampleAction, nodeRef);
    }
}

Alfresco Share handed my client-side JavaScript function an array of node objects which I then post to this web script. So the web script iterates over that array and grabs the node reference string to construct an actual NodeRef object. I use the node service to make sure that node ref actually exists, then I execute the action against it.

Other parts of the web script that I’m not showing here are the web script descriptor, the web script view template, and the Spring bean that injects the node service and action service dependencies into my controller.

Step 4: Test

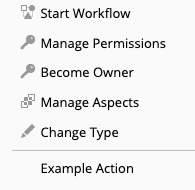
With everything in place, I’m ready to test. My project was bootstrapped with the Alfresco SDK, version 4.1.0, so it uses Alfresco Community Edition 6.2.0 by default and runs locally using Docker. After running run.sh build_start I can log in to Share, go to a site’s document library, selected multiple objects, and see this in the Selected Items menu (click to enlarge):

Alfresco Share selected items menu showing the custom action

And I can see this in the log:

Log output showing that the action worked

That’s it. Now you know how to add your own custom actions to the Selected Items menu in Alfresco Share.

Alfresco Tutorial: Custom actions including Share configuration

I’ve published a revision of my original Alfresco custom actions tutorial. The second edition greatly expands on the first by adding a UI action example. The original included only a rule action example. Just like the second edition of the content types tutorial, I’ve added instructions on how to configure the actions in Alfresco Share. The Alfresco Explorer steps are still there–they’ve been moved to the Appendix.

The code that accompanies the tutorial builds on the content types tutorial, so it includes the SomeCo content model and the user interface configuration needed to expose that to the Alfresco Share and Alfresco Explorer user interface.

This should be helpful to anyone who read the first edition who now wants to learn how to do the same thing using Alfresco Share, including some of the new extension points available in Alfresco 4.

Take a look and tell me what you think.

Alfresco tutorial: Custom content types including Share config and CMIS

UPDATE (2014): I’ve moved the tutorial and the source code to GitHub. The HTML version of the tutorial is here. It has been updated for Maven and AMPs.

It is hard to believe that the original version of my “Working With Custom Content Types” tutorial for Alfresco is almost five years old. That page has had over 37,000 unique visits since it was posted. It makes sense that it would be popular–creating a content model, exposing it to the user interface, and then performing CRUD functions against the repository through code are the first steps for most Alfresco development projects.

The fundamentals of content modeling haven’t changed since 2007, but since the original tutorial was posted the Alfresco Share web client has replaced Alfresco Explorer as the preferred user interface and the Content Management Interoperability Services (CMIS) API has become the first choice for writing remote code against the repository. That, combined with the influx of newcomers to the platform and a continued demand for how-to’s on the basics motivated me to revise the tutorial.

The second edition moves the Alfresco Explorer configuration to the Appendix and replaces it with steps for doing the same thing in Alfresco Share. I also moved the Java Web Services API to the Appendix and replaced that with Java examples that leverage the Apache Chemistry OpenCMIS API to create, update, query, and delete content in the repository. I’m executing the same queries as the first edition, just implemented using CMIS, so if you want to compare Lucene queries to CMIS Query Language, this is one place to do it.

I tested the document and the %