Tag: tutorial

New tutorial on Share customization with Alfresco Aikau

Alfresco community member, Ole Hejlskov (ohej on IRC), has just published a wonderful tutorial on customizing Alfresco Share with the new Alfresco Aikau framework.

You may have seen one of Dave Draper’s recent blog posts introducing the new framework. Ole’s tutorial is the next step you should take in order to understand the framework and how it can be used to make tweaks or additions to Alfresco Share.

I was happy to see Ole follow my example for the format and publication of his tutorial and that he’s made both the tutorial itself and the source code available on GitHub for anyone that wants to make improvements.

Thanks for the hard work and the great tutorial, Ole!

Updated tutorial: Implementing Custom Behaviors in Alfresco

I have published a major revision to my Implementing Custom Behaviors in Alfresco tutorial. I hadn’t really touched it since 2007–behaviors, the ability to bind programming logic to types, aspects, and events in Alfresco, haven’t changed at all since then.

The changes are mainly around using the Alfresco Maven SDK to produce AMPs and the addition of unit tests to the project. I also gave it a bit of a style scrub to make it more consistent with other tutorials.

The tutorial continues with the SomeCo example. In this tutorial you will create the content model and behavior needed to implement the back-end for SomeCo’s five star rating functionality. By the end of this tutorial you will know:

  • What a behavior is
  • How to bind a behavior to specific policies such as onCreateNode and onDeleteNode
  • How to write behaviors in Java as well as server-side JavaScript
  • How to write a unit test that tests your behavior

This tutorial, the source code that accompanies it, and the rest of the tutorials in the Alfresco Developer Series reside on GitHub. If you want to help with improvements, fork the project and send me a pull request.

Next week I hope to publish a major revision of the Introduction to Web Scripts tutorial.

CMIS example: Uploading multiple files to a CMIS repository

In my previous post on CMIS, I introduced the Content Management Interoperability Services (CMIS) specification and the Apache Chemistry project. You learned that CMIS gives you a language-neutral, vendor-independent way to perform CRUD functions against any CMIS-compliant server using a standard API. I showed a simple CMIS query being executed from a Groovy script running in the OpenCMIS Workbench.

Now I’d like to get a little more detailed and show a simple use case: I’ll use the OpenCMIS client library for Java to upload some files from my local machine to a CMIS repository. In my case, that repository is Alfresco 4.2.c Community Edition running locally, but this code should work with any CMIS-compliant server from vendors like IBM, EMC, Microsoft, Nuxeo, and so on. I’ll include the relevant snippets, but if you want to follow along, the full source code for this example lives here. I use that example to show the same code working against Alfresco in the cloud and Alfresco on-premise. If you are running against on-premise only or some other CMIS server, it has a few dependencies that won’t be relevant to you.

LoadFiles.java is a runnable Java class. The main method simply calls doExample(). That method grabs a session, gets a handle to the destination folder for the files on the local machine, and then, for each file in the local machine’s directory, it creates a hashmap of metadata values, then uploads each file and its associated metadata to the repository. Let’s look at each of these pieces in turn.

Get a Session

The first thing you need is a session. I have a getCmisSession() method that knows how to get one, and it looks like this:

SessionFactory factory = SessionFactoryImpl.newInstance();
Map parameter = new HashMap();

// connection settings
parameter.put(SessionParameter.ATOMPUB_URL, ATOMPUB_URL);
parameter.put(SessionParameter.BINDING_TYPE, BindingType.ATOMPUB.value());
parameter.put(SessionParameter.AUTH_HTTP_BASIC, "true");
parameter.put(SessionParameter.USER, USER_NAME);
parameter.put(SessionParameter.PASSWORD, PASSWORD);

List repositories = factory.getRepositories(parameter);

return repositories.get(0).createSession();

As you can see, establishing a session is as simple as providing the username, password, binding, and service URL. The binding is the protocol we’re going to use to talk to the server. In CMIS 1.0, usually the best choice is the Atom Pub binding because it is faster than the Web Services binding, the only other alternative. CMIS 1.1 adds a browser binding that is based on HTML forms and JSON but I won’t cover that here.

The other parameter that gets set is the service URL. This is server-specific. For Alfresco 4.x or higher, the CMIS 1.0 Atom Pub URL is http://localhost:8080/alfresco/cmisatom.

The last thing the method does is return a session for a specific repository. CMIS servers can serve more than one repository. In Alfresco’s case, there is only ever one, so it is safe to return the first one in the list.

Get the Target Folder

Okay, we’ve got a session with the CMIS server’s repository. The repository is a hierarchical tree of objects (folders and documents) similar to a local file system. The class is configured with a parent folder path and the name of a new folder that should be created in that parent folder. So the first thing we need to do is get a reference to the parent folder. My example getParentFolder() method just grabs the folder by path, like this:

Folder folder = (Folder) cmisSession.getObjectByPath(FOLDER_PATH);
return folder;

Now, given the parent folder and the name of a new folder, the createFolder() method attempts to create the new folder to hold our files:

Folder subFolder = null;
try {
  subFolder = (Folder) cmisSession.getObjectByPath(parentFolder.getPath() + "/" + folderName);
  System.out.println("Folder already existed!");
} catch (CmisObjectNotFoundException onfe) {
  Map props = new HashMap();
  props.put("cmis:objectTypeId",  "cmis:folder");
  props.put("cmis:name", folderName);
  subFolder = parentFolder.createFolder(props);
  String subFolderId = subFolder.getId();
  System.out.println("Created new folder: " + subFolderId);
}
return subFolder;

The folder is either going to already exist, in which case we’ll just grab it and return it, or it will need to be created. We can test the existence of the folder by trying to fetch it by path, and if it throws a CmisObjectNotFoundException, we’ll create it.

Look at the Map that is getting set up to hold the properties of the folder. The minimum required properties that need to be passed in are the type of folder to be created (“cmis:folder”) and the name of the folder to create. You might choose to extend your server’s content model with your own folder types. In this example, the out-of-the-box “cmis:folder” type is fine.

Set Up the Properties For Each New Document

Just like when the folder was created, every file we upload to the repository will have its own set of metadata. To make it interesting, though, we’ll provide more than just the type of document we want to create and the name of the document. In my example, I’m using a content model we created for the CMIS & Apache Chemistry in Action book. It contains several types. One of which is called “cmisbook:image”. The image type has attributes you’d expect that would be part of an image, like height, width, focal length, camera make, ISO speed, etc. In fact, if you use the OpenCMIS Workbench, you can inspect the type definition for cmisbook:image. Here’s a screenshot (click to enlarge):
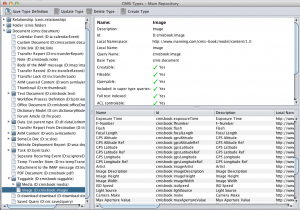
OpenCMIS Workbench, Type Inspector

Two of the properties I’m going to work with in this example are the latitude and longitude. Alfresco will automatically extract metadata like this when you add files to the repository. In fact, Alfresco already has a “geographic aspect” out-of-the-box that can be used to extract and store lat and long. But we wanted this content model to work with any CMIS repository and not all repositories support aspects (CMIS 1.1 call these “secondary types”) so the content model used in the book defines lat and long on the cmisbook:image type.

Because not all repositories know how to extract metadata, we’re going to use Apache Tika to do it in our client app.

The getProperties() method does this work. It returns a Map of properties that consists of the type of the object we want to create (“cmisbook:image”), the name of the object (the file name being uploaded), and the latitude and longitude. Here’s what that code looks like:

Map props = new HashMap();

String fileName = file.getName();
System.out.println("File: " + fileName);
InputStream stream = new FileInputStream(file);
try {
  Metadata metadata = new Metadata();
  ContentHandler handler = new DefaultHandler();
  Parser parser = new JpegParser();
  ParseContext context = new ParseContext();

  metadata.set(Metadata.CONTENT_TYPE, FILE_TYPE);

  parser.parse(stream, handler, metadata, context);
  String lat = metadata.get("geo:lat");
  String lon = metadata.get("geo:long");
  stream.close();

  // create a map of properties
  props.put("cmis:objectTypeId",  objectTypeId);
  props.put("cmis:name", fileName);
  if (lat != null && lon != null) {
    System.out.println("LAT:" + lat);
    System.out.println("LON:" + lon);
    props.put("cmisbook:gpsLatitude", BigDecimal.valueOf(Float.parseFloat(lat)));
    props.put("cmisbook:gpsLongitude", BigDecimal.valueOf(Float.parseFloat(lon)));
  }
} catch (TikaException te) {
  System.out.println("Caught tika exception, skipping");
} catch (SAXException se) {
  System.out.println("Caught SAXException, skipping");
} finally {
  if (stream != null) {
    stream.close();
  }
}
return props;

Now we have everything we need to upload the file to the repository: a session, the target folder, and a map of properties for each object being uploaded. All that’s left to do is upload the file.

Upload the File

The first thing the createDocument() method does is to make sure that we have a Map with the minimal set of metadata, which is the object type and the name. It’s conceivable that things didn’t go well in the getProperties() method, and if that is the case, this bit of code makes sure everything is in place:


String fileName = file.getName();

// create a map of properties if one wasn't passed in
if (props == null) {
  props = new HashMap<String, Object>();
}

// Add the object type ID if it wasn't already
if (props.get("cmis:objectTypeId") == null) {
  props.put("cmis:objectTypeId",  "cmis:document");
}

// Add the name if it wasn't already
if (props.get("cmis:name") == null) {
  props.put("cmis:name", fileName);
}

Next we use the file and the object factory on the CMIS session to set up a ContentStream object:

ContentStream contentStream = cmisSession.getObjectFactory().
  createContentStream(
    fileName,
    file.length(),
    fileType,
    new FileInputStream(file)
  );

And finally, the file can be uploaded.

Document document = null;
try {
  document = parentFolder.createDocument(props, contentStream, null);
  System.out.println("Created new document: " + document.getId());
} catch (CmisContentAlreadyExistsException ccaee) {
  document = (Document) cmisSession.getObjectByPath(parentFolder.getPath() + "/" + fileName);
  System.out.println("Document already exists: " + fileName);
}
return document;

Similar to the folder creating logic earlier, it could be that the document already exists, so we use the same find-or-create pattern here.

When I run this locally using a folder that contains five pics I snapped in Berlin, the output looks like this:

Created new folder: workspace://SpacesStore/2f576635-5058-4053-9a61-dad68939fdd2
File: augustiner.jpg
LAT:52.51387
LON:13.39111
Created new document: workspace://SpacesStore/b19755e1-74a2-4c1e-9eb5-a5bfd2c0ebd7;1.0
File: berlin_cathedral.jpg
LAT:52.51897
LON:13.39936
Created new document: workspace://SpacesStore/34aa7b80-9f09-4c07-a040-9aee94debf80;1.0
File: brandenburg.jpg
LAT:52.51622
LON:13.37783
Created new document: workspace://SpacesStore/6c02f8f6-accc-4997-be5c-601bc7131247;1.0
File: gendarmenmarkt.jpg
LAT:52.51361
LON:13.39278
Created new document: workspace://SpacesStore/44ff28e7-782a-46c3-b388-453fd8495472;1.0
File: old_museum.jpg
LAT:52.52039
LON:13.39926
Created new document: workspace://SpacesStore/03a85605-4a66-4f94-b423-82502efbca4a;1.0

Now Run Against Another Vendor’s Repo

What’s kind of cool, and what I think really demonstrates the great thing about CMIS, is that you can run this class against any CMIS repository, virtually unchanged. To demonstrate this, I’ll fire up the Apache Chemistry InMemory Repository we ship with the source code that accompanies the book because it is already configured with a custom content model that includes “cmisbook:image”. As the name suggests, this repository is a reference CMIS server available from Apache Chemistry that runs entirely in-memory.

To run the class against the Apache Chemistry InMemory Repository, we have to change the service URL and the content type ID, like this:

//public static final String CONTENT_TYPE = "D:cmisbook:image";
public static final String CONTENT_TYPE = "cmisbook:image";

//public static final String ATOMPUB_URL = ALFRESCO_API_URL + "alfresco/cmisatom";
public static final String ATOMPUB_URL = ALFRESCO_API_URL + "inmemory/atom";

And when I run the class, my photos get uploaded to a completely different repository implementation.

That’s It!

That’s a simple example, I know, but it illustrates fetching objects, creating new objects, including those of custom types, setting metadata, and handling exceptions all through an industry-standard API. There is a lot more to CMIS and OpenCMIS, in particular. I invite you to learn more by diving in to CMIS & Apache Chemistry in Action!

Alfresco Developer Series tutorial source code now on github

The source code for the tutorials in my Alfresco Developer Series has always been available to download as a zip. But for some reason I never put it in a project where we could collaborate on it. That’s fixed now. The code’s now on github. (Note that the source code that accompanies the Alfresco Developer Guide is on Google Code. I don’t intend to maintain that going forward and will instead focus on these github projects).

As part of that I’ve made sure that the content types, behaviors, actions, web scripts, and workflow tutorial code works on 4.0.d and 4.2.c. The original zips referenced in the tutorial PDF still work with the versions they were written for, of course, but if you grab the source from github, they’ll work on the version they are tagged for.

One thing I’ve realized as part of this is that with the actual tutorials in PDF, keeping the written instructions in sync with the code is tough. Maybe I should convert the tutorial text into markdown or something similar and check that into the source code repo as well. Let me know what you think about that idea.

Next step for the code is to convert from the old Ant-based Alfresco SDK to the new Maven-based SDK.

Alfresco Example: Share Dashlets that Retrieve Data from the Repository

If you need to learn how to write an Alfresco Share dashlet, hopefully you’ve already worked through the Hello World dashlets in the Share Extras project on Google Code. The rest of the dashlets in that project are either “mash-up” style dashlets that read data from third-party sites or dashlets that work with data from the Alfresco repository tier, but are of moderate to high complexity. What I think is missing is a dashlet that goes one small step beyond Hello World to show how to read and display a simple set of data from the repository tier. In this post I show you how to do just that.

I created the example I’m going to walk you through in response to a question someone posted in the forum. They asked, “How can I write a dashlet that will show basic metadata from the most recently-modified document in a given folder?”. I think this is something we haven’t explained to people–we show Hello World and we show dashlets from the other end of the spectrum, but nothing to illustrate this basic pattern. So I wrote a quick-and-dirty example. Fellow forum user, RikTaminaars, also got in on the act, making the dashlet configurable, which I’ll show in a subsequent post.

In this post, I’ll create the most basic implementation possible. The result is a simple dashlet that reads a path from a configuration file, asks the repository for the most recently modified document in that folder, then displays some basic metadata. In my next post, I’ll add to it by making the folder path configurable within the user interface.

Developer Setup

First, a bit about my setup. I’m running Alfresco 4.0.d Community, WAR distribution, Lucene for search, Tomcat application server, and MySQL for the database. I’m using Eclipse Indigo, but this implementation requires no compiled code. For organizing the project files I used the Sample Dashlet project structure from Share Extras. I’m using the Share Extras Ant build script to deploy my code from my project folder structure to the Alfresco and Share web applications.

When I’m doing Share customizations I use two Tomcats–one for the repository tier and one for the Share tier. This helps me avoid making assumptions about where my Alfresco and Share web applications are running and it speeds up my development because my Share Tomcat restarts very quickly. To get the Share Extras build script to work with a two Tomcats setup, I’ve added the following to a build.properties file in my home directory:

tomcat.home=/opt/apache/tomcat/apache-tomcat-6.0.32
tomcat.share.home=/opt/apache/tomcat81/apache-tomcat-6.0.32
tomcat.share.url=http://localhost:8081

Now the build script will know to put the deployed code in each of my Tomcat servers.

The Data Web Script/Presentation Web Script Pattern

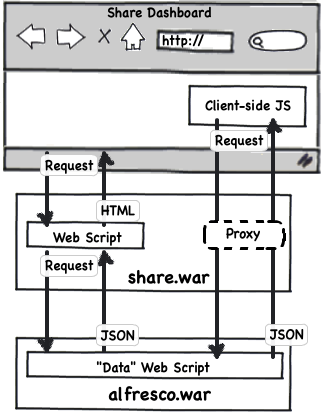
The Alfresco repository runs in a web application called “alfresco” while the Share user interface runs in a separate web application called “share”. Each of these two web applications has its own web script engine. If you aren’t familiar with web scripts, take a look at this tutorial, then come back, or just accept the high-level notion that web scripts are an MVC framework used to bind URLs to code and that web scripts can run on the repository tier as well as the Share tier.

Share dashlets–the “boxes” of content that display in the Share user interface–are just web scripts that return HTML. In fact, everything you see in Share is ultimately a web script. When a dashlet needs to display data from the Alfresco repository, it makes a call over HTTP to invoke a web script running on the repository tier. The repository tier web script responds, usually with JSON. The dashlet gets what it needs from the JSON, then renders outputs HTML to be rendered as part of the page. Because the repository tier web script responds with raw data, you may see these referred to as “data web scripts”.

In the previous paragraph, I was purposefully vague about where the request to the repository tier is made. That’s because there are two options. The first option, and the one we’ll use in this example, is to make the call from the dashlet’s web script controller. This might be called “the server-side option” because once the dashlet’s view is rendered, it has all of the data it needs–no further calls are needed.

The second option is to make AJAX calls from the client browser. To avoid cross-site scripting limitations, these calls typically go through a proxy that lives in the Share application, but their ultimate destination is the repository tier.

Two tier web scripts

You may be wondering about the details of making these remote connections. It’s all taken care of for you. Regardless of whether you make the remote invocation of the repository web script from the Share tier or through AJAX in the browser, all you need to specify is the URL you want to invoke and the framework handles everything else.

Show Me the Code: Repository Tier

Let’s walk through the code. I’ll start with the repository tier. Recall that the requirements are to find the most recently modified document in a given folder and return its metadata. There may be out-of-the-box web scripts that could be leveraged to return the most recently modified document, but this is actually very simple to do and I don’t want to have to worry about those out-of-the-box web scripts changing in some subsequent release, so I’m implementing this myself.

Using the Share Extras project layout, repository tier web scripts reside under config/alfresco/templates/webscripts. The best practice is to place your web script files in a package structure beneath that, so I am using “com/someco/components/dashlets” for my package structure. Yours would be different.

The first thing to think about is what the URL should look like. I want it to be unique and I need it to accept an argument. The argument is the folder path to be searched. For this example, my URL will look like this:

/someco/get-latest-doc?filterPathView={filterPathView}

If you’ve worked with web scripts, you know that a “path” pattern could be followed instead of a “query string” pattern but it doesn’t really matter for this example. The descriptor, get-latest-doc.get.desc.xml, declares the URL and other details about authentication and transaction requirements.

The controller performs the search and populates the model with data. This is a GET, so the controller is named get-latest-doc.get.js. Look at the source for the complete listing–I’ll just hit the high points.

First, I grab a handle to the folder represented by the path argument:

var folder = companyhome.childByNamePath(args.filterPathView);

Then I use the childFileFolders() method to get the most recently modified file and stick that in the model:

var results = folder.childFileFolders(true, false, 'cm:folder', 0, 1, 0, 'cm:modified', false, null);
model.latestDoc = files[0];

Obviously, I could have used a search here, but this method is quite handy. It must be new (thanks, Rik!).

The view then takes the data in the model and returns some of the metadata as JSON:

<#macro dateFormat date>${date?string("dd MMM yyyy HH:mm:ss 'GMT'Z '('zzz')'")}</#macro>
<#escape x as jsonUtils.encodeJSONString(x)>
{
"nodeRef": "${latestDoc.nodeRef}",
"name": "${latestDoc.properties.name}",
"title": "${latestDoc.properties.title!}",
"description": "${latestDoc.properties.description!}",
"created": "<@dateFormat latestDoc.properties.created />",
"modified": "<@dateFormat latestDoc.properties.modified />"
}
</#escape>

Note the exclamation points at the end of the title and description. That will keep the template from blowing up if those values are not set.

That’s all there is to the repository tier. If you want to add additional metadata, custom properties, or data from elsewhere in the repo, it is easy to do that.

At this point you should be able to deploy (run ant hotcopy-tomcat-jar, for example) and test the repository tier web script by pointing your browser to: http://localhost:8080/alfresco/s/someco/get-latest-doc?filterPathView=/Some/Folder/Path

Show Me the Code: Share Tier

Okay, the back-end is ready to return the data I need. Now for the front-end. The Share Extras project structure puts front-end web scripts in config/alfresco/site-webscripts so following a similar pattern as I did for the repository-tier web scripts, I put my share-tier web scripts into the site-webscripts folder under com/someco/components/dashlets.

The descriptor, get-latest-doc.get.desc.xml, declares a URL for the dashlet and specifies the “dashlet” family. This will make the dashlet appear in the “add dashlets” menu for both the global dashboard and the site dashboard.

I want to make the folder path configurable, so I created get-latest-doc.get.config.xml and used it to specify a title for the dashlet and the default folder path. I’ll read in this configuration from the controller.

As I mentioned, we’re doing everything server-side in this example, so the controller needs to call the web script I deployed to the repository tier to retrieve the JSON. Then it can put that object into the model and let the view format it as it sees fit. The controller lives in get-latest-doc.get.js and starts out by reading the configuration XML:

Then it uses the built-in “remote” object to invoke the repository tier web script and puts the result into the model:

Note that the URL starts with my web script’s URL–it includes nothing about where to find the Alfresco repository. That’s because the “end point” is declared in Share’s configuration (to be precise, it is actually Surf configuration, the framework on which Share is built) and the remote object uses the “alfresco” endpoint by default. I don’t see it used very often, but you can actually define your own end points and invoke them using the remote object.

The last part of this example is the HTML markup for the dashlet itself. The first half of get-latest-doc.get.html.ftl is boilerplate that has to do with the dashlet resizer. For this example, the length of the list is static–it will only ever have one entry. So the resizer is kind of overkill. The bottom half is where the markup for the document’s metadata lives:

If you’ve already worked with web scripts, you know that get-latest-doc.get.head.ftl is used to place resources into “<head>”. In this case, that is a CSS file used to style our dashlet and client-side JavaScript used by the resizer. The strings used in the dashlet are localized through the get-latest-doc.get.properties file.

Test It Out

You should be able to test this out yourself by creating a folder anywhere in the repository, adding one or more files to the folder, specifying that folder path in the get-latest-doc.get.config.xml file, and then using “ant deploy hotcopy-tomcat-jar” to deploy the customizations to the alfresco and share web applications. You’ll need to restart Tomcat to pick up the new JAR (both Tomcats if you are running two). Then, login and click “Customize Dashboard” to add the “Get Latest Document” dashlet to your dashboard. It should look something like this:

Screenshot: Get Latest Document Dashlet

Summary

This is a simple example, but it is powerful because it is the same pattern used throughout Share: A dashlet needs data from the repository tier, so its web script controller uses the “remote” object to call a web script on the repository tier. The repository tier web script returns JSON which the Share tier web script then formats into a nice looking dashlet.

In my next post, I’ll show how to make the folder path configurable, so that you can change it at run-time with a folder picker in the Share user interface instead of editing the config XML.

Alfresco tutorial: Advanced Workflows using Activiti

In 2007, I wrote a tutorial on Alfresco’s advanced workflows which I later used as the basis for the workflow chapter in the Alfresco Developer Guide. It showed examples using jBPM and the old Alfresco Explorer web client.

Then, in April of 2011 I posted a short article comparing Alfresco workflows built with jBPM to the same workflows built with Activiti, the new advanced workflow engine embedded in Alfresco 4. The article provided a quick glimpse into the new Activiti engine aimed at those who had heard about the Alfresco-sponsored project.

Today I’m making available the 2nd edition of the advanced workflow tutorial. It combines the SomeCo whitepaper example from 2007 with a few hello world examples to show you how to use the Activiti Process Designer Eclipse plug-in and the Activiti engine to design and run the example workflows, including how to configure your workflows in the Alfresco Share web client.

The accompanying source code builds on the workflow model and associated customizations created in the 2nd editions of the custom content types and custom actions tutorials.

UPDATE 7/18/2013: Thanks to a user on #alfresco who reported a bug in the sample workflows that have a UI. None of those workflows could be started in Alfresco Community Edition 4.2.c. I have corrected the bug. So if you are using 4.2.c, please use this zip instead.

Special thanks go to Joram Barrez and Tijs Rademakers for reviewing the tutorial and providing valuable feedback. Both are on the Activiti team. In fact, Tijs has been working on an Activiti book called Activiti in Action which should be out soon, so keep an eye out for that.

Anyway, take a look and let me know what you think.

Custom Data Lists in Alfresco Share Community 3.3

One of the new features of Alfresco 3.3 Community is Data Lists. The ability to create an arbitrary list within a team collaboration site is a feature so loved by SharePoint users, it is often cited as one of the things holding back a migration to Alfresco. I agree that it’s a useful feature and I’m glad to see it making its way into Alfresco Share. Let’s take a look at the new feature, then we’ll lift up the hood to see how it works so you can implement your own custom data lists.

Quick Review of Data Lists in Alfresco Share

First, take a look at this screencast. It shows the new Data List feature in action as well as the high-level steps needed to create your own custom Data Lists.

As you can see, Data Lists let you keep track of team information that lends itself to being managed by classic web form interactions and displayed in sortable columns. You can probably think of a lot of examples of things your team needs to track that don’t make sense in a blog or a document library or maybe need a little more structure than the wiki. The screencast showed To Do’s and Issues but it could really be anything.

In the Community 3.3 releases, Alfresco Share includes To Do Lists. It sounds like more Data List examples are coming in the 3.3g release. But if you want to add your own custom data list type, it’s really easy, especially if you’re familiar with Alfresco content models (tutorial). However, right now, this still requires XML editing. SharePoint allows lists to be defined on-the-fly, so while Alfresco’s roadmap does have this as something to address in the future, right now this is still a gap between the two products.

If you are interested in just the end-user functionality of Data Lists in Alfresco Share, this is where you should bail. If you want details on what’s going on behind the scenes, keep reading…

How Data Lists are Implemented

Data Lists are persisted as nodes in the repository. One node represents the list itself–it contains child nodes for each item in the list. The data values for each list item are stored as metadata on the node–sometimes we call these “content-less objects” because there is no file content associated with them. The nodes live in the DM repository just like data from the other tools in your Share site.

If you want to see this for yourself, go into the Explorer Client. In the Sites folder, there is a folder for Share site and within that, a folder for each site tool. Data List nodes reside in the one called dataLists. In the back of your mind you should be thinking that this means items in a Data List can trigger rules and be routed through workflows just like any other node. In fact, any API call that can work with a node can work with an entry in a Data List, including CMIS. (Shameless plug: “Heck, you could even create Data Lists with Python using cmislib!”)

You know from working with data models that each Alfresco data model has an XML file that describes it. If you go look at the out-of-the-box model directory you’ll see a new content model XML file called datalistModel.xml. If you take a look at that file, you’ll see that the node that represents the container of list items is an instance of dl:dataList which inherits from cm:folder.

The nodes that represent each item on the data list are instances of specific data list types. So, for example, the out-of-the-box To Do List has items that are of type dl:todoList. In my Issues example, Issue items are instances of scidl:issuesList. All data list item types must inherit from dl:dataListItem. For one thing, that’s how the Share user interface knows what to offer as an available data list type.

The form that’s displayed when you create and edit new Data List items is configured through the Alfresco Form Service. In my example I didn’t do anything fancy with the form, but you’ve got the full power of the new Alfresco Form Service behind you so you’re not limited to simply listing one field after another.

So, creating your own custom Data List types involves two steps:

  1. Define and deploy a custom content model for your new Data List type, making sure it inherits from dl:dataListItem.
  2. Configure the Alfresco Form Service in the Alfresco Share application to display the metadata from the custom Data List in the create and edit forms as well as in the browse grid.

In my example, I used an AMP to deploy the content model to the repository tier (my Alfresco WAR) and a JAR to deploy the form service configuration to the presentation tier (the Share WAR).

If you want to try this example in your own environment, you can download the Eclipse project here. It includes an Ant build file, the content model, and the form configuration. Note that I deployed the Forms Development Kit to both the Alfresco and Share WARs prior to deploying my Data List form configuration. The example assumes you’ve done the same. If you don’t want to fool with the FDK, that’s cool, it’s not required for data lists. You may want to look at the Forms Development Guide for tips.

New Tutorial: Getting Started with CMIS

I’ve written a new tutorial on the proposed Content Management Interoperability Services (CMIS) standard called, “Getting Started with CMIS“. The tutorial first takes you through an overview of the specification. Then, I do several examples. The examples start out using curl to make GET, PUT, POST, and DELETE calls against Alfresco to perform CRUD functions on folders, documents, and relationships in the repository. If you’ve been dabbling with CMIS and you’ve struggled to find examples, particularly of POSTs, here you go.

I used Alfresco Community built from head, but yesterday, Alfresco pushed a new Community release that supports CMIS 1.0 Committee Draft 04 so you can download that, use the hosted Alfresco CMIS repository, or spin up an EC2 image (once Luis gets it updated with the new Community release). If you don’t want to use Alfresco you should be able to use any CMIS repository that supports 1.0cd04. I tried some, but not all, of the command-line examples against the Apache Chemistry test server.

Once you’ve felt both the joy and the pain of talking directly to the CMIS AtomPub Binding, I take you through some very short examples using JavaScript and Java. For Java I show Apache Abdera, Apache Chemistry, and the Apache Chemistry TCK.

For the Chemistry TCK stuff, I’m using Alfresco’s CMIS Maven Toolkit which Gabriele Columbro and Richard McKnight put together. That inspired me to do my examples with Maven as well (plus, it’s practical–the Abdera and Chemistry clients have a lot of dependencies, and using Maven meant I didn’t have to chase any of those down).

So take a look at the tutorial, try out the examples with your favorite CMIS 1.0 repo, and let me know what you think. If you like it, pass it along to a friend. As with past tutorials, I’ve released it under Creative Commons Attribution-Share Alike.

[Updated to correct typo with Gabriele’s name. Sorry, Gab!]

Alfresco 3.1 clustering easier with JGroups

Optaros has worked on some of the largest and most complex Alfresco implementations anywhere. Projects where multi-node read-write clusters are required have been particularly challenging. So when Alfresco announced clustering improvements in 3.1 my interest was piqued.

I decided I’d do a simple test: Get a two-node read-write Alfresco 3.1 cluster running using a shared MySQL database and a shared file store (as opposed to a replicated database and a replicated file store). The process is mostly documented here but I thought I’d capture the steps I went through in case someone finds them helpful.

Prepare the virtual machines

If you already have virtual or physical machines ready to go, go on to “Setup the content store & database”.

I already had an Ubuntu server virtual machine image with everything I needed for the test. I upgraded it to Alfresco 3.1, cleared out the repository, and verified that everything was working okay. In order to share my data directory via NFS I did need to use apt-get to install nfs-kernel-server, nfs-common, and portmap, but that’s no big deal.

Once I had the first image all set it was time to create a second. I’m using Sun’s VirtualBox for virtualization. It doesn’t have a “clone” command in the UI and you can’t simply do a file copy of the VDI file. Instead, you have to use VBoxManage on the command line. The form of the command that uses the source VDI file name and target file name didn’t work, but using the source VDI UUID did:

BoxManage clonevdi 19a7646e-d5cb-4e01-90fd-2bcd556dc1d5 "Ubuntu Test Server Clone.vdi"

It was weird that I had to use the source UUID instead of the file name, but I got what I wanted.

Setup the network

I used VirtualBox “host only” networking for ease of setup. This allowed my host machine to see the images and the images to see each other.

My server image was originally set up to use DHCP. That appeared to be giving Alfresco and JGroups trouble so I converted the images to use static IP addresses, unique host names, and updated hosts files (I didn’t want to set up DNS). That left me with three machines (one host and two virtual machines called node1 and node2) that could ping each other by name.

Setup the content store & database

At this point I’ve got two identical Alfresco servers, but each have their own database and data store. For my test, they needed to point to the same database. They also needed to share the content store but have their own local Lucene index.

For this test I decided to use the database and file system on node1 for both nodes. In real life, that wouldn’t be a good setup because losing node1 would bring down the whole cluster. For a shared db/file system setup, you’d want separate nodes, each clustered, for the db and file system.

My Alfresco content store is in “/srv”. I wanted to use NFS to share the content store with the other nodes in my cluster, so I edited /etc/exports to add a new entry for the “/srv” directory. I used an IP address range here but I could have used explicit host names.

/srv 192.168.56.0/25(rw,no_root_squash,async)

You have to restart the nfs-kernel to make that change take effect:

/etc/init.d/nfs-kernel-server restart

Then, I split out the content and index stores into three directories:

/srv/alfresco-3.1-enterprise
/srv/alfresco-3.1-enterprise-local-index
/srv/alfresco-3.1-enterprise-local-index-backup

And updated custom-repository.properties accordingly:

dir.root=/srv/alfresco-3.1-enterprise
dir.indexes=/srv/alfresco-3.1-enterprise-local-index
dir.indexes.backup=/srv/alfresco-3.1-enterprise-local-index-backup

The second node will access the database remotely, so MySQL needed to know about that:

grant all on alfresco31e.* to 'alfresco31e'@'192.168.56.4' identified by 'alfresco31e' with grant option;

Later it seemed that node1 was accessing MySQL via its static IP address rather than localhost as it used to. Rather than figure out why or where that’s config’d, I just ran the same command as the above for node1’s static IP.

With node1 all set, it was time to give node2 some attention…

My original plan was to NFS mount the node1 data directory as something like “/srv/alfresco-labs-3d-shared” because using the same directory name I would have used on a single node seemed confusing. As it turned out, I think Alfresco must keep track of that data directory name because it complained that my “dir.root” was set incorrectly. So I wound up using the same directory names that I used on node1 and making the same update to custom-repository.properties:

dir.root=/srv/alfresco-3.1-enterprise
dir.indexes=/srv/alfresco-3.1-enterprise-local-index
dir.indexes.backup=/srv/alfresco-3.1-enterprise-local-index-backup

Then I mounted the data directory:

mount 192.168.56.3:/srv/alfresco-3.1-enterprise /srv/alfresco-3.1-enterprise

I didn’t do it, but it would be smart to update /etc/fstab so that the data directory would be automatically mounted on server startup.

With that the data directories are all set. Telling node2 to use the database on node1 instead of localhost was a simple custom-repository.properties change:

db.url=jdbc:mysql://node1.alfresco.jpotts.com/alfresco31e

Now node1 and node2 are pointing to the same content store and database, and each have their own Lucene index. The last step was to configure the cluster.

Configure the cluster

Configuring the cluster involved enabling the sample ehcluster-config.xml and making a few small changes to custom-repository.properties.

To enable the ehcluster-config, I copied the ehcluster-config.xml.sample file that came with the sample extensions to ehcluster-config.xml to my extensions directory. No other changes were needed in this particular case.

In custom-repository.properties, you have to assign a cluster name to activate the cluster. The index recovery mode needs to be set to AUTO so the indexes stay in sync:

alfresco.cluster.name=testcluster
index.recovery.mode=AUTO

In Alfresco 3.1, Alfresco uses JGroups to discover and coordinate cluster members. It has configurable protocols it uses for cluster member communication. The default is set to UDP but I couldn’t get that to work, so I changed it to TCP. I also found that I had to list the hosts in my cluster in order for the two nodes to find each other:

alfresco.jgroups.defaultProtocol=TCP
alfresco.tcp.initial_hosts=node1.alfresco.jpotts.com[7800],node2.alfresco.jpotts.com[7800]

As you can see, most of the work was really about networking and data setup. The cluster configuration itself is actually pretty minimal.

Test the cluster

Before starting Tomcat on the two nodes, I enabled a log4j logger so I could see nodes join and leave the cluster:

log4j.logger.org.alfresco.enterprise.repo.cache.jgroups=INFO

After starting up Tomcat, I eventually saw this in catalina.out:

06:24:52,043 INFO [repo.jgroups.AlfrescoJGroupsChannelFactory]
Created JChannelFactory:
Cluster Name: testcluster
Stack Mapping: {DEFAULT=TCP}
Configuration: file:/opt/apache/apache-tomcat-5.5.27/webapps/alfresco/WEB-INF/classes/alfresco/jgroups-default.xml

——————————————————-
GMS: address is 192.168.56.3:7800
——————————————————-

When the second node joined the cluster, the first node knew about it:

06:26:21,241 INFO [cache.jgroups.JGroupsKeepAliveHeartbeatReceiver]
New cluster view with additional members:
Last View: null
New View: [192.168.56.3:7800|1] [192.168.56.3:7800, 192.168.56.4:7800]

Once the nodes could see each other it was time to test it out from an end-user perspective. Obviously, in production you’ll have a load-balancer in front of these two nodes. For testing the cluster, though, you want to be able to hit each node specifically. I used two different browsers on the host machine logging in as two different users. There are some short test scenarios on the Alfresco wiki. In addition to those, you might want to:

  • Create, delete, and update content while a second node is shut down. Start the second node and see if you can navigate to, search for, and read the properties of content as you would expect. Note that it may take a few seconds for the cache and Lucene index to update.
  • Check out content in one browser and verify that it is checked out on the other.
  • Simultaneously edit content properties.
  • Open the edit properties page in one browser and delete the object in another.

That’s it
In a real-world production environment you often have numerous networking issues to deal with that makes this more of a headache, but hopefully this gives you an idea of the basic steps involved, and shows you how to get familiar with it by setting up your own test cluster using virtual machines.

Grasping Thumbnails in Alfresco 3

With Alfresco 3 (both Labs and Enterprise), Alfresco added a new thumbnail service. It isn’t documented too well yet so I thought I’d write up a quick example.

What is it

The Thumbnail Service is used to create alternate renditions of objects. Typically, those alternate renditions are small images called “thumbnails”. You can see a working application of the thumbnail service if you take a look at Alfresco Share’s document library. When you upload a document, the thumbnail service is invoked, and a small image is shown next to each item in the list.

Where thumbnails live

Like everything else in Alfresco, thumbnails are stored as nodes. Nodes are instances of cm:thumbnail and are stored as children of the object they represent. (You can see this for yourself by looking at the thumbnailed object in the node browser). Objects can have any number of thumbnails. This lets you have thumbnails of different sizes and mime types, for example.

Once Alfresco generates a thumbnail for an object, the object will have the cm:thumbnailed aspect applied to it so it is easy to find or filter objects based on whether or not they have at least one thumbnail.

Thumbnail definitions & thumbnail names

Every thumbnail has a thumbnail definition. The thumbnail definition keeps track of things like the mime type, transformation options, placeholder path, and thumbnail name. The thumbnail name uniquely identifies the thumbnail definition in the thumbnail registry. When you want to generate or display a thumbnail for an object, you must specify the name. For example, given a thumbnail definition named “scImageThumbnail”, you could use JavaScript to create a thumbnail for an object by calling the “createThumbnail” method on a ScriptNode like this:

document.createThumbnail("scImageThumbnail", true);

The first argument is the name of the thumbnail definition. The second argument says the thumbnail should be generated asynchronously.

Registering thumbnail definitions

The thumbnail registry needs to know about your thumbnail definitions. The out-of-the-box thumbnails are registered in the thumbnail-service-context.xml file. I don’t see a clean way to extend that without repeating the definitions, so in my example, I wrote a bean that calls the Thumbnail Registry and registers the custom thumbnail definitions provided in the Spring context file:


public class ThumbnailRegistryBootstrap {
  private ThumbnailService thumbnailService;
  private List<ThumbnailDefinition> thumbnailDefinitions;
  private Logger logger = Logger.getLogger(ThumbnailRegistryBootstrap.class);

public void init() {
  ThumbnailRegistry thumbnailRegistry = thumbnailService.getThumbnailRegistry();
    for (ThumbnailDefinition thumbDef : thumbnailDefinitions) {
      logger.info("Adding thumbnail definition:" + thumbDef.getName());
      thumbnailRegistry.addThumbnailDefinition(thumbDef);
    }
}

public void setThumbnailService(ThumbnailService thumbnailService) {
  this.thumbnailService = thumbnailService;
}

public void setThumbnailDefinitions(
  List<ThumbnailDefinition> thumbnailDefinitions) {
  this.thumbnailDefinitions = thumbnailDefinitions;
}

}

So this class will add all of my thumbnail definitions to the thumbnail registry. The class and the definitions are configured in a Spring context file. The config for a single thumbnail called “scImageThumbnail” which is a PNG 100 pixels high and retains the original aspect ratio of the image would be:


<bean id="someco.thumbnailRegistry"
 class="com.someco.thumbnails.ThumbnailRegistryBootstrap"
 depends-on="ThumbnailService"
 init-method="init">
  <property name="thumbnailService" ref="ThumbnailService" />
  <property name="thumbnailDefinitions">
    <list>
      <bean class="org.alfresco.repo.thumbnail.ThumbnailDefinition">
        <property name="name" value="scImageThumbnail" />
        <property name="mimetype" value="image/png"/>
        <property name="transformationOptions">
          <bean  class="org.alfresco.repo.content.transform.magick.ImageTransformationOptions">
            <property name="resizeOptions">
              <bean class="org.alfresco.repo.content.transform.magick.ImageResizeOptions">
              <property name="height" value="100"/>
              <property name="maintainAspectRatio" value="true"/>
              <property name="resizeToThumbnail" value="true" />
            </bean>
          </property>
        </bean>
     </property>
     <property name="placeHolderResourcePath" value="alfresco/extension/thumbnail/thumbnail_placeholder_scImageThumbnail.png" />
   </bean>
 </list>
 </property>
</bean>

The placeholder is a graphic that the thumbnail service can return as the thumbnail if the thumbnail for a given node has not been generated. In my example I just copied one of the out-of-the-box placeholders and renamed it but you could use anything you want there.

Example

I built a simple example to show how this works. Here is a screencast that shows it running or you can download the source and build it yourself.

In the example, a simple form is presented to allow a file to be uploaded. The form posts to a web script which creates a new node using the file provided. The form GET and POST web scripts are essentially the “helloworldform” web scripts from the Alfresco Developer Guide.

The “image list” is a simple GET web script that queries the folder where the images are uploaded to and writes out a list of image tags. The interesting thing to note here is the URL that’s used:

${url.serviceContext}/api/node/workspace/SpacesStore/${image.id}/content/thumbnails/scImageThumbnail?ph=true&c=queue

That URL is an out-of-the-box web script that returns the specified thumbnail for a given node reference. In my example I’m using the “ph” and “c” arguments. The “ph” argument says whether or not the placeholder image should be returned if the thumbnail does not exist. The “c” argument says that if a thumbnail doesn’t exist, queue a request for thumbnail creation. (Note that the descriptor says the queue create argument is “qc” but if you look at the controller source you’ll see it is actually just “c”. I’ll check to see if there’s a Jira on that).

When you add a new image and then go to the image list you’ll see the placeholder graphic. Behind the scenes, a thumbnail creation request has been queued. If you refresh the page, the thumbnail should show up because Alfresco has had a chance to generate it. If you wanted to queue the request when the node is created, you could either create a rule on the folder that holds the images, or you could add a call to “createThumbnail” in the upload POST web script controller, as shown earlier. (I’ve got an example of that commented out in the source).

That’s it

Hopefully this has given you some insight into the new thumbnail service in Alfresco. If you want to play with it yourself, you can download the source for the example and build it with Ant (make sure you set build.properties to match your environment first) by running “ant deploy”. Make sure you’ve got ImageMagick installed on your Alfresco server–the thumbnail service depends on it. You’ll also need the SDK to compile the registry bootstrap class. If you want to see what the thumbnail service is actually doing you’ll need the Alfresco source. None of the thumbnail source is included in the source code that currently accompanies the SDK.