Tag: OpenCMIS

CMIS example: Uploading multiple files to a CMIS repository

In my previous post on CMIS, I introduced the Content Management Interoperability Services (CMIS) specification and the Apache Chemistry project. You learned that CMIS gives you a language-neutral, vendor-independent way to perform CRUD functions against any CMIS-compliant server using a standard API. I showed a simple CMIS query being executed from a Groovy script running in the OpenCMIS Workbench.

Now I’d like to get a little more detailed and show a simple use case: I’ll use the OpenCMIS client library for Java to upload some files from my local machine to a CMIS repository. In my case, that repository is Alfresco 4.2.c Community Edition running locally, but this code should work with any CMIS-compliant server from vendors like IBM, EMC, Microsoft, Nuxeo, and so on. I’ll include the relevant snippets, but if you want to follow along, the full source code for this example lives here. I use that example to show the same code working against Alfresco in the cloud and Alfresco on-premise. If you are running against on-premise only or some other CMIS server, it has a few dependencies that won’t be relevant to you.

LoadFiles.java is a runnable Java class. The main method simply calls doExample(). That method grabs a session, gets a handle to the destination folder for the files on the local machine, and then, for each file in the local machine’s directory, it creates a hashmap of metadata values, then uploads each file and its associated metadata to the repository. Let’s look at each of these pieces in turn.

Get a Session

The first thing you need is a session. I have a getCmisSession() method that knows how to get one, and it looks like this:

SessionFactory factory = SessionFactoryImpl.newInstance();
Map parameter = new HashMap();

// connection settings
parameter.put(SessionParameter.ATOMPUB_URL, ATOMPUB_URL);
parameter.put(SessionParameter.BINDING_TYPE, BindingType.ATOMPUB.value());
parameter.put(SessionParameter.AUTH_HTTP_BASIC, "true");
parameter.put(SessionParameter.USER, USER_NAME);
parameter.put(SessionParameter.PASSWORD, PASSWORD);

List repositories = factory.getRepositories(parameter);

return repositories.get(0).createSession();

As you can see, establishing a session is as simple as providing the username, password, binding, and service URL. The binding is the protocol we’re going to use to talk to the server. In CMIS 1.0, usually the best choice is the Atom Pub binding because it is faster than the Web Services binding, the only other alternative. CMIS 1.1 adds a browser binding that is based on HTML forms and JSON but I won’t cover that here.

The other parameter that gets set is the service URL. This is server-specific. For Alfresco 4.x or higher, the CMIS 1.0 Atom Pub URL is http://localhost:8080/alfresco/cmisatom.

The last thing the method does is return a session for a specific repository. CMIS servers can serve more than one repository. In Alfresco’s case, there is only ever one, so it is safe to return the first one in the list.

Get the Target Folder

Okay, we’ve got a session with the CMIS server’s repository. The repository is a hierarchical tree of objects (folders and documents) similar to a local file system. The class is configured with a parent folder path and the name of a new folder that should be created in that parent folder. So the first thing we need to do is get a reference to the parent folder. My example getParentFolder() method just grabs the folder by path, like this:

Folder folder = (Folder) cmisSession.getObjectByPath(FOLDER_PATH);
return folder;

Now, given the parent folder and the name of a new folder, the createFolder() method attempts to create the new folder to hold our files:

Folder subFolder = null;
try {
  subFolder = (Folder) cmisSession.getObjectByPath(parentFolder.getPath() + "/" + folderName);
  System.out.println("Folder already existed!");
} catch (CmisObjectNotFoundException onfe) {
  Map props = new HashMap();
  props.put("cmis:objectTypeId",  "cmis:folder");
  props.put("cmis:name", folderName);
  subFolder = parentFolder.createFolder(props);
  String subFolderId = subFolder.getId();
  System.out.println("Created new folder: " + subFolderId);
}
return subFolder;

The folder is either going to already exist, in which case we’ll just grab it and return it, or it will need to be created. We can test the existence of the folder by trying to fetch it by path, and if it throws a CmisObjectNotFoundException, we’ll create it.

Look at the Map that is getting set up to hold the properties of the folder. The minimum required properties that need to be passed in are the type of folder to be created (“cmis:folder”) and the name of the folder to create. You might choose to extend your server’s content model with your own folder types. In this example, the out-of-the-box “cmis:folder” type is fine.

Set Up the Properties For Each New Document

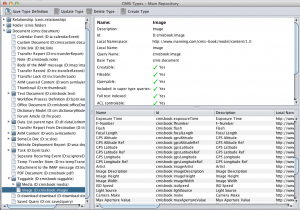
Just like when the folder was created, every file we upload to the repository will have its own set of metadata. To make it interesting, though, we’ll provide more than just the type of document we want to create and the name of the document. In my example, I’m using a content model we created for the CMIS & Apache Chemistry in Action book. It contains several types. One of which is called “cmisbook:image”. The image type has attributes you’d expect that would be part of an image, like height, width, focal length, camera make, ISO speed, etc. In fact, if you use the OpenCMIS Workbench, you can inspect the type definition for cmisbook:image. Here’s a screenshot (click to enlarge):

OpenCMIS Workbench, Type Inspector

Two of the properties I’m going to work with in this example are the latitude and longitude. Alfresco will automatically extract metadata like this when you add files to the repository. In fact, Alfresco already has a “geographic aspect” out-of-the-box that can be used to extract and store lat and long. But we wanted this content model to work with any CMIS repository and not all repositories support aspects (CMIS 1.1 call these “secondary types”) so the content model used in the book defines lat and long on the cmisbook:image type.

Because not all repositories know how to extract metadata, we’re going to use Apache Tika to do it in our client app.

The getProperties() method does this work. It returns a Map of properties that consists of the type of the object we want to create (“cmisbook:image”), the name of the object (the file name being uploaded), and the latitude and longitude. Here’s what that code looks like:

Map props = new HashMap();

String fileName = file.getName();
System.out.println("File: " + fileName);
InputStream stream = new FileInputStream(file);
try {
  Metadata metadata = new Metadata();
  ContentHandler handler = new DefaultHandler();
  Parser parser = new JpegParser();
  ParseContext context = new ParseContext();

  metadata.set(Metadata.CONTENT_TYPE, FILE_TYPE);

  parser.parse(stream, handler, metadata, context);
  String lat = metadata.get("geo:lat");
  String lon = metadata.get("geo:long");
  stream.close();

  // create a map of properties
  props.put("cmis:objectTypeId",  objectTypeId);
  props.put("cmis:name", fileName);
  if (lat != null && lon != null) {
    System.out.println("LAT:" + lat);
    System.out.println("LON:" + lon);
    props.put("cmisbook:gpsLatitude", BigDecimal.valueOf(Float.parseFloat(lat)));
    props.put("cmisbook:gpsLongitude", BigDecimal.valueOf(Float.parseFloat(lon)));
  }
} catch (TikaException te) {
  System.out.println("Caught tika exception, skipping");
} catch (SAXException se) {
  System.out.println("Caught SAXException, skipping");
} finally {
  if (stream != null) {
    stream.close();
  }
}
return props;

Now we have everything we need to upload the file to the repository: a session, the target folder, and a map of properties for each object being uploaded. All that’s left to do is upload the file.

Upload the File

The first thing the createDocument() method does is to make sure that we have a Map with the minimal set of metadata, which is the object type and the name. It’s conceivable that things didn’t go well in the getProperties() method, and if that is the case, this bit of code makes sure everything is in place:


String fileName = file.getName();

// create a map of properties if one wasn't passed in
if (props == null) {
  props = new HashMap<String, Object>();
}

// Add the object type ID if it wasn't already
if (props.get("cmis:objectTypeId") == null) {
  props.put("cmis:objectTypeId",  "cmis:document");
}

// Add the name if it wasn't already
if (props.get("cmis:name") == null) {
  props.put("cmis:name", fileName);
}

Next we use the file and the object factory on the CMIS session to set up a ContentStream object:

ContentStream contentStream = cmisSession.getObjectFactory().
  createContentStream(
    fileName,
    file.length(),
    fileType,
    new FileInputStream(file)
  );

And finally, the file can be uploaded.

Document document = null;
try {
  document = parentFolder.createDocument(props, contentStream, null);
  System.out.println("Created new document: " + document.getId());
} catch (CmisContentAlreadyExistsException ccaee) {
  document = (Document) cmisSession.getObjectByPath(parentFolder.getPath() + "/" + fileName);
  System.out.println("Document already exists: " + fileName);
}
return document;

Similar to the folder creating logic earlier, it could be that the document already exists, so we use the same find-or-create pattern here.

When I run this locally using a folder that contains five pics I snapped in Berlin, the output looks like this:

Created new folder: workspace://SpacesStore/2f576635-5058-4053-9a61-dad68939fdd2
File: augustiner.jpg
LAT:52.51387
LON:13.39111
Created new document: workspace://SpacesStore/b19755e1-74a2-4c1e-9eb5-a5bfd2c0ebd7;1.0
File: berlin_cathedral.jpg
LAT:52.51897
LON:13.39936
Created new document: workspace://SpacesStore/34aa7b80-9f09-4c07-a040-9aee94debf80;1.0
File: brandenburg.jpg
LAT:52.51622
LON:13.37783
Created new document: workspace://SpacesStore/6c02f8f6-accc-4997-be5c-601bc7131247;1.0
File: gendarmenmarkt.jpg
LAT:52.51361
LON:13.39278
Created new document: workspace://SpacesStore/44ff28e7-782a-46c3-b388-453fd8495472;1.0
File: old_museum.jpg
LAT:52.52039
LON:13.39926
Created new document: workspace://SpacesStore/03a85605-4a66-4f94-b423-82502efbca4a;1.0

Now Run Against Another Vendor’s Repo

What’s kind of cool, and what I think really demonstrates the great thing about CMIS, is that you can run this class against any CMIS repository, virtually unchanged. To demonstrate this, I’ll fire up the Apache Chemistry InMemory Repository we ship with the source code that accompanies the book because it is already configured with a custom content model that includes “cmisbook:image”. As the name suggests, this repository is a reference CMIS server available from Apache Chemistry that runs entirely in-memory.

To run the class against the Apache Chemistry InMemory Repository, we have to change the service URL and the content type ID, like this:

//public static final String CONTENT_TYPE = "D:cmisbook:image";
public static final String CONTENT_TYPE = "cmisbook:image";

//public static final String ATOMPUB_URL = ALFRESCO_API_URL + "alfresco/cmisatom";
public static final String ATOMPUB_URL = ALFRESCO_API_URL + "inmemory/atom";

And when I run the class, my photos get uploaded to a completely different repository implementation.

That’s It!

That’s a simple example, I know, but it illustrates fetching objects, creating new objects, including those of custom types, setting metadata, and handling exceptions all through an industry-standard API. There is a lot more to CMIS and OpenCMIS, in particular. I invite you to learn more by diving in to CMIS & Apache Chemistry in Action!

Webinar: Getting Started with CMIS

If you are brand new to CMIS or have heard about it but aren’t sure how to get started, you might want to join me in a free webinar on Thursday, January 26 at 15:00 GMT. I’m going to give a brief intro to the Content Management Interoperability Services (CMIS) standard and then I’m going to jump right in to examples that leverage Apache Chemistry OpenCMIS (Java), Apache Chemistry cmislib (Python), and Groovy (via the OpenCMIS Workbench).

UPDATED on 1/26 to fix webinar link (thanks, Alessandro). See comments for a link to webinar recording and slides.

Alfresco tutorial: Custom content types including Share config and CMIS

UPDATE (2014): I’ve moved the tutorial and the source code to GitHub. The HTML version of the tutorial is here. It has been updated for Maven and AMPs.

It is hard to believe that the original version of my “Working With Custom Content Types” tutorial for Alfresco is almost five years old. That page has had over 37,000 unique visits since it was posted. It makes sense that it would be popular–creating a content model, exposing it to the user interface, and then performing CRUD functions against the repository through code are the first steps for most Alfresco development projects.

The fundamentals of content modeling haven’t changed since 2007, but since the original tutorial was posted the Alfresco Share web client has replaced Alfresco Explorer as the preferred user interface and the Content Management Interoperability Services (CMIS) API has become the first choice for writing remote code against the repository. That, combined with the influx of newcomers to the platform and a continued demand for how-to’s on the basics motivated me to revise the tutorial.

The second edition moves the Alfresco Explorer configuration to the Appendix and replaces it with steps for doing the same thing in Alfresco Share. I also moved the Java Web Services API to the Appendix and replaced that with Java examples that leverage the Apache Chemistry OpenCMIS API to create, update, query, and delete content in the repository. I’m executing the same queries as the first edition, just implemented using CMIS, so if you want to compare Lucene queries to CMIS Query Language, this is one place to do it.

I tested the document and the %

Deconstructing DeckShare: A brief look at Alfresco Web Quick Start

Last Fall, just before the Developer Conference in New York City, Alfresco approached Metaversant with a small project–they needed a web site to share presentations from the DevCon sessions and other events. There are several generic slide-sharing sites out there–Alfresco and I have both used SlideShare for that sort of thing pretty extensively. But Alfresco was looking for something they could have complete control over, plus they were looking to exercise their new Web Quick Start offering. So I rounded up a sucker–I mean a collaborator–named Michael McCarthy from over at Tribloom, and we knocked it out.

Although it makes good marketing sense for Alfresco to use its own offering for the site, I do think the “private presentation-sharing” use case is also generally applicable to many other businesses out there. Technology companies, of course, but also any company with a large sales force or even more modest extranet needs could benefit from a solution like this. SlideShare is great when what you want to share is public. When presentations need to be securely shared, many companies use expansive portals to share sales collateral, marketing presentations, or company communications, but those often come with a very low signal-to-noise ratio. The solution we built–we call it “DeckShare”–is laser-focused on one thing: Making it easy for content consumers to find the presentations they need, quickly.

DeckShare is built on top of Alfresco’s new Web Content Management (WCM) offering called Web Quick Start. Honestly, Web Quick Start, as the name implies, provides a good starting point for building a dynamic web site on top of Alfresco, and the sample site was so close to what a basic slide-sharing site needed, we didn’t have to do a whole lot of work. Even so, if you want to do slide-sharing on top of Alfresco, you can save even more time by starting with DeckShare.

I thought it might be cool to walk you through how we got from the Web Quick Start sample app to DeckShare as a way of getting you familiar with Web Quick Start and to help you understand how DeckShare works in case you want to use it on your project.

Some of this write-up is also included in the “About” page within the DeckShare site. Alfresco is currently branding DeckShare to meet their needs so I have no idea if the About page will still be there when the site goes live, so I may or may not be repeating myself somewhat.

What is DeckShare?

Alfresco’s DeckShare implementation isn’t live yet, so let me give you the nickel tour. DeckShare is a solution for quickly creating a self-hosted presentation-sharing site on top of Alfresco without having to write any code. DeckShare lets non-technical users manage and categorize presentations that are then consumed by end-users. End-users can find presentations by browsing one or more hierarchies (“Topics”, “Events”, “Audience”, for example), performing a full-text search, or by browsing the list of the latest and “featured” presentations. Content managers can associate presentations with “related” presentations and can link supporting files with a presentation.

In this solution, Content Managers are a different set of users than Content Consumers. As it stands, the solution doesn’t accomodate user-contributed presentations, unlike SlideShare. Obviously, it could be customized to do that.

Here’s what it looks like when a Content Manager edits the metadata for a particular presentation (click the image for full-size):

DeckShare Manage Details Screenshot

Those familiar with Alfresco can tell from the screenshot that Content Managers use Alfresco Share as the “content administration” user interface. Optionally, you could turn on Alfresco’s Web Editor Framework and allow Content Managers to edit the site in-context, but that will require some minor tweaking if you go that route. Using Share for content administration works really well. What started out as a team collaboration web app has essentially turned into Alfresco’s uber client.

Now let’s take a look at the Content Consumer user interface:

DeckShare Home Screenshot

If you’ve seen either of the sample Web Quick Start applications, the layout will look familiar. The home page includes a featured content carousel, a recently added document list, and a document category tree. We’re using a different carousel widget than the Web Quick Start sample apps and the category tree is also something we’ve added.

The set of categories is almost completely arbitrary and can be managed by DeckShare administrators. In fact, if you are running DeckShare on top of an existing Alfresco repository, you can specify the subset of categories you want to show in the category tree. When you click a specific category, the resulting page looks like this:

DeckShare Category Page Screenshot

The category page shows only the presentations for a specific category and features the same category tree browser that appears on the home page.

Ultimately, an end-user will either download a presentation or they’ll click on the details page link to learn more. The details page, shown below, shows high-level metadata about the presentation, supporting files that accompany the presentation, related presentations, and a flash-based document preview. The flash-based preview allows end-users to browse the presentation without downloading the entire file.

DeckShare Presentation Details Screenshot

That’s really it from a Content Consumer perspective. The site also has full-text search and that page is very similar to the category list page.

From a Content Manager’s point of view, DeckShare, like all Web Quick Start sites, is built on concepts familiar to anyone who has built or managed a web site: A site consists of collections of assets that get categorized and tagged and then presented in various ways across one or more pages. The look-and-feel of the end-user web site can be completely customized to match client branding needs. And, both the metadata model and category hierarchy can be extended to support specific client requirements.

Assets are stored in Alfresco’s Document Management repository and managed through the Alfresco Share User Interface. Alternatively, Content Managers have several other options for getting presentations into the repository, including FTP, drag-and-drop via Windows Explorer or Mac Finder, emailing content into the repository, drag-and-drop from within Microsoft Outlook or Lotus Notes, or saving directly from Microsoft Office as if the repository were a Microsoft SharePoint Server. Regardless of how the files arrive, Alfresco automatically takes care of creating thumbnails and PDF renditions of the presentations.

What is Web Quick Start?

Web Quick Start is a sample web application built with Spring, Spring Surf, and Apache Chemistry’s OpenCMIS library. It is essentially a sample web application that sits on top of the Web Quick Start API (Java), some presentation tier services, some repository tier services, and an extended content model.

Assets are stored in Alfresco’s Document Management repository and managed through the Alfresco Share User Interface. That means you can use all of the familiar building blocks present in the repository such as custom types and aspects to model your data, behaviors, and web scripts.

The presentation tier uses Alfresco Surf to lay out pages and to define regions on those pages. Regions get their content from presentation tier web scripts. What’s different with Web Quick Start as opposed to previous Surf-based web application examples is the use of the Apache Chemistry OpenCMIS library. Instead of using Surf’s object dispatcher to load and persist objects, the Web Quick Start API uses OpenCMIS to make CMIS requests between the front-end and the repository tier. There are some places where the Web Quick Start API uses non-CMIS web scripts, so it is not a pure CMIS implementation, however.

The Web Quick Start API is exposed to the Alfresco JavaScript API and Freemarker API on the presentation tier, so everything you’ve already learned about Spring Surf is immediately leverageable when you build the front-end. However, if you’ve decided on another framework, you can still use the Web Quick Start API, the services, the content model, and Share for editing content. For example, Metaversant recently worked with a client that chose Spring 3 and Apache Tiles for the front-end because that was their standard, but they used Web Quick Start for everything else from the API, back.

Web Quick Start sites have a flexible deployment configuration which can be boiled down to “single-server” or “multi-server”. In the single-server approach, the same Alfresco server is used for content authoring and content serving whereas in the multi-server approach, Alfresco’s transfer service is used to move content from the “authoring” or “editorial” web server to the “Live” server (it doesn’t have to be one hop, you could throw in one or more “QA” servers as well if you want to, for example).

High-level steps

Web Quick Start is meant as a starter application. It’s functional out-of-the-box, but you’re expected to use as much (or as little) of it as you need. Here are the high-level steps we took to reshape the starter app into DeckShare.

Step 1: Extend the content model

Web Quick Start has a simple content model that provides for articles, images, and user feedback. For DeckShare, we added two new aspects to our own model. One is used to associate a presentation with zero or more related presentations. The other is used to associate a presentation with zero or more supporting files (like source code downloads). At some point we may also add an aspect to track fine-grained event metadata such as session time, speaker, etc. Extending the model with your own aspects is pretty easy–it’s some XML to define the model and then some XML to expose the model to the Share interface.

Step 2: Set up site sections and collections

Web Quick Start has a default folder structure that lives in the Document Library of the Share site being used to manage the content. Within that there is one folder for editorial content and one for live content. Then, it breaks down into “section” folders for site assets (publications, in this case) and collections. Each section will typically map to a section of a site and will therefore show up in the site navigation, but you can exclude sections from the navigation.

Every section folder has a set of collections. A collection is an arbitrary grouping of site assets. Collections can either be static or query based. For a static collection, Content Managers choose the assets that belong in that section with standard Share “picker” components. For a query-based collection, Content Managers can use either CMIS Query Language or Lucene to define queries that identify the assets that are included in the collection. Either way, from the Web Quick Start API, a developer just says, “Give me this collection and let me iterate over the assets in it” to produce a list of the assets in a collection.

There are two sample data sets that ship with Web Quick Start. One is for a Finance example site and the other is for a Government site. We started with the Finance site (the choice was based on luck–there’s really not much of a difference between the two other than images and content). Once we imported the sample site, we deleted all of the sample content and then tweaked the collection definitions. The “latest” collection, for example, contains the most recently-added presentations. The “featured” collection is static out-of-the-box, but we wanted it to be dynamic. So, we simply edited the collection metadata to add a query that returns all of the presentations that have been categorized as “Featured”. Alfresco runs the query periodically so that Content Consumers don’t take the performance hit when the page is rendered.

The carousel works similarly. We wanted Content Managers to be able to specify which presentations appear in the carousel simply by applying the “Carousel” category to the content from within Share, so the carousel collection looks for content that has that category applied.

The other tweaks we made to the sample data set include telling Web Quick Start which rendition should be used for the various thumbnails in the site. We added a new rendition definition for the images shown in the carousel and a new rendition for the thumbnails used everywhere else. Web Quick Start has its own rendition definitions, but the thumbnails aren’t set to maintain the aspect ratio when they are resized and that looks a little weird for images of thumbnail presentations, hence the need for our own.

Step 3: Customize page layout

Once we had some sample data in place and our collections defined, it was time to start laying out the pages. As luck would have it, the requirements matched up fairly closely to the layout of the sample financial site. Surf pages and templates are used for layout, but you don’t have to be a Surf Guru to make changes. Surf templates are just FreeMarker, after all. Other than minor re-arranging, our template modifications were limited to adding additional regions to existing templates.

Once you define your page layouts, you use metadata on the section folders to tell Web Quick Start which page layout to use for a given piece of content. The mapping is type-based. For a given section, you might say, “All instances of ws:indexPage in this section should use the ‘list’ template” which is expressed like this:

ws:indexPage=list

The template mapping is hierarchical. That means for a given piece of content, Alfresco will look at that content’s section for the template mapping but if it isn’t specified, it will look in that section’s parent, and so on. So if we specify:

cmis:document=publicationpage1

in a high-level section folder, all instances of cmis:document in child sections will be layed out using publicationpage1 unless it is overridden by a child section.

Note: If you are familiar with Surf, don’t be confused by the use of the word “template” here. It’s used by Web Quick Start in a generic sense. In the example above, “list” and “publicationpage1” are actually page data objects in Surf. For the Metaversant client that used Spring 3 and Tiles, for example, the template mapping specified which Tile definition to use.

Step 4: Add custom components

We spent most of our time on components. In Surf, components are implemented as web scripts. A web script implements the Model-View-Controller (MVC) pattern. In this case, controllers are JavaScript. Here’s what one of the controllers looks like:


model.articles = collectionService.getCollection(context.properties.section.id, args.collection);

if (args.linkPage != null) 
{
	model.linkParam = '?view='+args.linkPage;
}

This one is simply grabbing a collection of articles and a parameter and sticking them on the model for the FreeMarker-based view to pick up. Behind the scenes, the Web Quick Start API is making RESTful calls to the repository to retrieve (and cache) objects. This is a typical controller–in this app, most of the controllers are less than 10 lines long.

Web Quick Start already has components for different types of content lists. So doing something like the carousel was relatively easy: The collection service returns the “carousel” collection and a FreeMarker template dumps the collection metadata into a list that the YUI carousel control can grok.

We had a couple of places where we had to write our own components. One was the Categories component and another was the Related Presentations component. The Categories component is rendered using a YUI tree control. It gets its data by invoking a Surf-tier web script which, in turn, invokes a repository-tier web script that returns a list of category metadata as JSON. YUI then styles the data as a tree.

The Related Presentations component similarly invokes a repository-tier web script, but its JSON contains only node references. It then asks the Web Quick Start API to convert those into CMIS objects. That allows us to take advantage of the cache if the object has been loaded before, and it means we can re-use the Web Quick Start view templates that already know how to format lists of CMIS objects.

But wait, there’s more

Web Quick Start also has a user feedback mechanism that you can use for comments, “contact us” forms, and, at some point, ratings, but none of that was a requirement for this solution at the time we built it. The capability is there, so we’ll probably expose it at some point. Refer to the wiki for more information on the user feedback functionality.

There’s also a workflow that is used to submit content for review. Once approved, the content is queued up for publishing to the live site. The workflow is the same jBPM engine you are probably already familiar with so the process can be modified to fit your needs.

Although it is a new product and there are still a few hitches here and there, I was happy with Web Quick Start and the time it saved for building a site like this. I’m looking forward to seeing its continued evolution.

DeckShare is a simple site. There is a lot more that could be done with it and, based on client demand (or contributions from others, hint, hint), new features will be added over time. I think it’s a good example of what you can do quickly with Web Quick Start.

Hopefully, this write-up gave you some ideas you can use on your own projects. If you want to dive deeper into the Web Quick Start web application, check out the Web Quick Start Developer Guide on the Alfresco wiki. Feel free to grab the DeckShare source from Google Code and use it on your own projects.

If you’re interested in major customizations to DeckShare or you have a project that might be a fit for Alfresco Web Quick Start, let me know.

Book Review: Alfresco 3 Web Services

I’ve just finished reading Alfresco 3 Web Services, by Ugo Cei and Piergiorgio Lucidi, which Packt sent me to read and comment on.

Alfresco 3 Web Services is meant for developers with a very specific focus: Remotely talking to Alfresco. That might mean communicating via SOAP-based Web Services, RESTful web services (Web Scripts), or either protocol through CMIS. Whichever you choose, Ugo and Piergiorgio have you covered. I really like that the authors set out to write such a focused piece and stuck to it–it allows them to go deep on their topic and keeps the chapter length and total book length digestable.

The book is written very clearly and follows a logical progression. It starts out with SOAP-based services (first 5 chapters), including a chapter on .NET, and then moves on to web scripts (3 chapters). After that, the authors discuss AtomPub, which is an interesting, but not critical, background for the remaining 5 chapters of the book which focus on CMIS.

The discussion on web scripts covers both Java and JavaScript controllers, but JavaScript definitely gets more attention. Something developers new to the platform will find helpful is the chapter on FreeMarker. Most of Alfresco’s documentation and the books that are out there (including mine) relegate the FreeMarker API to appendices or just show examples and assume you’ll look up details later when you need it. Because it is typically such a key component of web scripts and other aspects of Alfresco, it was a good call to include it in the book.

The book comes with several small examples and a couple of tie-it-together examples. None of it runs out-of-the-box without some tweaking which isn’t a surprise given how rapidly things are changing in this area, particularly with regard to CMIS. At the time the book was written, OpenCMIS, the Java API for CMIS available as part of Apache Chemistry, had not been officially released. As I write this, the Chemistry team is about to release their second tagged build. The differences aren’t significant enough to cause confusion–most readers will be able to fidget with the import statements and the other changes required to get the sample code running.

I thought there was a little too much time devoted to SOAP-based Web Services, but that’s just personal preference and the fact that nearly all of my clients over the last four years have gone the RESTful route. The authors note that others may have the same preference and they make it easy to skip over those chapters if the reader wants to.

Although the chapters logically progress and build on each other, the code samples don’t–for the most part, each chapter’s code samples are self-contained. For example, I thought it was kind of strange that the code built in Chapter 13 for the CMIS Web Services binding examples isn’t used in Chapter 14 to build the CMIS Wiki example.

Many Alfresco implementation teams are divided into at least back-end and front-end teams and when the project is large enough, you can definitely have people focused on the middle. This book is perfect for that middle-ware team or for anyone who’s got a handle on the back- and front-ends and just needs to learn how to stitch them together. Nice job, Ugo and Piergiorgio.