 A common requirement for an Alfresco installation is the need to update configuration on customizations at runtime. One way to handle this is to add your own custom admin console panels to the out-of-the-box Alfresco admin console.
For example, suppose that at our company there is a system that manages data about our projects. Maybe it has a REST API that returns a list of projects. And, maybe we want to do something with that data from Alfresco.
It would be a good idea to centralize the logic that invokes the project API in a service class. The service class will need to know the URL of the project API. We could hardcode the project API URL, but then we’d have to build and deploy if it ever needs to be changed. We could put it in the alfresco-global.properties file and read it from there, which is a little better, but not great.
Alfresco already has an admin console that it uses to display and, in the case of Enterprise Edition, manage settings at runtime. This post shows how to add your own admin console panel to update settings of your custom service classes at runtime whether you use Enterprise or Community Edition.
This example uses a basic API built using Node and Express that returns a list of project names and IDs. In the real world your API won’t likely be part of the project–we use this “fake” API here as a convenient stand-in for demonstration purposes.
On the Alfresco side, we’ll create a UI action that gets the project list from the API and displays the projects in a dialog. It doesn’t really matter what we do with the data because the point of this example is to show how to make the API endpoint configurable via the admin console.
When you’re done, you’ll be able to invoke the API from Share and then change the API endpoint via the Alfresco admin console, and see that change reflected immediately on subsequent invocations from Share.
Ready? Let’s do it.
Steps
This code is available in GitHub. Each of the steps below is tagged. After you clone the repository you can switch between steps by doing git checkout step1 or git checkout step2 etc.
If you are going to follow along, clone the project:
git clone https://github.com/jpotts/alfresco-custom-admin.git
Then, checkout step0:
git checkout step0
The code now reflects an empty project created from the Alfresco SDK. At this point it is configured to use Community Edition. We’ll optionally switch over to Enterprise Edition in a while when the implementation steps become edition-specific.
The first three steps are about setting up the fake API as a Docker container, implementing a repo tier web script to fetch project data from the API, and then implementing a simple UI action that displays the project data in a Share dialog.
Once those steps are complete the path diverges: one step shows how to implement the custom admin console in Enterprise Edition and the other shows how to do it in Community Edition.
Step 1: Add a simple API to return project data
If you are following along:
git checkout step1
We want an API that returns a list of projects as JSON. A really easy way to do that is with Node.js and Express. So, we’ll add a new container to our Docker setup so that when we run Alfresco locally it will launch the fake API app.
Now we have a new Maven module called fake-projects-api that will build a Docker image that has the Node.js app. All we need to do is add it to the docker-compose.yml file that was bootstrapped when we created the project so that Docker Compose will create and run a container for the API alongside the containers for ACS, Share, and the others.
- docker/docker-compose.yml. This is the original docker-compose.yml file provided by the Alfresco SDK, updated to include the new projects API.
If you want to test the API, run ./run.sh build_start then invoke this URL in your browser:
http://localhost:3000/projects
The API returns a list of project names and IDs as JSON.
Step 2: Add a service class and web script
If you are following along:
git checkout step2
At this point Alfresco is running and a Node.js app is running. The Node.js app represents our other enterprise API that we need to integrate with. In this step we’ll wire the two together by creating a repository tier web script that invokes the API and returns the list of projects. The web script won’t actually have the logic to call the API. Instead, we’ll put that in a service class to centralize the logic and make it easier to call from other places if needed.
I’ll create two model classes to make it easier to work with the JSON API response:
The service has the logic that actually invokes the API, and the web script calls that:
I’ll put the default value for the project service API URL in the alfresco-global.properties file. The web script Spring context can read it from there and inject it into the Project Service class.
Now you can run ./run.sh build_start from the root of the project source and after everything starts up, invoke the web script:
http://localhost:8080/alfresco/s/ecmarchitect/projects
To get a list of project names and IDs back as JSON.
[
    {
        "projectId": "A001",
        "projectName": "Some Project"
    },
    {
        "projectId": "A002",
        "projectName": "Some Other Project"
    },
    {
        "projectId": "A003",
        "projectName": "Yet Another Project"
    },
    {
        "projectId": "A004",
        "projectName": "Pilot Project"
    },
    {
        "projectId": "A005",
        "projectName": "Pet Project"
    }
]
Next, let’s add a small customization to Share that will invoke this API.
Step 3: Add a UI action that invokes the repo tier web script
If you are following along:
git checkout step3
The Share part of this example is not really important, but it is nice to have it just to verify that everything is working as we expect.
Let’s add a UI action that invokes client-side JavaScript. The client-side JavaScript will call the repo tier web script and display the results in a Share dialog.
If nothing is running, do a ./run.sh build_start to start everything up. If everything is still running from the previous step, run ./run.sh reload_share.
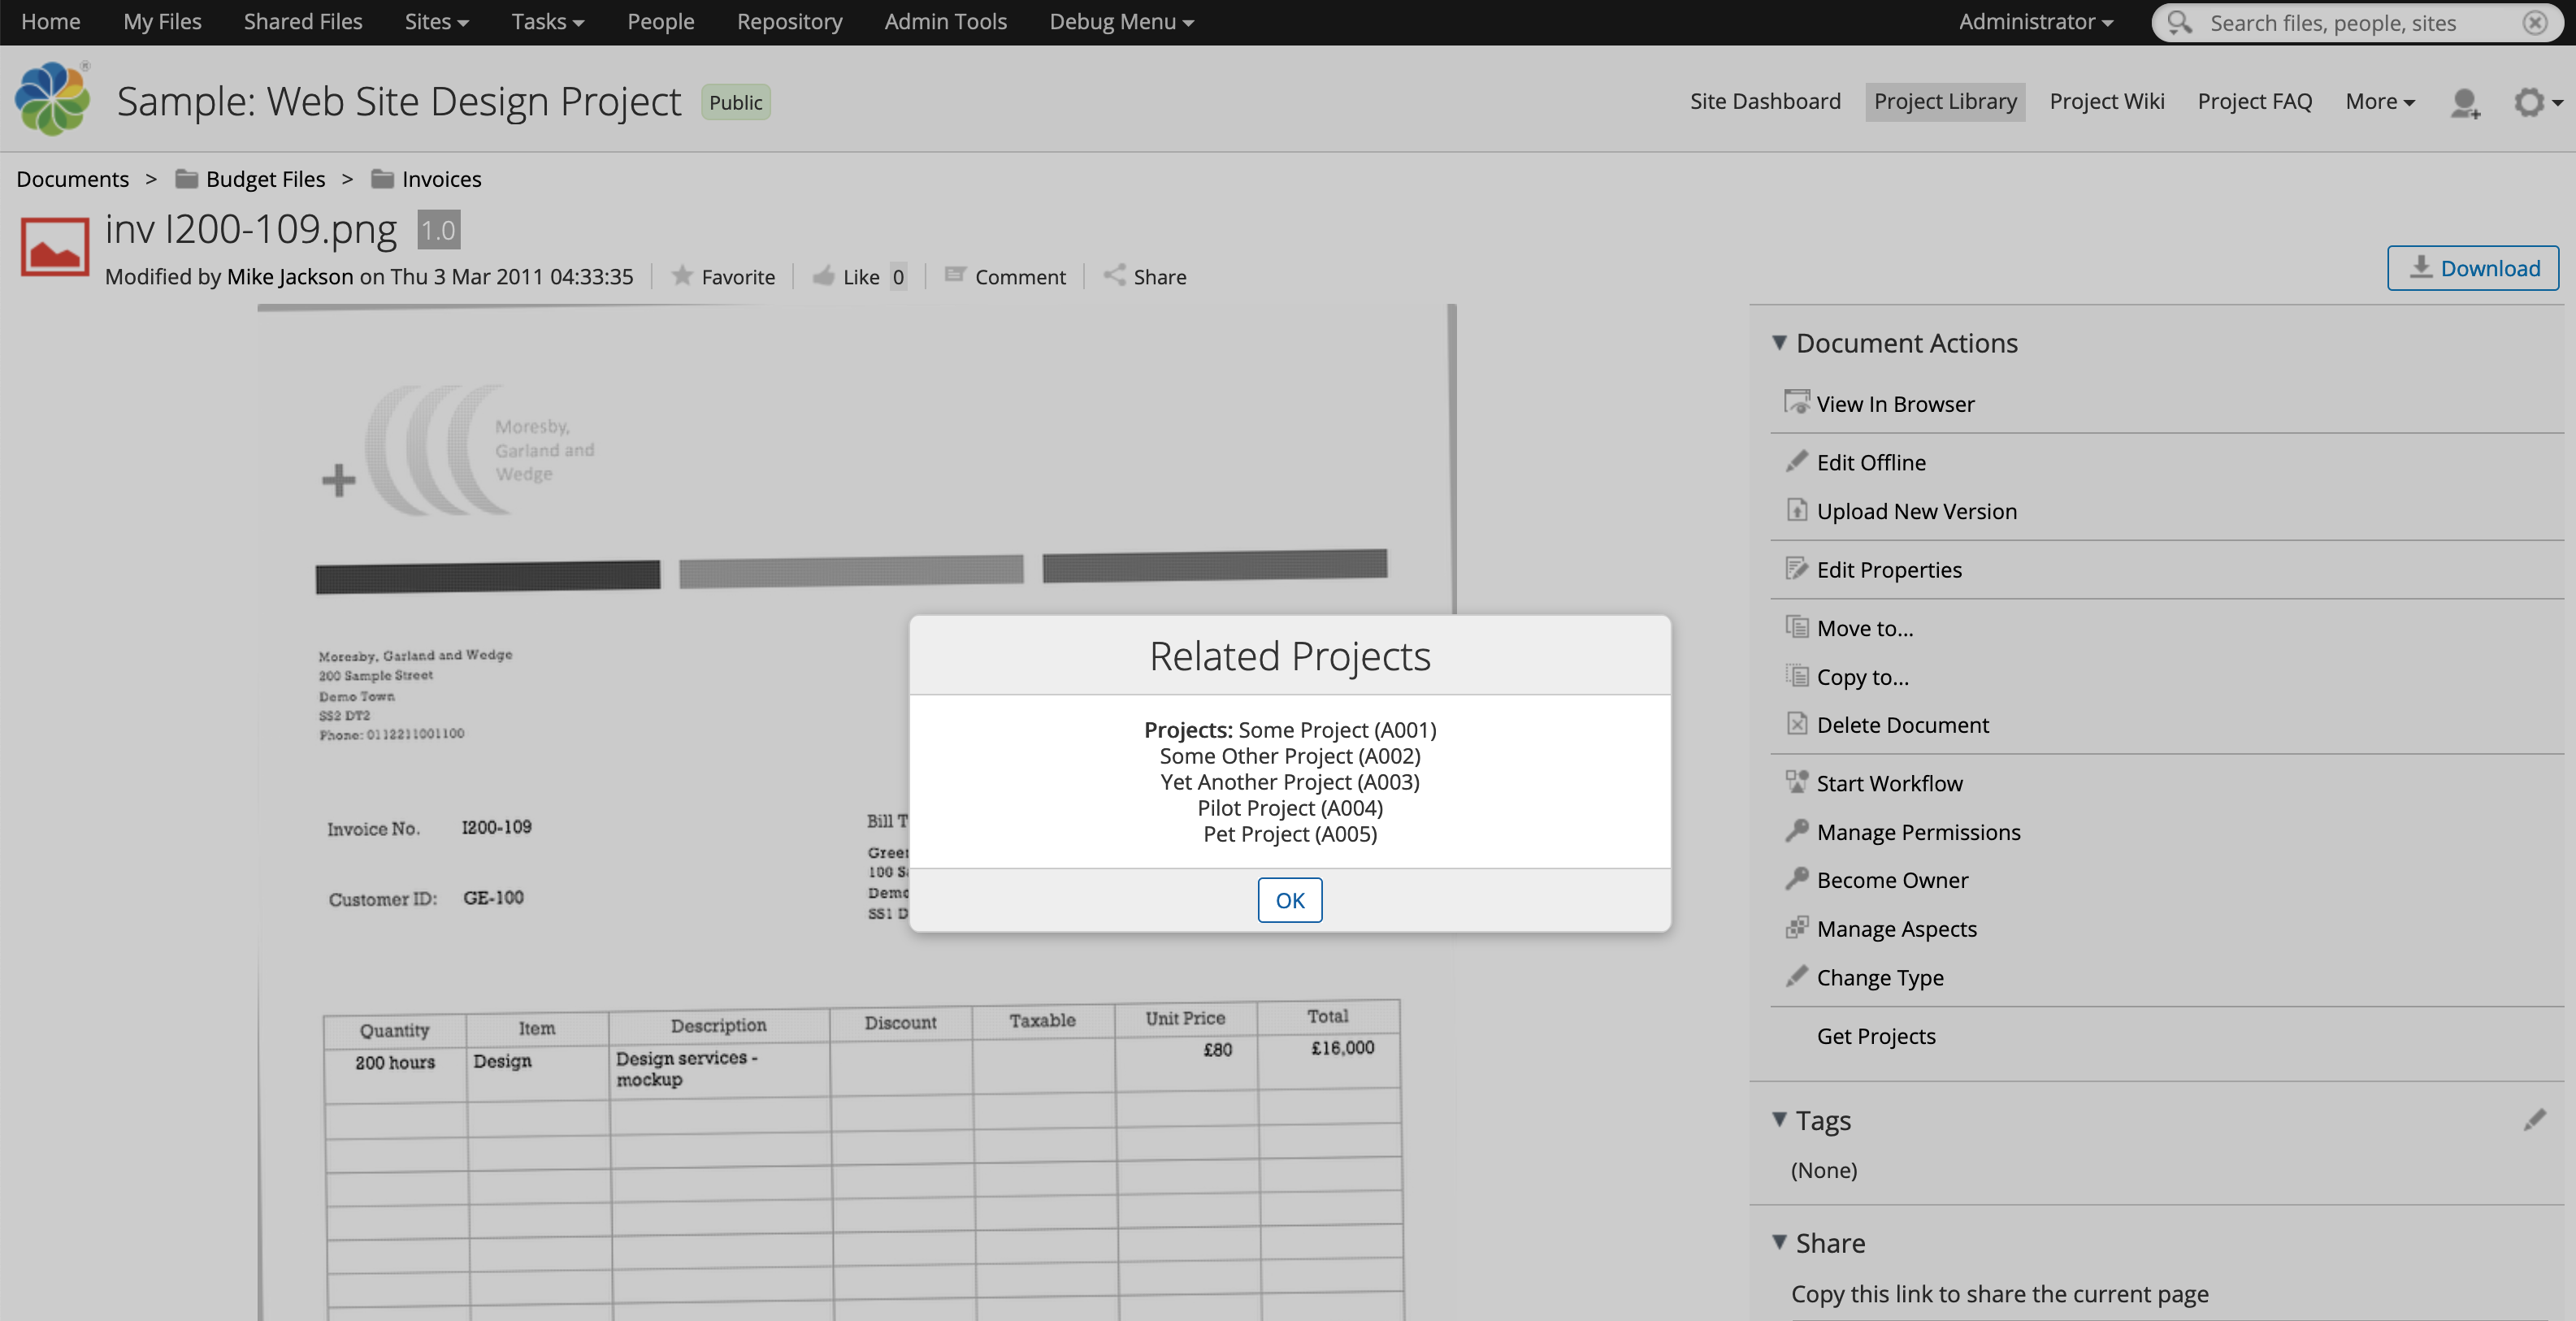
You should now be able to log in to Share, navigate to a document, and from either the document library or document details page click “Get Projects” to show the dialog with the list of project information retrieved from the API.
Enterprise Edition or Community Edition?
You now have a fake API, a repo web script that invokes it, and a Share UI action that calls the repo web script. Now it is time to add an admin console panel that can be used to configure the projects API URL at runtime.
Exactly how you do this differs between Enterprise Edition and Community Edition. It’s a bit easier with Enterprise Edition because the Enterprise Edition admin console supports JMX and it has a framework of sorts for displaying and modifying JMX-managed beans. In that case, we just add some JMX annotations to our service class and it becomes very easy to configure an admin panel that can get and set attributes on the JMX bean.
To see how that works, continue reading the next section, Step 4a.
If you are using Community Edition, it’s a bit more work because the admin console framework in Community Edition isn’t the same as the one in Enterprise Edition that relies heavily on JMX. But we can still add an admin console panel that will function just like the one in Enterprise Edition, from an end-user’s perspective.
To see how that works, skip the next section, Step 4a, and continue reading Step 4b.
Step 4a: Add the custom admin console panel to Enterprise Edition
If you are following along:
git checkout step4a
Up to this point, our project has been running Community Edition. If you are reading this section you’ve decided to move forward with Enterprise Edition, so the first change is to update the root pom.xml to change editions:
Of course you’ll need credentials for the private artifacts directory as well as quay.io for the Enterprise Docker image. I am assuming you already know where to put the credentials in your Maven and Docker authentication setup.
Next, the project service we created earlier needs some JMX annotations and the service-context.xml file needs a few additional JMX-related beans:
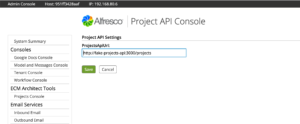
At this point, you could change the projects API URL at runtime using a JMX tool like JConsole or JMXTerm. But our goal is to create a custom admin panel. Admin console panels are just web scripts, so we’ll add a GET web script that renders the panel:
Be careful here. The path to the web script is important. It dictates where the panel shows up in the admin console. In this case, the important part of the path is “admin/ecmarchitect-tools”. That establishes a new section (“ecmarchitect-tools”) that we could use to group multiple panels. If we were to just use “admin” this new panel would show up in the “root” list of admin console panels, as a sibling to “System Summary”. It’s probably better to group them as I’ve done here.
Enterprise Edition comes with JMX support, and that makes it very easy to add our JMX managed beans to the admin console. Look at the web script controller. It’s just:
Admin.initModel(
    "ecmarchitect:name=Projects",
    ["ProjectsApiUrl"],
    "ecmarchitect-projects"
);
The initModel method of Admin takes care of everything for us. We just pass in three arguments:
- The name of the bean. This value matches up with what’s in the “ecmarchitect-projects_MBeanExporter” Spring bean in service-context.xml.
- An array of managed attributes. In this simple example there’s just one, ProjectsApiUrl, which is derived from the getter/setter method in the project service class.
- The doc in admin-common.lib.js says this is the “ID of the current console tool” but it did not seem to matter what I put here, so I used values from my JMX bean to make a unique string, “ecmarchitect-projects”.
The freemaker view for this web script is also pretty succinct because the Enterprise Edition admin console framework does a lot of the work for us:
<#include "/org/alfresco/enterprise/repository/admin/admin-template.ftl" />
<@page title=msg("project-api-settings-console.title") readonly=false>
    <div class="column-full">
        <@section label=msg("project-api-settings-console.column") />
        <#-- Example - Retrieve keys - which are attribute names - use to index into attribute hash -->
        <#-- You can index directly by attribute name e.g. <@control attribute=attributes["Subject"] /> -->
        <#list attributes?keys as a>
            <@control attribute=attributes[a] />
        </#list>
    </div>
</@page>
This is all boilerplate with the exception of the message properties keys.
Since the last step, you’ve changed the Alfresco edition, so now you need to start fresh:
- Run
./run.sh purge to destroy and remove the existing containers.
- Run
./run.sh build_start to do a clean build and start up fresh containers.
Once everything comes up you can test your work:
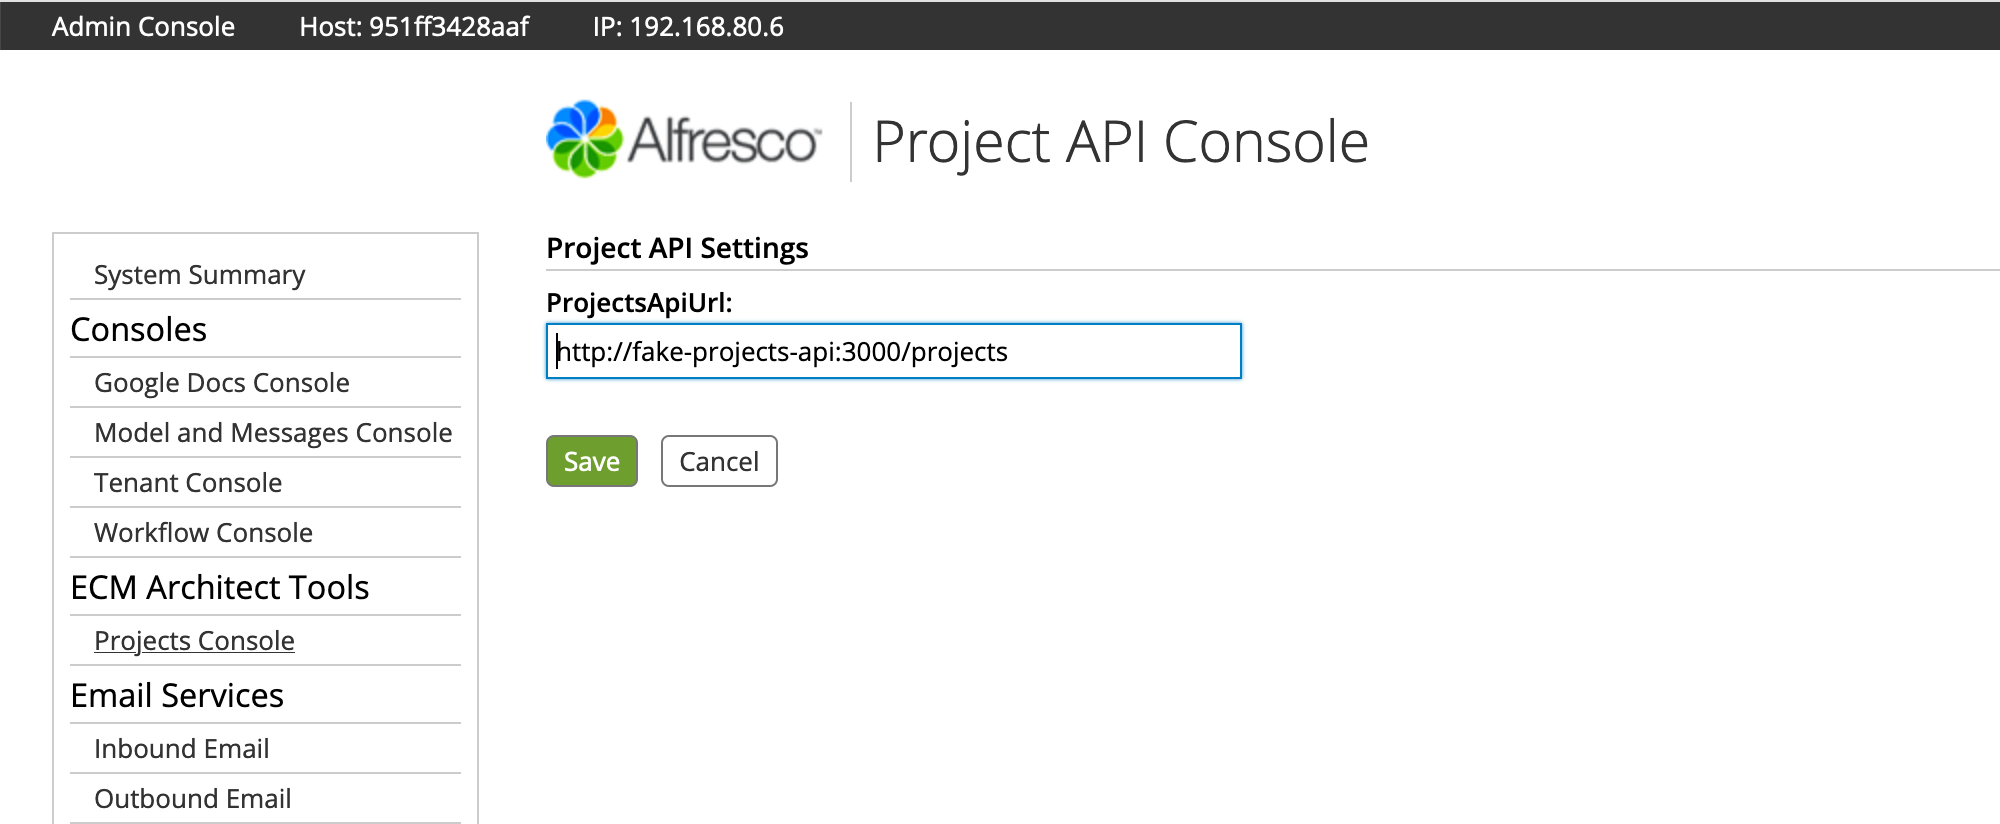
- Log in to the admin console and click TBD to see the new admin console panel. The projects API URL is already set because the default value
from the alfresco-global.properties file was injected into the Project Service class.
- Go ahead and change the URL to a bad value, then click Save.
- Now go into Share and try out the UI action. It should fail.
- Go back into the admin console and change the URL to the correct value, which is http://fake-projects-api:3000/projects, then click Save.
- Now go back into Share and try the UI action again. It should display the project data successfully.
If you only care about Enterprise Edition, you’re done. You can make changes to the projects API URL at runtime via the admin console.
Note that if you deploy what we’ve built so far to a multi-node cluster, each node will have its own copy of the projects API URL and when you make a change to the URL on one node, it will not propagate to the other nodes. In a future blog post I’ll show to address that with a replicating cache.
If you want to see how much work Enterprise Edition saved you, or you just realized you read the wrong section, read on to see how to implement the same admin console panel in Community Edition.
Step 4b: Add the custom admin console panel to Community Edition
If you are following along:
git checkout step4b
Our Enterprise Edition friends turned the Project Service class into a JMX-managed bean, then took advantage of the pre-existing framework for admin console panels to create a panel that can get and set managed attributes. We aren’t so lucky, but it isn’t the end of the world. We can still have the exact same functionality, we just have to do a bit more work. That’s how it goes with Community Edition, right?
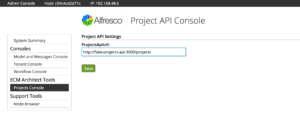
We’ll need a web script that establishes the admin console panel and renders a form with the current value of the projects API URL:
Assuming you skipped the Enterprise Edition section (Step 4a) I’ll reiterate what I said there about paths. The path to the web script is important. It dictates where the panel shows up in the admin console. In this case, the important part of the path is “admin/ecmarchitect-tools”. That establishes a new section (“ecmarchitect-tools”) that we could use to group multiple panels. If we were to just use “admin” this new panel would show up in the “root” list of admin console panels, as a sibling to “System Summary”.
These are the same file paths and names as the Enterprise Edition example, but the web script controller and the freemarker view are different.
The web script controller has to grab the project service bean from the Spring context so it can get the current value of the projects API URL and add it to the model:
ctxt = Packages.org.springframework.web.context.ContextLoader.getCurrentWebApplicationContext();
projectService = ctxt.getBean('project-service', Packages.com.ecmarchitect.alfresco.examples.projects.services.ProjectService);
model.projectsApiUrl = projectService.getProjectsApiUrl();
The remaining calls take advantage of the out-of-the-box Admin component:
model.tools = Admin.getConsoleTools("api-settings");
model.metadata = Admin.getServerMetaData();
The freemarker view is a bit more involved. Rather than relying on Alfresco to build the form, we’ve got to do it ourselves:
<#include "/org/alfresco/repository/admin/admin-template.ftl" />
<@page title=msg("project-api-settings-console.title") readonly=true>
    <link rel="stylesheet" type="text/css" href="${url.context}/alfresco-custom-admin/css/api-settings.css" />
    <script type="text/javascript" src="${url.context}/alfresco-custom-admin/js/api-settings.js"></script>
    <div id="message" class="message hidden">Successfully saved values.
        <a href="#" onclick="this.parentElement.classList.add('hidden');" title="Close">[X]</a>
    </div>
    <form id="api-settings-form">
        <div class="column-full">
            <h2>${msg("project-api-settings-console.column")}</h2>
            <div class="section">
            </div>
            <div class="control text">
                <span class="label">ProjectsApiUrl:</span>
                <span class="value"><input id="projectsApiUrl" name="ecmarchitect:name=Projects|ProjectsApiUrl" value="${projectsApiUrl}" maxlength="255" tabindex="0"/></span>
            </div>
        </div>
        <div class="submission buttons">
            <input type="button" value="Save" onclick="ECMArchAdmin.saveSettings()"/>
        </div>
    </form>
</@page>
In the call to the page macro, readonly is set to true because I don’t want Alfresco trying to create its own form–I’m going to handle it.
Next there are some references to stylesheets and a small JavaScript file which I’ll cover shortly.
Then there is a DIV that starts out as hidden. This will show itself after successfully saving the settings.
After that is a simple form. The form has an input for the projects API URL and a save button that invokes a function in the client-side JavaScript file to do the save. The client-side JavaScript file is:
We could have posted the form to a web script using the form’s action, but I thought it would be nicer to use AJAX instead. That gave me a chance to display a success message using the same style that’s used in the Enterprise Edition case, so the look-and-feel is a lot closer.
Note that in Community Edition, the out-of-the-box Admin object actually has a request method, but it does not set the content-type header properly when it makes the request, which breaks the automatic JSON handling in the POST web script. To fix this, I copied the request function into api-settings.js and set the header properly.
As mentioned earlier, the save button invokes a client-side function called ECMArchAdmin.saveSettings. The function POSTs JSON to a web script, which is responsible for actually saving the settings. Here’s the web script:
Similar to the GET web script, the POST web script controller gets the project service from the Spring context, then grabs the projects API URL from the JSON that was POSTed, and invokes the project service setter.
var obj = JSON.parse(json.toString());
var projectsApiUrl = obj.projectsApiUrl;

ctxt = Packages.org.springframework.web.context.ContextLoader.getCurrentWebApplicationContext();
projectService = ctxt.getBean('project-service', Packages.com.ecmarchitect.alfresco.examples.projects.services.ProjectService);
projectService.setProjectsApiUrl(projectsApiUrl);

model.projectsApiUrl = projectsApiUrl;
If you came to this step from Step 3 and everything is still running, you can do ./run.sh reload_acs to rebuild and restart the ACS container. Otherwise, run ./run.sh build_start to start everything up.
Once everything is up-and-running, you can test your work:
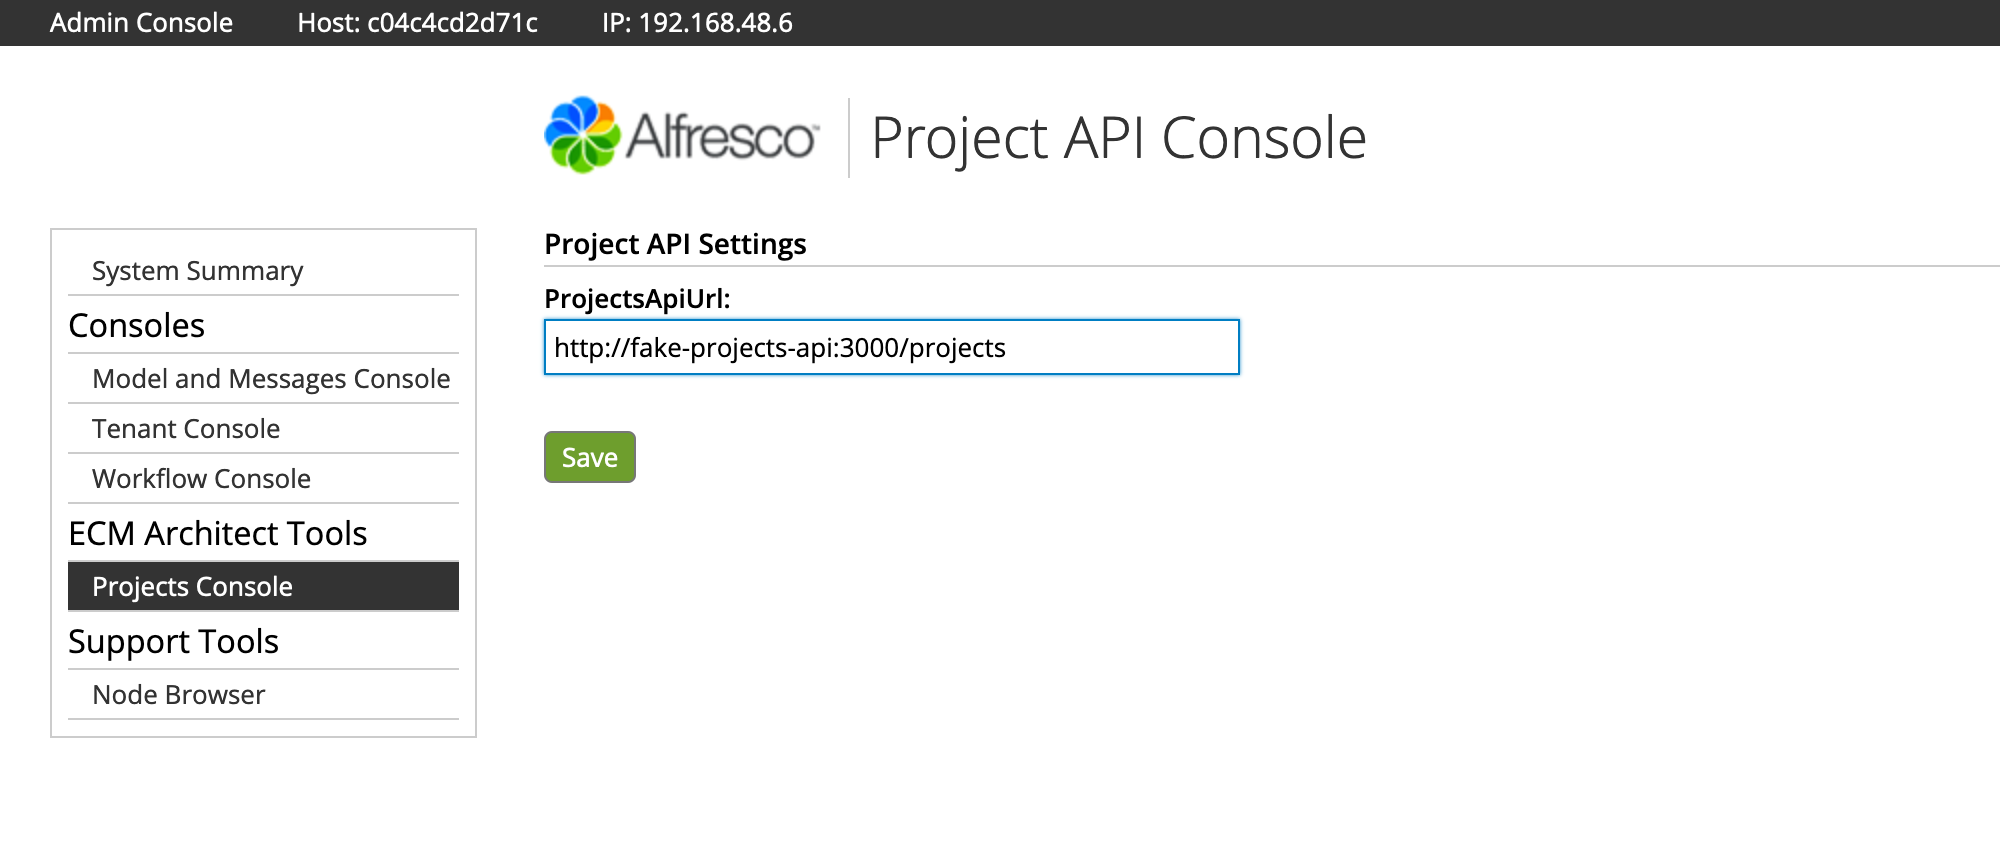
- log in to the admin console and click TBD to see the new admin console panel. The projects API URL is already set because the default value
from the alfresco-global.properties file was injected into the Project Service class.
- Go ahead and change the URL to a bad value, then click Save.
- Now go into Share and try out the UI action. It should fail.
- Go back into the admin console and change the URL to the correct value, which is http://fake-projects-api:3000/projects, then click Save.
- Now go back into Share and try the UI action again. It should display the project data successfully.
There you have it. You now know how to create your own custom admin console panels so that you can change properties on your Alfresco customizations at runtime. You saw that if you are using Enterprise Edition, it’s a little bit easier, because you can take advantage of JMX, whereas with Community Edition you have to render the form yourself and then write your own POST web script to call setters on your service class with updated data.
If you need to do more elaborate work on the admin console, take a look at the Order of the Bee Support Tools Add-On for further examples. It was really helpful to me when working on the Community Edition version of this example. And, if you are running Community Edition, you really ought to install that Add-On and maybe even get involved in helping maintain that project.
Photo credit: Data Center, Cushing Memorial Library, CC BY-NC-ND 2.0