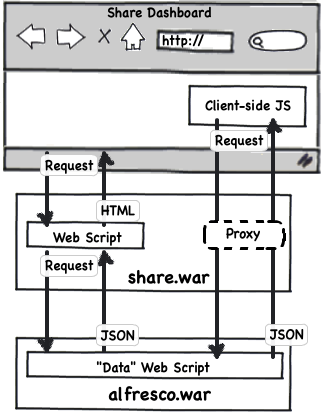
In my last post I showed a simple example that illustrates the “repository tier data web script/share tier presentation web script” pattern that is used any time you need to create a dashlet in Alfresco Share that reads data from the Alfresco repository. The example I used is called “Get Latest Document” and it does just that–given a folder path, it reads some basic metadata about the most recently modified document and displays it in a dashlet.
That example read the folder path from an XML configuration file that is included as part of the Share tier web script. But what if you wanted to make it easier to configure the dashlet by allowing a Share user to open up a configuration dialog that includes a folder picker? Luckily, Alfresco Share already includes all of the bits and pieces you need to make this possible–it’s just up to you to wire them together. I’ll show you how to do that in this post.
The code that implements this example lives in a Google Code project. I’ve tagged the prior post’s source code–the “XML configuration” code–as “1.0“. The code that goes along with this post is tagged as “2.0“. So if you are following along make sure you are using the appropriate code set.
I’m using Alfresco 4.0.d Community, WAR-only distribution, Lucene for search, two Tomcats, and MySQL. My project is organized following the Share Extras Sample Dashlet project folder structure.
Here’s the Recipe
The goal is to take the 1.0 version of the Get Latest Document dashlet and make it configurable through the UI instead of an XML configuration file. Recall from the prior post that we have a repository tier web script that returns JSON for the most recently modified document in a specified folder path. To make that folder path configurable, nothing at all needs to change on the repository tier. All of the changes are going to take place on the Share tier.
Here’s what has to be created or changed to make this work:
- Modify the dashlet markup to include a configuration link
- Create a custom client-side JavaScript component to handle the configuration dialog and the folder picker
- Write a new Share-tier web script that persists the configuration data
Not too bad, right? Well let’s get after it then.
Modify the dashlet markup to handle configuration
In a minute I’m going to show you the code for the client-side JavaScript component that listens for configuration clicks. For now, I’ll just point out where that client-side object is instantiated within the dashlet’s markup. It is near the top of get-latest-doc.get.html.ftl:
var getLatestDoc = new SomeCo.dashlet.GetLatestDoc("${el}").setOptions(
{
  "componentId": "${instance.object.id}",
  "siteId": "${page.url.templateArgs.site!""}",
  "title": "${title}",
  "filterPath": "${filterPath}",
  "filterPathView": "${filterPathView}"
}).setMessages(${messages});
Notice the “SomeCo” object. When creating new client-side objects, you definitely want to steer clear of the “Alfresco” object if you can so that your stuff doesn’t collide with Alfresco’s stuff.
Next, I need an “edit” icon in the dashlet’s title bar. I want it to appear only if the user is a site manager. So I’m going to add a little blurb to the get-latest-doc.get.html.ftl view that does this:
var editDashletEvent = new YAHOO.util.CustomEvent("onDashletConfigure");
editDashletEvent.subscribe(getLatestDoc.onConfigGetLatestDocClick,
                           getLatestDoc, true);
new Alfresco.widget.DashletTitleBarActions("${args.htmlid?html}").
  setOptions(
{
  actions:
  [
    <#if userIsSiteManager>
    {
      cssClass: "edit",
      eventOnClick: editDashletEvent,
      tooltip: "${msg("dashlet.edit.tooltip")?js_string}"
    },
    </#if>
The first part of this code hooks a YUI “onDashletConfigure” event to the “onConfigGetLatestDocClick” handler in the custom GetLatestDoc client-side JavaScript object. The second part is a FreeMarker conditional that is checking the value of “userIsSiteManager”. The controller will set that value. I’ll show you that shortly. The rest of the view is unchanged from the 1.0 version.
The dashlet needs access to the custom client-side JavaScript component as well as some of Alfresco’s out-of-the-box components that I will leverage to open a dialog and to present a folder picker. I’ve added these to get-latest-doc.get.head.ftl:
<!-- getLatestDoc -->
<@link rel="stylesheet" type="text/css"
  href="${page.url.context}/res/extension/components/dashlets/get-latest-doc.css" />
<@script type="text/javascript"
  src="${page.url.context}/res/extension/components/dashlets/get-latest-doc.js"></@script>
<!-- Simple Dialog -->
<@script type="text/javascript"
  src="${page.url.context}/modules/simple-dialog.js"></@script>
<!-- Global Folder Select -->
<@link rel="stylesheet" type="text/css"
  href="${page.url.context}/modules/documentlibrary/global-folder.css" />
<@script type="text/javascript"
  src="${page.url.context}/modules/documentlibrary/global-folder.js"></@script>
Now take a look at the dashlet’s controller, get-latest-doc.get.js. The biggest change here is to add a call to the repository to find out if the current user is a site manager:
var userIsSiteManager = false,
json = remote.call("/api/sites/" + page.url.templateArgs.site +
  "/memberships/" + encodeURIComponent(user.name));
if (json.status == 200)
{
  var obj = eval('(' + json + ')');
  if (obj)
  {
    userIsSiteManager = (obj.role == "SiteManager");
  }
}
model.userIsSiteManager = userIsSiteManager;
The rest of the controller is pretty much the same as 1.0, with the minor addition of checking “args” for values that the configuration service is going to pass in. If they don’t get passed in, the values will be read from the config XML as they were in 1.0.
That’s it for the changes to the dashlet. If you wanted to you could deploy at this point, but clicking the edit button would result in JavaScript errors.
Create a custom client-side JavaScript component
Client-side JavaScript for this example lives in source/web/extension/components in a file called dashlets/get-latest-doc.js. The “source/web” part of the path is dictated by the Share Extras sample project folder layout. I used “extension” to keep my client-side static assets separate from Alfresco’s. You might choose something more unique.
I’m not going to go line-by-line–look at the source for the full detail. The first thing worth noting is at the very beginning of the file: It’s a declaration of the “SomeCo” object. The client-side object I define in this file will live in that namespace. If I had other custom client-side objects I’d declare them as part of that namespace as well. I’ve seen a lot of examples that place their custom client-side objects in the “Alfresco” namespace, which is a bad habit. There’s nothing magical about that Alfresco namespace, so why not make it obvious what’s part of the product and what’s a customization?
if (typeof SomeCo == "undefined" || !SomeCo)
{
  var SomeCo = {};
  SomeCo.dashlet = {};
}
Next comes the declaration of the constructor for this new object:
SomeCo.dashlet.GetLatestDoc = function GetLatestDoc_constructor(htmlId)
{
  SomeCo.dashlet.GetLatestDoc.superclass.constructor.call(this,
    "SomeCo.dashlet.GetLatestDoc", htmlId);
  /**
   * Register this component
   */
  Alfresco.util.ComponentManager.register(this);
  /**
   * Load YUI Components
   */
  Alfresco.util.YUILoaderHelper.require(["button", "container",
    "datasource", "datatable", "paginator", "json", "history",
    "tabview"], this.onComponentsLoaded, this);
  return this;
};
After calling the superclass’ constructor, I ask the Alfresco ComponentManager to register the class. Then, I use Alfresco’s YUILoaderHelper to declare the components on which my component depends.
After that, the actual definition of the object begins. My GetLatestDoc object is going to extend Alfresco’s Base object, so I use YAHOO.extend to make that happen:
YAHOO.extend(SomeCo.dashlet.GetLatestDoc, Alfresco.component.Base,
{
What follows are the properties and methods of the GetLatestDoc object. The two big things it takes care of are (1) Responding to the “Configure” click and (2) Displaying the folder picker dialog.
The first method is the onConfigGetLatestDocClick. You’ll remember that from the updates to the view–I hooked up the “configure” link to this method. Here is the declaration followed by specifying the actionUrl. The actionUrl is where the configure form will be posted. In this case it is a web script I’ll walk you through in the next section.
onConfigGetLatestDocClick: function getLatestDoc_onConfigGetLatestDocClick(e)
{
  var actionUrl = Alfresco.constants.URL_SERVICECONTEXT +
    "modules/someco/get-latest-doc/config/" +
    encodeURIComponent(this.options.componentId);
The onConfigGetLatestDocClick method does two things: (a) It defines the dialog that gets displayed when someone configures the dashlet and (b) it defines field validation for the fields on the configure dialog. Here is the dialog definition part:
That templateUrl is where the SimpleDialog module should find the form to use. It looks just like the actionUrl and it is. The actionUrl will be a POST while the templateUrl will be a GET.
The getLatestDoc_onConfig_callback function will be invoked when the configuration form is successfully posted to the config web script. That response object contains the response from that web script, which, in this case, we are returning as JSON.
Here is the part of the method that defines field validation:
This function makes the title mandatory. Note the final two assignments. These are hooking up buttons on the config dialog to events in this client-side component. So, when someone clicks “select path” the folder picker will be launched and when someone clicks “clear path” the selected path will be reset.
Then, the final part of the method simply displays the dialog:
this.configDialog.setOptions(
{
  actionUrl: actionUrl,
  siteId: this.options.siteId,
  containerId: this.options.containerId
}).show();
},
So when this method is invoked, Alfresco’s out-of-the-box SimpleDialog component is used to display a pop-up dialog. The dialog will contain the form that we return in the config’s GET web script, and when the user saves the values, the values will be POSTed to the config web script.
As part of the configuration, the user needs to specify a folder path. Alfresco already ships with a folder picker–there is no need to code one from scratch. The onSelectFilterPath method sets that up:
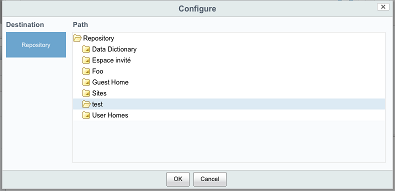
This method uses the out-of-the-box DoclibGlobalFolder to present a tabbed dialog of folders for the user to navigate and pick. When someone selects a folder, it throws a “folderSelected” event which this code listens for. When it hears it, it grabs the selected folder and nodeRef to save for later.
I’m not sure why Rik, my partner in crime for this little example, chose to append the selected path to the end of the nodeRef with a pipe. It could easily be stored in its own property.
Now, at this point, a logical question in your mind might be, “SimpleDialog and DoclibGlobalFolder look generally useful. How do I find out more about those and other goodies that might be available to my client-side JavaScript in Share?”. The answer is JSDoc. The Share Extras project has generated the JSDoc for all client-side JavaScript in Alfresco. The index for Alfresco 4.0.d lives here, the doc for DoclibGlobalFolder lives here, and the doc for SimpleDialog lives here.
With this client-side JavaScript in place, the “configure” link can now be clicked, but the SimpleDialog will be looking for a config web script that doesn’t exist yet. That’s the last step.
Write a Share-tier web script to handle config
In the previous section you saw that the SimpleDialog needs two web scripts: One returns a form that is rendered in the dialog. The other is the web script that dialog will POST to. These web scripts are Share tier web scripts, so they live in config/alfresco/site-webscripts. The com/someco package structure is used to keep code separate from other add-ons, and, by convention, web scripts that aren’t surf components go under “modules”. Under that I’m using “getLatestDoc” to group web scripts related to that and “config” below that to identify the purpose of these web scripts.
First, the GET web script. It’s kind of boring. There is no controller at all. The web script consists only of a FreeMarker view, a descriptor, and some properties files to localize the labels on the form. If you look at the view, config-get-latest-doc.get.html.ftl, you’ll see what I mean. It doesn’t even need any client-side JavaScript–the buttons were hooked up to methods on the GetLatestDoc component in the prior step.
Next, the POST web script. The SimpleDialog component will be sending JSON representing the form data to this web script. Because it is sending JSON, the web script controller is named config-get-latest-doc.post.json.js. That extra little “.json” bit gives me access to the form data in a “json” root-scoped object so I don’t have to fool around with eval.
The logic itself is pretty simple:
var c = sitedata.getComponent(url.templateArgs.componentId);
var saveValue = function(name, value)
{
  c.properties[name] = value;
  model[name] = value;
}
saveValue("title", String(json.get("title")));
saveValue("filterPath", String(json.get("filterPath")));
saveValue("filterPathView", String(json.get("filterPath")).split("|")[1]);
c.save();
What’s going on here? First, the controller grabs a handle to a component using a componentId. The component ID was passed in as an argument by the client-side JavaScript component that told the SimpleDialog which action URL to use. The client-side JavaScript component got the component ID when the dashlet’s view (get-latest-doc.get.html.ftl) instantiated it. So this component is actually the web script that renders the Get Latest Document dashlet.
The saveValue function is just a little helper that sets the properties on the component and the model in one call.
So, given the “json” object that is being passed in from the configuration dialog, all that needs to be done is to read those form field values out of the JSON and stick them onto the component properties and the model.
Now, when the dashlet’s web script is invoked, the framework will pass those properties to it via the args array. If the dashlet’s controller sees the values in the args array, it uses those, otherwise, it uses what it finds in the XML configuration.
Deploy and Test
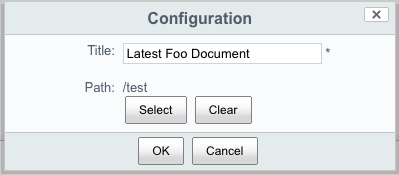
You can deploy the example by running “ant hotcopy-tomcat-jar”. If you already deployed 1.0 of the code and you are running two Tomcats, you won’t have to restart your repository tier, but you will have to restart your Share tier. Then, go into a site and add the dashlet to the site dashboard. If you click the pencil icon on the dashlet’s title bar, you should see the configuration form pop up:

If you then click “Select Path” the folder browser should be displayed:

On clicking “OK” the new configuration values will be persisted, but you’ll have to refresh the page to see them take effect. Of course you could modify the example further to move the rendering of the metadata to the client-side such that when the configuration data is saved it immediately refreshes the dashlet content, but I’ll save that for another time.


