Tag: jBPM

Trying out Activiti: Examples that leverage Alfresco’s new workflow engine

I’ve been playing with Activiti. It’s an open source, BPMN 2.0 compliant business process engine. The project is sponsored by Alfresco, who hired Tom Baeyens and Joram Barrez, the founders of jBPM, to create the Apache-licensed engine (take a look at the rest of Activiti’s all-star cast).

The first thing I did was head over to Activiti’s site and read through the user guide. I followed the tutorial and got a standalone instance of Activiti going with very little fuss. The concepts and terminology aren’t terribly different from jBPM, so if you’ve used jBPM, you’ll be familiar with the basics of Activiti in no time. The user guide is well-written so I urge everyone to start there.

Last week, Alfresco released a preview release of their Community product, labeled 3.4.e. This release, which I stress is only for preview purposes, was made available to let everyone get a first look at Alfresco’s integration of Activiti. If you watched the screencast showing an Alfresco workflow based on Activiti you may have thought, “Gee, that looks just like a jBPM-based workflow,” and you’re right–from a user standpoint, it is nearly identical. The difference, of course, is how the processes are described and the underlying implementation that executes the processes.

The screencast showed that the end users won’t see much of a change. That’s good, but I was anxious to find out how big a deal this transition will be from a developer’s perspective. The 3.4.e release gave me the perfect opportunity to dig in. I decided to take the examples from the Advanced Workflow chapter in the Alfresco Developer Guide (2008, Packt) and make them work with Alfresco’s embedded Activiti engine in 3.4.e. In this post, I’ll talk about how that went and I’ll give you the code so you can try it out yourself.

The code that accompanies this blog post includes the same set of four workflows implemented both in jBPM and Activiti as well as a readme that explains how to install and run everything. I’ll let you inspect that to see what the exact differences are rather than go over them here. Instead, I’ll spend the rest of the post covering the major differences in general.

Before we go any further, I guess we should have a quick terminology discussion. First, in jBPM, everything is a node. Specialized node types do different things like joins, splits, decisions, wait-states, sub-processes, and enclose tasks that get assigned to humans. In Activiti (and really, in BPMN) there are essentially events (start, stop, timer), tasks, and gateways. Of course, I’m simplifying greatly here–you should read the spec and the Activiti user guide. The important thing to note for people coming from jBPM is that in Activiti a “task” might be something a human does (“userTask”) or it could be automated (“scriptTask”, “serviceTask”, etc.). In jBPM connections between nodes are called “transitions” while in Activiti they are called “sequenceFlows”.

Designing Processes

I use Eclipse, so the first step was to get the Activiti BPMN 2.0 Designer plug-in working. Installation is well-documented on the Activiti wiki and it installs just like any other Eclipse plug-in, so it went fairly smooth. I had some sort of dependency conflict that I had to deal with, but nothing major.

All in all, designing processes in Activiti works just like it does in jBPM. The tool is different, but you’re still laying out a business process graphically, connecting steps in the workflow, and setting properties on those objects.

There are some known issues with the Designer that made creating and editing processes painful at times. I’m not going to call every one of those out in this post because this is a preview release–I expected to work through a few bumps. I will warn you of a few to hopefully save you some time:

  • You cannot save the diagram until it is syntactically correct. This means the BPMN 2.0 XML will not get generated until the diagram is correct. On a new process, when the editor complains about the diagram, you’d kind of like to just drop in to the XML source and fix what needs fixing. If that’s what you want to do, you have to open the .activiti file in the XML editor, make the change, re-open in the diagram, and then make a change and save to force the generation of the BPMN 2.0 XML.
  • You cannot change things like IDs, names, form keys, and task assignment in the BPMN 2.0 XML. You have to change these in the Activiti diagram. If you change the BPMN 2.0 XML the settings in the Activiti diagram will overwrite the BPMN XML. This doesn’t sound like a big deal until you come across the next issue.
  • There is a known problem enabling the properties for an object in the diagram: clicking an object in the diagram doesn’t refresh the properties view. I worked around it by first clicking some other tab in the properties view, then double-clicking on the object (and sometimes repeating that) until the properties view refreshed with the appropriate property set.

Again, I didn’t expect everything to be fully functional, so I am not complaining. I just want you to have your expectations properly set when you play with this on your own.

I should mention that the overall look-and-feel of the Activiti Designer seems a lot crisper and more visually appealing than the JBoss Graphical Process Designer (GPD) Eclipse plug-in. As an example, I loved the alignment helper rules. And I liked that you can bend sequence flows.

Adding Business Logic to Processes

My goal was to take four Alfresco jBPM processes and port them to Activiti. The first three are variations on Hello World. The fourth is a more real-life process that is used to review and approve whitepapers. In the book, the Publish Whitepaper workflow uses an action to set properties on the approved whitepaper. And I show how to combine a wait state with a mail action and a web script to allow third parties without direct access to Alfresco to participate in a workflow. For the initial cut at this exercise, I skipped all of that. For now, I really wanted to focus on the basics of the workflow engine. But the state idea and the web script interaction are interesting so I’ll do that later and will provide the update in a future blog post.

Challenge 1: Alfresco JavaScript in automated steps

The first problem I came to was how to handle workflow steps that have no human intervention. In jBPM those steps are implemented as nodes. Alfresco JavaScript can live inside events within the node or on transitions between nodes. Tasks assigned to users are typically enclosed in a task-node. In Activiti, tasks assigned to users are called userTasks. All of Alfresco’s sample Activiti workflows consist entirely of userTasks. But Activiti includes several node types that aren’t user tasks: a scriptTask uses JavaScript or Groovy to implement its logic and a serviceTask delegates to a Java class. My helloWorld processes consist entirely of automated steps, so a scriptTask sounded good to me. The problem was that scriptTask uses Activiti’s JavaScript implementation, not Alfresco’s JavaScript. So doing something simple like invoking the “logger” root object doesn’t work in a scriptTask.

Fine, I thought, I’ll use one of Alfresco’s listener classes to wrap my logger call and stick that listener in the scriptTask. But that didn’t work either because in the current release Alfresco’s listener classes don’t fully implement the interface necessary to run in a scriptTask.

After confirming these issues with the Activiti guys I decided I’d put my Alfresco JavaScript in listeners either on a userTask or on a sequenceFlow (we called those “transitions” in jBPM) depending on what I needed to do. Hopefully at some point we’ll be able to use scriptTask for Alfresco JavaScript because there are times when you need automated steps in your process that can deal with the Alfresco JavaScript root objects you’re used to.

Challenge 2: Processes without user tasks

As I mentioned, my overly simple Hello World examples are nothing but automated steps. I could implement those without userTasks by placing my Alfresco JavaScript on sequenceFlows. But Alfresco complained when I tried to run workflows that didn’t contain at least one user task. I didn’t debug this, and it is possible I could have worked through it, but I decided for now, the Activiti versions of my Hello World examples would all have at least one userTask.

Challenge 3: Known issue causes iBatis exceptions

In 3.4.e, there is a known issue in which user tasks will cause read-only iBatis exceptions unless you set the due date and priority. Search my examples for “ACT-765” to find the workaround.

Challenge 4: Letting a user pick between multiple output paths

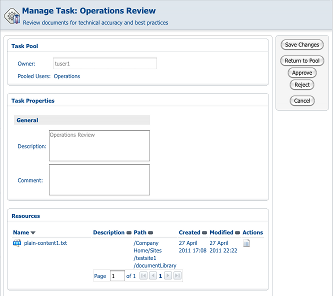
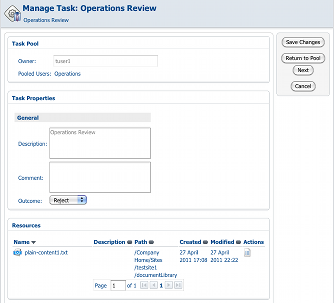
Suppose you have a task in which a human must decide whether to “Approve” or “Reject”. In Alfresco jBPM, you’d simply have two transitions and you’d set the label for those transitions in a properties bundle. In Alfresco Activiti that is handled a bit differently. Instead of having two transitions leaving the task, you have a single transition to an “exclusive gateway” (called a “decision”, in polite company). The task presents the “outcome” options–in this case “Approve” and “Reject”–to the user in a dropdown, as if it were any other piece of metadata on the task. Once the user picks an outcome and completes the task, the exclusive gateway checks the outcome value and takes the appropriate sequence flow. This difference will impact your business process logic, your workflow content model, and your end user experience so it is a significant difference.

For comparison, here’s what this looks like in the Alfresco Explorer UI for jBPM (click to enlarge):

And here is what it looks like in the Alfresco Explorer UI for Activiti (click to enlarge):

So in Explorer, with jBPM, the user can just click “Approve” or “Reject” while in Activiti, the user must make a dropdown selection and then click “Next”.

Here is the same task managed through the Alfresco Share UI for jBPM:
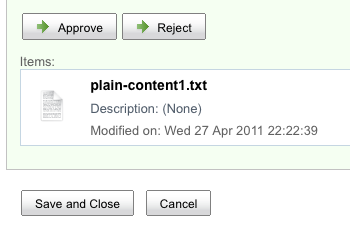
Versus Alfresco Share for Activiti:
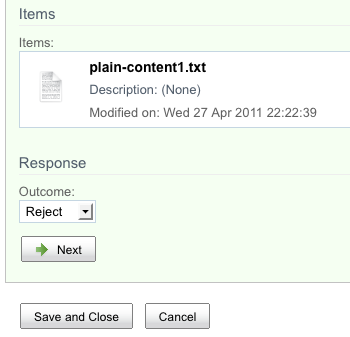
Similar to the Explorer differences, in Share, with jBPM, the user gets a set of buttons while with Activiti, the user makes a dropdown selection.

One open question I have about this is how to localize the transition steps for Activiti workflows if the steps are stored as constraints in the content model. On a past client project we implemented a Share-based customization to localize constraint list items but our approach won’t work in Explorer. Maybe the Activiti guys can help me out on that one.

Exposing Process to the Alfresco User Interface

And that brings us to user interface configuration. Overall, the process is exactly the same. First, you work on your process definition, then you create a workflow content model. Once the workflow content model is in place, you expose it to the user interface through the normal Alfresco user interface configuration approach. For the Explorer client that means web-client-config-custom. For the Share client that means share-config-custom. Labels, workflow titles, and workflow descriptions are localized via properties bundles.

One minor difference is that in jBPM, task names are identical to corresponding type names in your workflow content model. In Activiti, a userTask has an attribute called “activiti:formKey” that is used to map the task to the appropriate content type in the workflow content model.

Assigning Tasks to Users and Groups

The out-of-the-box workflows for both jBPM and Activiti show how to use pickers to let workflow initiators assign users and groups to workflows. My example workflows use hardcoded references rather than pickers so that you’ll have an example of both approaches. In my Hello World examples, I assign the userTask to the workflow initiator. This is done by using the “activiti:assignee” attribute on userTask, like this:

<userTask id="usertask3" name="User Task" activiti:assignee="${initiator.properties.userName}" activiti:formKey="bpm:task">

If you need to use a more complex expression there’s a longer form that uses a “humanPerformer” tag. See the User Guide.

In the Publish Whitepaper example I use pooled group assignment by using the “activiti:candidateGroups” attribute on userTask, like this:

<userTask id="usertask7" name="Operations Review" activiti:candidateGroups="GROUP_Operations" activiti:formKey="scwf:activitiOperationsReview">

Again, if you need to, there’s a longer form that uses a “potentialOwner” tag.

In my jBPM examples I use swimlanes for task assignment. I didn’t get a chance to use the equivalent in Activiti.

Deploying Processes

In standalone Activiti there are multiple options for deploying process definitions to the engine, including uploading a BAR (Business Archive) file into the running engine. I couldn’t find the equivalent of that in Alfresco’s embedded Activiti implementation or the equivalent of the jBPM deployer servlet, so for this exercise I used Spring configuration for both Activiti and jBPM processes. I hope by the time the code goes into Enterprise there will be a dynamic deployment option because that’s really helpful during development.

Workflow Console

Alfresco’s workflow console is a critical tool for anyone doing anything with advanced workflow. It has always been a puzzle to me as to why the workflow console (along with others) can only be navigated to directly using an unpublished URL. That head-scratcher still remains, but rest assured, all of your favorite console commands now work for both jBPM and Activiti workflows.

Summary

I hope this post has given you a small taste of the new Activiti engine embedded in Alfresco. I haven’t spent any time talking about the higher level benefits to Activiti. And there are many more details and features I didn’t have time to go into. My goal was to give all of you who have experience with Alfresco jBPM some start at getting your head around the new option for advanced workflow.

If you haven’t done so, grab a copy of Alfresco 3.4.e, download these examples, and play around. The zip is an Eclipse project that will deploy the workflows and associated configuration to your Alfresco and Share web applications via ant. The included readme file has step-by-step directions for running through each jBPM and Activiti example.

It is entirely possible that I’ve done something boneheaded. If so, do let me know so that all of us can benefit.

Resources

Collaborative content creation with Amazon Mechanical Turk

Amazon’s Mechanical Turk has been intriguing to me since I first heard about it. I think it is because the idea of essentially having a workflow with tasks that can be handled by any one of potentially hundreds of thousands of people has mind-blowing potential.

If you’re not familiar, Mechanical Turk (MTurk) is essentially a marketplace that matches up work requests (called HITs) with human workers (called “Turkers”). The work requests are typically very short tasks that require human intelligence like identifying, labeling, and categorizing images or transcribing audio. Amazon is the middleman that matches up HITs with Turkers. From a coding standpoint, your app makes calls to Amazon’s Web Services API to submit requests and to respond to completed work. Turkers monitor the available HITs, select the ones that look interesting to them and then complete the tasks for which they are paid, usually pennies per task.

Sorting through images or performing other simple tasks is one thing, but what about more complex tasks, like, say, writing an article? Here’s a story about some guys who have created a framework called CrowdForge to do just that. CrowdForge is a Django implementation based on research that one of the authors did at Carnegie Mellon. In a nutshell, their approach splits complex problems into smaller problems until they are small enough to be successfully handled by MTurk, then aggregates the results to form the answer to the original problem. It’s Map Reduce applied to human tasks instead of data clusters.

You should read the original post, but to summarize it, the story talks about an experiment that the team did around collaborative content creation. They applied their framework to the task of writing travel articles. They split the task into 36 sub-tasks and gave each sub-task to an author, then aggregated the results into a coherent article. The partitioning, writing, and re-assembly (the “reduce” part of Map Reduce) was all done through Mechanical Turk by CrowdForge. Total cost for each article? About $3.26.

Then, for comparison, they assigned individual authors to write articles on the same topics using the traditional approach of one author per article paying roughly what they paid for the collaboratively created content. When the results were reviewed, the crowd sourced content beat the single author content in terms of quality. It’s important to note that in both cases, authors were Turkers. This wasn’t Mechanical Turk versus Rick Steves. But still, the researchers were able to use Mechanical Turk to break the problem down, perform each task, and then clean up the result, all for about the same cost without sacrificing quality. That’s pretty cool.

As you know, I’m a huge fan of Django, and I think it is more than okay for the presentation tier of a solution like this. But it seems like a workflow engine like Activiti or jBPM would be a better tool for implementing the actual process flow for a framework like CrowdForge because it could potentially mean less coding and maybe more accessibility by business analysts. Imagine using a process modeling tool to lay out your business process and then dropping in a “Mechanical Turk Partition Task” node, graphically connecting it with a “Mechanical Turk Map Task”, and then hooking that to a “Mechanical Turk Reduce Task”. In and around those you’re wiring up email notifications, internal review tasks, etc.

Metaversant has been working with a client who’s doing something very similar. Editors make writing assignments which are outsourced to Mechanical Turk. When the assignments are complete, they are published to one or more channels. Instead of the Django CrowdForge framework, we’re using Alfresco and the embedded jBPM workflow engine. Alfresco stores the content while the jBPM workflow engine orchestrates the process, making calls to Mechanical Turk and the publishing endpoints.

This approach can be generalized to apply to all kinds of problems beyond content authoring. If you are an Alfresco, jBPM, or Activiti user, and you have a business problem that might lend itself to being addressed by a micro task marketplace like Mechanical Turk, let me know. Maybe we can get my client to open source the specific integration between jBPM and Mechanical Turk. If you’ve already done something like this, let me know that too. I’m interested to hear how others might be integrating content repositories and BPM engines with Mechanical Turk.

Monitoring folders with Alfresco workflows

This is the second part of a two-part post on some recent work Metaversant did with Alfresco workflows. The first part was a post on Workflow Reporting. It outlined a high-level recipe for creating a workflow dashboard in Share that showed a list of workflows started for a specific Share site and allowed bulk actions (such as “cancel”). In this post, we’ll look at Folder Monitoring which deals with how to automatically start an Alfresco jBPM workflow when a document is dropped into a folder.

The easy answer

The embedded jBPM workflow engine that’s embedded in Alfresco is flexible and powerful. Creating a new process and wiring it into the Alfresco Explorer or Alfresco Share user interface is straightforward once you’ve done it a time or two. If you need a refresher on the details, see “Get your Alfresco ‘flow on“. For the purposes of this discussion, just know that your process definition can have process variables which you can read and set from the user interface and from code within the process definition.

It’s actually really easy to start a workflow when objects are created or updated in a folder. That’s because the Alfresco JavaScript API can run the “start-workflow” action, and Alfresco JavaScript can be invoked from a rule that runs when something is updated in a folder. The JavaScript to start a workflow using this approach looks like this:

var startWorkflowAction = actions.create("start-workflow");
startWorkflowAction.parameters.workflowName = "jbpm$wf:adhoc";
startWorkflowAction.parameters["bpm:assignee"] = assignee;
startWorkflowAction.parameters["bpm:workflowDescription"] = description;
startWorkflowAction.execute(document);

The catch is that when you use that approach, the developer writing the JavaScript has to know at design-time what values to provide to the workflow when it starts up (in this case, the assignee and the description). Ordinarily, when a workflow is manually invoked, the end-user starting the workflow is there to provide those values. If your particular workflow doesn’t require any variables to start, or the variables are known at design-time, the simple rule-invokes-JavaScript approach will work. Otherwise, something more is required.

What we needed for this client was not only the ability to start a workflow when a new object landed in a folder, but also the ability for an end-user to specify parameters for that workflow ahead of time. When discussing the functionality we called it “precompiled workflows” and “workflow templates”, which is pretty descriptive of what we needed. From the user’s perspective, we needed one user (let’s call her a Manager) to be able to say, “When an object is created in this folder, launch this specific workflow with these parameters”. When other users (or systems) create objects in that folder, the workflow needs to launch automatically without further input.

Options considered

As usual, there are a few different ways to go about this. One is the rule-invokes-JavaScript approach discussed earlier. The problem with this is that the parameters have to be specified in the JavaScript and that won’t work for non-technical end-users. This option was discarded early.

The next option we considered was creating a custom action. This almost gets us there. The Manager user can create a rule on a folder and select the custom action. The form service (Share was the main UI in this case) can be configured to let the Manager set the parameters to use when launching the workflow. Non-Manager users can then create objects and workflows will launch automatically.

The problem with this approach is that the list of parameters is not finite–this client had big plans for the workflow engine and they did not want to modify the custom workflow launching action every time they created a workflow that had a new parameter. Similar to the first option, this approach has worked well in the past, but it didn’t fit for this client, so we moved on.

The third option we looked at was a variation on the second. Rather than having the action handler responsible for grabbing parameter values, this approach uses the workflow model itself to persist a “workflow configuration” that the action can point to. The Manager would create a workflow configuration, then configure the rule to say, “When documents are added to this folder, start this workflow with this configuration”.

The workflow configuration could be a custom object. Briefly, we considered actually persisting objects that correspond to the types defined in the workflow model (normally, those aren’t saved anywhere), and I think if we ever revist this option, we may look at that again.

The problem with this approach was that the Manager has to think too much. Am I creating a workflow that’s going to launch other workflows? Okay, then I need to create a “workflow configuration” and configure a rule. Am I just routing something through a workflow? Okay, then I need to use “start workflow” like I normally would. That’s way too confusing. Next!

Implementation

Ultimately, we decided that the easiest route from both an implementation perspective and an end-user perspective was to rely on the business process to be smart enough to tell the difference between a package with a folder and a package with documents. When the workflow is run on a folder, it can iterate over the children of the folder, spawning new workflows and copying its process variables into the newly started workflows. It can then transition to a wait state until something tells it to go check for new children in the folder. When the same workflow is run on a document however, it proceeds down the “non-folder” route and performs the work it normally would.

Using this approach, every workflow is able to run as both a “folder monitor” and a “worker”. That way, when a Manager starts a workflow, she doesn’t have to think about whether she’s starting a “monitor” workflow or a one-time workflow, she just starts the workflow as normal and sets the parameters. The business process does the work of spawning additional workflows when it needs to and passes those parameters along. Now we’re talking!

High-level Recipe

Similar to my previous post on workflow dashboards, I may make this source available at some point, but until then, here are the high-level steps to do it yourself.

Create the jBPM process definition

This will work with any process definition, so I won’t describe anything business-specific here. Instead, I’ll talk about what you would add to your process definition to make this work.

The first thing the business process needs to do is make a decision: Am I running against a folder or a document? If the package contains documents, the workflow continues as it normally would. If, however, it contains a folder, the workflow iterates over the folder’s children and starts a new workflow instance for every child in the package, copying its process variables into the new workflows.

The decision is implemented as JavaScript. If we find one folder, we take the folder route. In this case, the users are only going to run the workflow on one folder at-a-time so we don’t have to worry about what to do if the workflow package contains a mix of documents and folders. The decision JavaScript looks like this:

var flag = false;
for (var i = 0; i < bpm_package.children.length; i++) {
    if (bpm_package.children[i].isContainer) {
        flag = true;
        break;
    }
}
isContainer = flag;

And the transitions for the decision look like this:

<transition to="forkWork" name="toForkWork"></transition>
<transition to="forkMonitor" name="toForkMonitor">
    <condition>#{isContainer == true}</condition>
</transition>

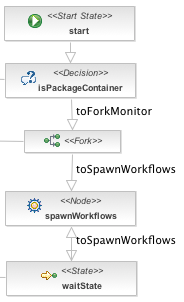
The forkMonitor node is a fork that creates a workflow dashboard task (see previous post) and simultaneously transitions to the spawnWorkflows node. The spawn workflows code is a little too lengthy to include here, but what it does is:

  • Grabs the parameters it needs to pass in to each of the newly started workflows
  • For each document in the workflow package…
  • Checks to make sure the document hasn’t already been processed (more on that later)
  • Checks to make sure the document isn’t already in a workflow
  • Starts the workflow using the out-of-the-box start-workflow action (see the code at the start of the article)

Once the workflows are spawned, the business process transitions to a wait state where the process sits indefinitely until it is told to check the folder for new children.

Create a custom action that will tell the process definition to check for children

How does the workflow know when new children have been added to the folder? I’m so glad you asked. After the workflow spawns new workflows for the children, it transitions to a wait state. To trigger the workflow to move off the wait state, we used a custom rule action. The rule action is set high enough up the folder hierachy that end-users don’t have to worry about it–it automatically inherits onto the folders created below it. The rule action is Java-based, and it takes two parameters: The name of a node and the name of a transition to take.

When a new document is added to a folder, the rule triggers the action. The action grabs the node’s parent and checks to see if it is involved in a workflow. If it is, it tries to find the workflow node named in the parameter, which will be the wait state mentioned in the previous step. If it finds that, it signals the node to take the specified transition. The transition will be to the “spawn workflows” node.

Workflow screenshotThe combination of the wait state and the spawn workflows node in the business process with the custom rule action that signals the wait state creates a cool little “interrupt” loop: The process spawns workflows for folder children, then waits until more children arrive, then spawns workflows for those children, and so on until someone kills the workflow.

Customize the Share user interface to allow workflows to start on folders

Since the dawn of time Alfresco’s UI has not allowed workflows to start on folders, but the workflow engine can handle it. For this approach to work we most definitely have to be able to start workflows on folders. That’s a pretty simple little config tweak to make that happen in Share–just copy the existing assign workflow action link from the document actionSet to the folder actionSet in documentlist.get.config.xml (and document-actions.get.config.xml), like this:

<actionSet id="folder">
    ...
    <action type="action-link" id="onActionAssignWorkflow" permission="permissions" label="actions.document.assign-workflow" />
    ...
</actionSet>

Voila! Now you can run workflows against folders.

Create a “workflow status” aspect to avoid processing docs more than once

The last step is to make sure that documents only run through the process once. Otherwise, every time the process spawns workflows for children in a folder, he’ll start one up for every child in the folder, regardless of whether or not its been through the workflow already. This may be what you want, but this particular client wanted docs to run through the process only once.

To do this, we created a simple aspect with a “workflow status” property. In the last node of the process, the property gets set. When the spawn workflows code runs, it filters out folder children that have the status set.

That’s it!

This approach puts the burden on the workflow designer to use some standard node names and logic in their process definitions. And, it will result in many in-flight workflows (at least one for every folder being monitored), although that shouldn’t be a big deal from a performance perspective (running workflows really aren’t “running”).

The important thing for this client is that it provides a nice way for users to essentially “pre-configure” workflows so that subsequent users can start workflows simply by adding documents to a folder, all without anyone having to learn any new “workflow configuration” constructs. And, workflow designers can easily make their workflows “folder aware” or “templatable”, depending on how you want to look at it, all within the process definition, without having to recompile any custom actions or tweak JavaScript.