Tag: Alfresco Share

Alfresco Tutorial: Custom actions including Share configuration

I’ve published a revision of my original Alfresco custom actions tutorial. The second edition greatly expands on the first by adding a UI action example. The original included only a rule action example. Just like the second edition of the content types tutorial, I’ve added instructions on how to configure the actions in Alfresco Share. The Alfresco Explorer steps are still there–they’ve been moved to the Appendix.

The code that accompanies the tutorial builds on the content types tutorial, so it includes the SomeCo content model and the user interface configuration needed to expose that to the Alfresco Share and Alfresco Explorer user interface.

This should be helpful to anyone who read the first edition who now wants to learn how to do the same thing using Alfresco Share, including some of the new extension points available in Alfresco 4.

Take a look and tell me what you think.

Will Abson’s Wonderful World of Dashlets

Back when Alfresco first launched Surf, the framework on which Alfresco Share is based, a handful of us went to Chicago to hang out in a conference room on a ship in the harbor where we did a deep dive on the framework and then came up with proposed add-ons that would leverage it. I was at Optaros at the time. Our add-on was the Alfresco Share microblogging component and we also did some Surf Code Camps. The goal, of course, was to get the word out about Surf and encourage others to develop and contribute Share customizations.

The deep dive was great and the code camps that followed were valuable and well-attended. What I think the approach missed was that you don’t need to be a Surf expert to code some simple dashlets. We were handing out “How to Fly the Space Shuttle” when we probably should have started with “Building and Launching Your First Model Rocket”.

That’s why Will Abson is my current Alfresco community hero. At this year’s Alfresco Kickoff meeting in Orlando (notes), Will showed a project he and a few others have been working on called Share Extras. Share Extras is a collection of small projects ranging from “Hello World” dashlets to custom theme, data lists, and document action examples.

For example, the list of what I’d call simple, mash-up examples includes things like:

  • Twitter Feed Dashlet – Shows a specific Twitter user’s feed.
  • Twitter Search Dashlet – Shows a Twitter feed based on a hashtag.
  • BBC Weather Dashlet – Shows weather feed from BBC.
  • Flickr Dashlets – Shows flickr photos in a slideshow.
  • Google Site News – Shows the last ten blog posts from Google News.
  • iCal Feed – Shows entries from an iCal feed.
  • Notice Dashlet – Stores/shows arbitrary text, like what you’d use for a maintenance message or an announcement.
  • Train times – Shows the National Rail train schedule.

From there, you can move on to more extensive examples. For example, rather than simply displaying data from public services, these examples start to store/retrieve data in the underlying Alfresco repository:

  • Site Tags Dashlet – Displays a tag cloud consisting of tags used in your site.
  • Site Poll Dashlet – Uses a custom data list type called Poll to configure a simple poll. Shows results in bar chart.
  • Document Geographic Details – Adds a map using the document’s geocoding metadata just below the permissions section.
  • Sample Data Lists – A simple data list example that lets you capture info on Books (author, title, ISBN).
  • Execute Script Custom Document Action – Shows an example of adding a custom action to the action list that runs server-side JavaScript against a node.

The nice thing is that (almost) every one of these extensions deploys as a self-contained JAR file. Will’s build assumes you are running the repository and the Share web apps in the same container, so it deploys the JAR to $TOMCAT_HOME/shared/classes/lib, but you can obviously tweak that if your config is different. The ability to run everything out of a JAR, including what would normally be file system based resources like CSS, client-side JavaScript, and images is a relatively new feature (3.3, I think). It’s much nicer than fooling with AMPs.

Here is a list of my five favorites from the collection:

  • Node Browser – A port of the Explorer client’s node browser to the Share UI. I like this one because it brings an extremely useful developer tool into Share, which is where most of us are spending time these days. It also shows how you can plug your own tools into Share’s admin console.
  • Red Theme – A simple custom theme example. This is on my favorites list because creating a custom theme is something that is requested often and should be easy to do. Follow this example to create your own.
  • Site Geotagged Content Dashlet – Adds a dashlet that shows a map of geotagged content contained in the document library. I can’t help it. I like maps.
  • Site Blog Dashlet – Dashlet that shows site blog posts. This is a favorite because it plugs a hole in the product. If you’re going to use the blog tool in a Share site, you’re going to want to show those posts somewhere and a dashlet makes a lot of sense.
  • Wiki Rich Content – Automatically puts a table of contents at the top of a wiki page based on the headings contained within the page. Also does a nice job with pre-formatted text. This is another example of a feature that should probably be in the core product.

The Google Code project includes screenshots for each of these projects, but it is really easy to do a checkout on the code, import the projects into Eclipse, create a build.properties file in your home directory to override the tomcat.home prop, then run “ant hotcopy-tomcat-jar” to deploy one and see it in action for yourself. I tried them all out on Alfresco 3.4d Community and they worked great. I think all but one or two will work on 3.3.

The Share Extras project includes a Sample Project with a folder structure and Ant build that you can clone and use as a starting point for your own development. If you create something cool, you should share it on Google Code and then let me know about it. Or give it to Will and he can add it to his ever-growing pile of cool Share add-on examples.

Trying out Activiti: Examples that leverage Alfresco’s new workflow engine

I’ve been playing with Activiti. It’s an open source, BPMN 2.0 compliant business process engine. The project is sponsored by Alfresco, who hired Tom Baeyens and Joram Barrez, the founders of jBPM, to create the Apache-licensed engine (take a look at the rest of Activiti’s all-star cast).

The first thing I did was head over to Activiti’s site and read through the user guide. I followed the tutorial and got a standalone instance of Activiti going with very little fuss. The concepts and terminology aren’t terribly different from jBPM, so if you’ve used jBPM, you’ll be familiar with the basics of Activiti in no time. The user guide is well-written so I urge everyone to start there.

Last week, Alfresco released a preview release of their Community product, labeled 3.4.e. This release, which I stress is only for preview purposes, was made available to let everyone get a first look at Alfresco’s integration of Activiti. If you watched the screencast showing an Alfresco workflow based on Activiti you may have thought, “Gee, that looks just like a jBPM-based workflow,” and you’re right–from a user standpoint, it is nearly identical. The difference, of course, is how the processes are described and the underlying implementation that executes the processes.

The screencast showed that the end users won’t see much of a change. That’s good, but I was anxious to find out how big a deal this transition will be from a developer’s perspective. The 3.4.e release gave me the perfect opportunity to dig in. I decided to take the examples from the Advanced Workflow chapter in the Alfresco Developer Guide (2008, Packt) and make them work with Alfresco’s embedded Activiti engine in 3.4.e. In this post, I’ll talk about how that went and I’ll give you the code so you can try it out yourself.

The code that accompanies this blog post includes the same set of four workflows implemented both in jBPM and Activiti as well as a readme that explains how to install and run everything. I’ll let you inspect that to see what the exact differences are rather than go over them here. Instead, I’ll spend the rest of the post covering the major differences in general.

Before we go any further, I guess we should have a quick terminology discussion. First, in jBPM, everything is a node. Specialized node types do different things like joins, splits, decisions, wait-states, sub-processes, and enclose tasks that get assigned to humans. In Activiti (and really, in BPMN) there are essentially events (start, stop, timer), tasks, and gateways. Of course, I’m simplifying greatly here–you should read the spec and the Activiti user guide. The important thing to note for people coming from jBPM is that in Activiti a “task” might be something a human does (“userTask”) or it could be automated (“scriptTask”, “serviceTask”, etc.). In jBPM connections between nodes are called “transitions” while in Activiti they are called “sequenceFlows”.

Designing Processes

I use Eclipse, so the first step was to get the Activiti BPMN 2.0 Designer plug-in working. Installation is well-documented on the Activiti wiki and it installs just like any other Eclipse plug-in, so it went fairly smooth. I had some sort of dependency conflict that I had to deal with, but nothing major.

All in all, designing processes in Activiti works just like it does in jBPM. The tool is different, but you’re still laying out a business process graphically, connecting steps in the workflow, and setting properties on those objects.

There are some known issues with the Designer that made creating and editing processes painful at times. I’m not going to call every one of those out in this post because this is a preview release–I expected to work through a few bumps. I will warn you of a few to hopefully save you some time:

  • You cannot save the diagram until it is syntactically correct. This means the BPMN 2.0 XML will not get generated until the diagram is correct. On a new process, when the editor complains about the diagram, you’d kind of like to just drop in to the XML source and fix what needs fixing. If that’s what you want to do, you have to open the .activiti file in the XML editor, make the change, re-open in the diagram, and then make a change and save to force the generation of the BPMN 2.0 XML.
  • You cannot change things like IDs, names, form keys, and task assignment in the BPMN 2.0 XML. You have to change these in the Activiti diagram. If you change the BPMN 2.0 XML the settings in the Activiti diagram will overwrite the BPMN XML. This doesn’t sound like a big deal until you come across the next issue.
  • There is a known problem enabling the properties for an object in the diagram: clicking an object in the diagram doesn’t refresh the properties view. I worked around it by first clicking some other tab in the properties view, then double-clicking on the object (and sometimes repeating that) until the properties view refreshed with the appropriate property set.

Again, I didn’t expect everything to be fully functional, so I am not complaining. I just want you to have your expectations properly set when you play with this on your own.

I should mention that the overall look-and-feel of the Activiti Designer seems a lot crisper and more visually appealing than the JBoss Graphical Process Designer (GPD) Eclipse plug-in. As an example, I loved the alignment helper rules. And I liked that you can bend sequence flows.

Adding Business Logic to Processes

My goal was to take four Alfresco jBPM processes and port them to Activiti. The first three are variations on Hello World. The fourth is a more real-life process that is used to review and approve whitepapers. In the book, the Publish Whitepaper workflow uses an action to set properties on the approved whitepaper. And I show how to combine a wait state with a mail action and a web script to allow third parties without direct access to Alfresco to participate in a workflow. For the initial cut at this exercise, I skipped all of that. For now, I really wanted to focus on the basics of the workflow engine. But the state idea and the web script interaction are interesting so I’ll do that later and will provide the update in a future blog post.

Challenge 1: Alfresco JavaScript in automated steps

The first problem I came to was how to handle workflow steps that have no human intervention. In jBPM those steps are implemented as nodes. Alfresco JavaScript can live inside events within the node or on transitions between nodes. Tasks assigned to users are typically enclosed in a task-node. In Activiti, tasks assigned to users are called userTasks. All of Alfresco’s sample Activiti workflows consist entirely of userTasks. But Activiti includes several node types that aren’t user tasks: a scriptTask uses JavaScript or Groovy to implement its logic and a serviceTask delegates to a Java class. My helloWorld processes consist entirely of automated steps, so a scriptTask sounded good to me. The problem was that scriptTask uses Activiti’s JavaScript implementation, not Alfresco’s JavaScript. So doing something simple like invoking the “logger” root object doesn’t work in a scriptTask.

Fine, I thought, I’ll use one of Alfresco’s listener classes to wrap my logger call and stick that listener in the scriptTask. But that didn’t work either because in the current release Alfresco’s listener classes don’t fully implement the interface necessary to run in a scriptTask.

After confirming these issues with the Activiti guys I decided I’d put my Alfresco JavaScript in listeners either on a userTask or on a sequenceFlow (we called those “transitions” in jBPM) depending on what I needed to do. Hopefully at some point we’ll be able to use scriptTask for Alfresco JavaScript because there are times when you need automated steps in your process that can deal with the Alfresco JavaScript root objects you’re used to.

Challenge 2: Processes without user tasks

As I mentioned, my overly simple Hello World examples are nothing but automated steps. I could implement those without userTasks by placing my Alfresco JavaScript on sequenceFlows. But Alfresco complained when I tried to run workflows that didn’t contain at least one user task. I didn’t debug this, and it is possible I could have worked through it, but I decided for now, the Activiti versions of my Hello World examples would all have at least one userTask.

Challenge 3: Known issue causes iBatis exceptions

In 3.4.e, there is a known issue in which user tasks will cause read-only iBatis exceptions unless you set the due date and priority. Search my examples for “ACT-765” to find the workaround.

Challenge 4: Letting a user pick between multiple output paths

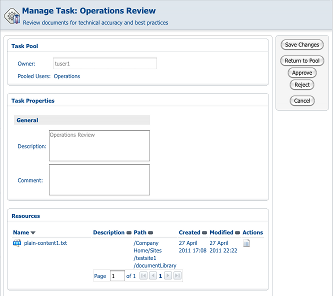
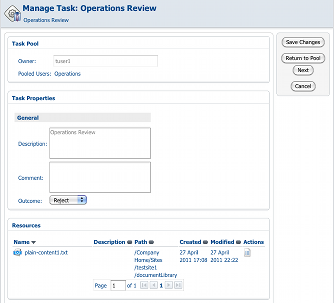
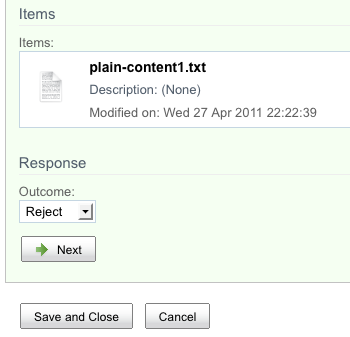
Suppose you have a task in which a human must decide whether to “Approve” or “Reject”. In Alfresco jBPM, you’d simply have two transitions and you’d set the label for those transitions in a properties bundle. In Alfresco Activiti that is handled a bit differently. Instead of having two transitions leaving the task, you have a single transition to an “exclusive gateway” (called a “decision”, in polite company). The task presents the “outcome” options–in this case “Approve” and “Reject”–to the user in a dropdown, as if it were any other piece of metadata on the task. Once the user picks an outcome and completes the task, the exclusive gateway checks the outcome value and takes the appropriate sequence flow. This difference will impact your business process logic, your workflow content model, and your end user experience so it is a significant difference.

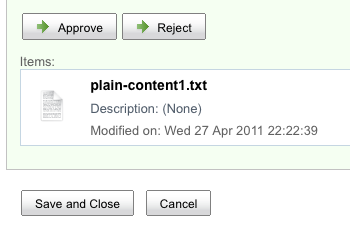
For comparison, here’s what this looks like in the Alfresco Explorer UI for jBPM (click to enlarge):

And here is what it looks like in the Alfresco Explorer UI for Activiti (click to enlarge):

So in Explorer, with jBPM, the user can just click “Approve” or “Reject” while in Activiti, the user must make a dropdown selection and then click “Next”.

Here is the same task managed through the Alfresco Share UI for jBPM:

Versus Alfresco Share for Activiti:

Similar to the Explorer differences, in Share, with jBPM, the user gets a set of buttons while with Activiti, the user makes a dropdown selection.

One open question I have about this is how to localize the transition steps for Activiti workflows if the steps are stored as constraints in the content model. On a past client project we implemented a Share-based customization to localize constraint list items but our approach won’t work in Explorer. Maybe the Activiti guys can help me out on that one.

Exposing Process to the Alfresco User Interface

And that brings us to user interface configuration. Overall, the process is exactly the same. First, you work on your process definition, then you create a workflow content model. Once the workflow content model is in place, you expose it to the user interface through the normal Alfresco user interface configuration approach. For the Explorer client that means web-client-config-custom. For the Share client that means share-config-custom. Labels, workflow titles, and workflow descriptions are localized via properties bundles.

One minor difference is that in jBPM, task names are identical to corresponding type names in your workflow content model. In Activiti, a userTask has an attribute called “activiti:formKey” that is used to map the task to the appropriate content type in the workflow content model.

Assigning Tasks to Users and Groups

The out-of-the-box workflows for both jBPM and Activiti show how to use pickers to let workflow initiators assign users and groups to workflows. My example workflows use hardcoded references rather than pickers so that you’ll have an example of both approaches. In my Hello World examples, I assign the userTask to the workflow initiator. This is done by using the “activiti:assignee” attribute on userTask, like this:

<userTask id="usertask3" name="User Task" activiti:assignee="${initiator.properties.userName}" activiti:formKey="bpm:task">

If you need to use a more complex expression there’s a longer form that uses a “humanPerformer” tag. See the User Guide.

In the Publish Whitepaper example I use pooled group assignment by using the “activiti:candidateGroups” attribute on userTask, like this:

<userTask id="usertask7" name="Operations Review" activiti:candidateGroups="GROUP_Operations" activiti:formKey="scwf:activitiOperationsReview">

Again, if you need to, there’s a longer form that uses a “potentialOwner” tag.

In my jBPM examples I use swimlanes for task assignment. I didn’t get a chance to use the equivalent in Activiti.

Deploying Processes

In standalone Activiti there are multiple options for deploying process definitions to the engine, including uploading a BAR (Business Archive) file into the running engine. I couldn’t find the equivalent of that in Alfresco’s embedded Activiti implementation or the equivalent of the jBPM deployer servlet, so for this exercise I used Spring configuration for both Activiti and jBPM processes. I hope by the time the code goes into Enterprise there will be a dynamic deployment option because that’s really helpful during development.

Workflow Console

Alfresco’s workflow console is a critical tool for anyone doing anything with advanced workflow. It has always been a puzzle to me as to why the workflow console (along with others) can only be navigated to directly using an unpublished URL. That head-scratcher still remains, but rest assured, all of your favorite console commands now work for both jBPM and Activiti workflows.

Summary

I hope this post has given you a small taste of the new Activiti engine embedded in Alfresco. I haven’t spent any time talking about the higher level benefits to Activiti. And there are many more details and features I didn’t have time to go into. My goal was to give all of you who have experience with Alfresco jBPM some start at getting your head around the new option for advanced workflow.

If you haven’t done so, grab a copy of Alfresco 3.4.e, download these examples, and play around. The zip is an Eclipse project that will deploy the workflows and associated configuration to your Alfresco and Share web applications via ant. The included readme file has step-by-step directions for running through each jBPM and Activiti example.

It is entirely possible that I’ve done something boneheaded. If so, do let me know so that all of us can benefit.

Resources

Improving Alfresco Share performance by using getChildren

I had a client that was seeing response time in the neighborhood of several seconds for the Alfresco Share document library and data list pages across all of his sites. The client’s Share install had just over 1,000 Share sites. The volume of the data lists in each site was insignificant. This is the story of how we resolved the issue, but note that the resolution may not be appropriate for everyone in all cases.

The Symptoms

The client was seeing slow performance of the document library and data list pages in Share. They noticed that the folder tree in the document library view responded quickly but the actual document list itself took a long time to render. This was happening for all users in all sites.

Looking for a quick resolution, even if that meant solving the symptom but not necessarily the underlying cause, we decided to see if we could optimize the repository tier web script that returns the document library contents to see if we could get it to perform a little closer to what we were seeing with the folder tree. I made a copy of the repository tier’s doclist.get web script into our project’s extension directory and started tweaking.

The Bunny Trail

First, I’ll fess up to a mistaken assumption I had: I thought that everything in Alfresco always went through Lucene. I knew that separating out full-text index searches and property searches into Lucene queries and DB queries, respectively, was on the roadmap, but I had it in my head that in 3.4, even a call to something like ScriptNode.getChildren() was ultimately a Lucene index hit. If everything is a Lucene hit, I figured, there had to be a different reason for the folder list control to perform so much better than the document library list.

So, instead of starting with what, in hindsight, would have yielded the most bang for the buck, I started tuning what turned out to be little things. For example, our app didn’t use favorites, so I removed any references to the preferences service. Our app didn’t allow users to check out documents so out went any logic that dealt with that. Goodbye, Google Docs code blocks. Adios, type and aspect checking for types and aspects our app doesn’t support. Farewell, filters. I hardcoded permissions to avoid the lookup. I set created by and modified by values to empty strings to avoid the lookup to the person object. I jettisoned anything that wasn’t crucial to simply producing a list of the folder contents. All of this did speed up the repository-tier web script, but only a little bit. I needed an order of magnitude improvement.

The Lightbulb

Next, I did what I should have done initially: Add some simple log statements to see which part of the code was taking the longest to execute. Of course, it was the query. As it turns out, it is much, much faster to ask a node for its children (which is what the treenode web script does) than it is to do a Lucene search with a PARENT clause that yields the same result set (which is what the doclist web script does). On a dev machine with a small dataset, you don’t notice the difference. But on our integration and prod servers the difference is huge.

The Fix

The Share document library page uses a YUI data table to produce the list of documents for the currently selected folder. The data table is bound to a web script that lives on the repository tier that is responsible for returning the requested data as JSON. Out-of-the-box, the repository tier web script that returns the document list calls a function called getFilterParams which is responsible for setting up a bunch of query predicates based on the document library filter the user has selected in the Share UI. The script then asks the filterParams object for the Lucene query it needs to run to return the document list. It then uses the search service to invoke the query and return the results.

My optimization was to bypass building and executing the query completely because, in our case, we don’t care about filters. All we want is the list of children in the current folder, and ScriptNode already has a function to do that called getChildren. So instead of performing a Lucene search, we ask the current “root node” for its children. We then iterate over the results and filter out a couple of content types that otherwise would have been excluded had we used the Lucene query instead of getting all children.

Oh man, that did it. The document library went from rendering in 6+ seconds to rendering in less than 1 second.

I gave the data lists web script the same treatment. In that case, our customized Share app still makes use of filters, so the “getChildren bypass” is only used when the “All” filter is selected. When any other filter is selected the original out-of-the-box Lucene query is used.

Now, again, I completely acknowledge that we may have succeeded in speeding up performance for those two cases, but failed to resolve the underlying issue, and addressing that may result in a system-wide performance boost, but it was good to get the quick fix in place and it should be easy enough to revert if and when we resolve the underlying index issue, if one exists.

Here’s a code snippet from the custom doclist.get.js controller if you are curious:


if (parsedArgs.path == "")
{
    parentNode = parsedArgs.rootNode;
}
else
{
    parentNode = parsedArgs.rootNode.childByNamePath(parsedArgs.path);
}      
// We are iterating over the parent node's children instead of iterating
// over search results... 
for each (node in parentNode.getChildren())
{
   try
   {
      // ...so we need to filter out some system types that would have otherwise been
      // filtered out by the lucene query
      if (node.typeShort == "cm:systemfolder" || node.typeShort == "cm:thumbnail")
      {
         // do nothing. we don't want these.
      }
      else if (node.isContainer || node.typeShort == "app:folderlink")
      {
         folderNodes.push(node);
      }
      else
      {
         documentNodes.push(node);
      }
   }
   catch (e)
   {
      // Possibly an old indexed node - ignore it
   }
}

Now available: Alfresco Fivestar Ratings add-on for Alfresco Share

A couple of weeks ago I posted a survey asking if anyone saw any value in a five star ratings widget for Alfresco Share. Honestly, it would have only taken one or two positive responses–even if no one needed one, there’s value in it for example’s sake. It turns out about 20 readers of this blog voted positively, so I went ahead and knocked it out.

This Alfresco Share customization makes it possible for any document in the repository to become “rateable”. When a document is rateable, the Alfresco Share user interface will show a clickable five star ratings widget. The stars light up to indicate the average rating for that document. Users simply click one of the stars to post their own rating. When clicked, the widget refreshes itself with the updated average.

Here is a short screencast that demonstrates the customization. You’ll want to make it full screen.

To implement this, I took the Someco Ratings Service from the Alfresco Developer Guide, moved it to the Metaversant namespace, and changed the names of my Spring beans and JavaScript root variable. Even though my initial target Alfresco version is 3.3, I didn’t want the code to conflict with Alfresco’s new back-end-only ratings service in 3.4 which uses some of the same names that were in the book. I also changed the JSON that the ratings web scripts use to be closer to what exists in 3.4. That way, when I do make a version that works with 3.4, it could potentially work with either my ratings back-end or Alfresco’s.

I then went to work on the UI side, integrating the widget into Share’s document details page, document library (both Share and repository views), search results page, and document-related dashlets. To go from what was in the book to a working integration I revamped the client-side ratings JavaScript from a set of functions to an actual object. Then, I started injecting my own methods into Alfresco’s client-side object prototypes to drop my widget in where appropriate.

Alfresco is still working to make customizations like this more modular and easier to plug in alongside their code and code from the community. Until then, be aware that if your Alfresco implementation already has customizations that override some of the same web scripts and client-side components this module does, there may be some manual integration needed. If you have an out-of-the-box installation (or a set of customizations that won’t conflict with this one) you can deploy the AMP to the Alfresco WAR and the Share customizations to the Share WAR and you’ll be set.

The Alfresco Fivestar Ratings project lives at Google Code. Feel free to check out the source, try it out, and use it on your projects. If you find a bug, log it, then fix it!

Deconstructing DeckShare: A brief look at Alfresco Web Quick Start

Last Fall, just before the Developer Conference in New York City, Alfresco approached Metaversant with a small project–they needed a web site to share presentations from the DevCon sessions and other events. There are several generic slide-sharing sites out there–Alfresco and I have both used SlideShare for that sort of thing pretty extensively. But Alfresco was looking for something they could have complete control over, plus they were looking to exercise their new Web Quick Start offering. So I rounded up a sucker–I mean a collaborator–named Michael McCarthy from over at Tribloom, and we knocked it out.

Although it makes good marketing sense for Alfresco to use its own offering for the site, I do think the “private presentation-sharing” use case is also generally applicable to many other businesses out there. Technology companies, of course, but also any company with a large sales force or even more modest extranet needs could benefit from a solution like this. SlideShare is great when what you want to share is public. When presentations need to be securely shared, many companies use expansive portals to share sales collateral, marketing presentations, or company communications, but those often come with a very low signal-to-noise ratio. The solution we built–we call it “DeckShare”–is laser-focused on one thing: Making it easy for content consumers to find the presentations they need, quickly.

DeckShare is built on top of Alfresco’s new Web Content Management (WCM) offering called Web Quick Start. Honestly, Web Quick Start, as the name implies, provides a good starting point for building a dynamic web site on top of Alfresco, and the sample site was so close to what a basic slide-sharing site needed, we didn’t have to do a whole lot of work. Even so, if you want to do slide-sharing on top of Alfresco, you can save even more time by starting with DeckShare.

I thought it might be cool to walk you through how we got from the Web Quick Start sample app to DeckShare as a way of getting you familiar with Web Quick Start and to help you understand how DeckShare works in case you want to use it on your project.

Some of this write-up is also included in the “About” page within the DeckShare site. Alfresco is currently branding DeckShare to meet their needs so I have no idea if the About page will still be there when the site goes live, so I may or may not be repeating myself somewhat.

What is DeckShare?

Alfresco’s DeckShare implementation isn’t live yet, so let me give you the nickel tour. DeckShare is a solution for quickly creating a self-hosted presentation-sharing site on top of Alfresco without having to write any code. DeckShare lets non-technical users manage and categorize presentations that are then consumed by end-users. End-users can find presentations by browsing one or more hierarchies (“Topics”, “Events”, “Audience”, for example), performing a full-text search, or by browsing the list of the latest and “featured” presentations. Content managers can associate presentations with “related” presentations and can link supporting files with a presentation.

In this solution, Content Managers are a different set of users than Content Consumers. As it stands, the solution doesn’t accomodate user-contributed presentations, unlike SlideShare. Obviously, it could be customized to do that.

Here’s what it looks like when a Content Manager edits the metadata for a particular presentation (click the image for full-size):

DeckShare Manage Details Screenshot

Those familiar with Alfresco can tell from the screenshot that Content Managers use Alfresco Share as the “content administration” user interface. Optionally, you could turn on Alfresco’s Web Editor Framework and allow Content Managers to edit the site in-context, but that will require some minor tweaking if you go that route. Using Share for content administration works really well. What started out as a team collaboration web app has essentially turned into Alfresco’s uber client.

Now let’s take a look at the Content Consumer user interface:

DeckShare Home Screenshot

If you’ve seen either of the sample Web Quick Start applications, the layout will look familiar. The home page includes a featured content carousel, a recently added document list, and a document category tree. We’re using a different carousel widget than the Web Quick Start sample apps and the category tree is also something we’ve added.

The set of categories is almost completely arbitrary and can be managed by DeckShare administrators. In fact, if you are running DeckShare on top of an existing Alfresco repository, you can specify the subset of categories you want to show in the category tree. When you click a specific category, the resulting page looks like this:

DeckShare Category Page Screenshot

The category page shows only the presentations for a specific category and features the same category tree browser that appears on the home page.

Ultimately, an end-user will either download a presentation or they’ll click on the details page link to learn more. The details page, shown below, shows high-level metadata about the presentation, supporting files that accompany the presentation, related presentations, and a flash-based document preview. The flash-based preview allows end-users to browse the presentation without downloading the entire file.

DeckShare Presentation Details Screenshot

That’s really it from a Content Consumer perspective. The site also has full-text search and that page is very similar to the category list page.

From a Content Manager’s point of view, DeckShare, like all Web Quick Start sites, is built on concepts familiar to anyone who has built or managed a web site: A site consists of collections of assets that get categorized and tagged and then presented in various ways across one or more pages. The look-and-feel of the end-user web site can be completely customized to match client branding needs. And, both the metadata model and category hierarchy can be extended to support specific client requirements.

Assets are stored in Alfresco’s Document Management repository and managed through the Alfresco Share User Interface. Alternatively, Content Managers have several other options for getting presentations into the repository, including FTP, drag-and-drop via Windows Explorer or Mac Finder, emailing content into the repository, drag-and-drop from within Microsoft Outlook or Lotus Notes, or saving directly from Microsoft Office as if the repository were a Microsoft SharePoint Server. Regardless of how the files arrive, Alfresco automatically takes care of creating thumbnails and PDF renditions of the presentations.

What is Web Quick Start?

Web Quick Start is a sample web application built with Spring, Spring Surf, and Apache Chemistry’s OpenCMIS library. It is essentially a sample web application that sits on top of the Web Quick Start API (Java), some presentation tier services, some repository tier services, and an extended content model.

Assets are stored in Alfresco’s Document Management repository and managed through the Alfresco Share User Interface. That means you can use all of the familiar building blocks present in the repository such as custom types and aspects to model your data, behaviors, and web scripts.

The presentation tier uses Alfresco Surf to lay out pages and to define regions on those pages. Regions get their content from presentation tier web scripts. What’s different with Web Quick Start as opposed to previous Surf-based web application examples is the use of the Apache Chemistry OpenCMIS library. Instead of using Surf’s object dispatcher to load and persist objects, the Web Quick Start API uses OpenCMIS to make CMIS requests between the front-end and the repository tier. There are some places where the Web Quick Start API uses non-CMIS web scripts, so it is not a pure CMIS implementation, however.

The Web Quick Start API is exposed to the Alfresco JavaScript API and Freemarker API on the presentation tier, so everything you’ve already learned about Spring Surf is immediately leverageable when you build the front-end. However, if you’ve decided on another framework, you can still use the Web Quick Start API, the services, the content model, and Share for editing content. For example, Metaversant recently worked with a client that chose Spring 3 and Apache Tiles for the front-end because that was their standard, but they used Web Quick Start for everything else from the API, back.

Web Quick Start sites have a flexible deployment configuration which can be boiled down to “single-server” or “multi-server”. In the single-server approach, the same Alfresco server is used for content authoring and content serving whereas in the multi-server approach, Alfresco’s transfer service is used to move content from the “authoring” or “editorial” web server to the “Live” server (it doesn’t have to be one hop, you could throw in one or more “QA” servers as well if you want to, for example).

High-level steps

Web Quick Start is meant as a starter application. It’s functional out-of-the-box, but you’re expected to use as much (or as little) of it as you need. Here are the high-level steps we took to reshape the starter app into DeckShare.

Step 1: Extend the content model

Web Quick Start has a simple content model that provides for articles, images, and user feedback. For DeckShare, we added two new aspects to our own model. One is used to associate a presentation with zero or more related presentations. The other is used to associate a presentation with zero or more supporting files (like source code downloads). At some point we may also add an aspect to track fine-grained event metadata such as session time, speaker, etc. Extending the model with your own aspects is pretty easy–it’s some XML to define the model and then some XML to expose the model to the Share interface.

Step 2: Set up site sections and collections

Web Quick Start has a default folder structure that lives in the Document Library of the Share site being used to manage the content. Within that there is one folder for editorial content and one for live content. Then, it breaks down into “section” folders for site assets (publications, in this case) and collections. Each section will typically map to a section of a site and will therefore show up in the site navigation, but you can exclude sections from the navigation.

Every section folder has a set of collections. A collection is an arbitrary grouping of site assets. Collections can either be static or query based. For a static collection, Content Managers choose the assets that belong in that section with standard Share “picker” components. For a query-based collection, Content Managers can use either CMIS Query Language or Lucene to define queries that identify the assets that are included in the collection. Either way, from the Web Quick Start API, a developer just says, “Give me this collection and let me iterate over the assets in it” to produce a list of the assets in a collection.

There are two sample data sets that ship with Web Quick Start. One is for a Finance example site and the other is for a Government site. We started with the Finance site (the choice was based on luck–there’s really not much of a difference between the two other than images and content). Once we imported the sample site, we deleted all of the sample content and then tweaked the collection definitions. The “latest” collection, for example, contains the most recently-added presentations. The “featured” collection is static out-of-the-box, but we wanted it to be dynamic. So, we simply edited the collection metadata to add a query that returns all of the presentations that have been categorized as “Featured”. Alfresco runs the query periodically so that Content Consumers don’t take the performance hit when the page is rendered.

The carousel works similarly. We wanted Content Managers to be able to specify which presentations appear in the carousel simply by applying the “Carousel” category to the content from within Share, so the carousel collection looks for content that has that category applied.

The other tweaks we made to the sample data set include telling Web Quick Start which rendition should be used for the various thumbnails in the site. We added a new rendition definition for the images shown in the carousel and a new rendition for the thumbnails used everywhere else. Web Quick Start has its own rendition definitions, but the thumbnails aren’t set to maintain the aspect ratio when they are resized and that looks a little weird for images of thumbnail presentations, hence the need for our own.

Step 3: Customize page layout

Once we had some sample data in place and our collections defined, it was time to start laying out the pages. As luck would have it, the requirements matched up fairly closely to the layout of the sample financial site. Surf pages and templates are used for layout, but you don’t have to be a Surf Guru to make changes. Surf templates are just FreeMarker, after all. Other than minor re-arranging, our template modifications were limited to adding additional regions to existing templates.

Once you define your page layouts, you use metadata on the section folders to tell Web Quick Start which page layout to use for a given piece of content. The mapping is type-based. For a given section, you might say, “All instances of ws:indexPage in this section should use the ‘list’ template” which is expressed like this:

ws:indexPage=list

The template mapping is hierarchical. That means for a given piece of content, Alfresco will look at that content’s section for the template mapping but if it isn’t specified, it will look in that section’s parent, and so on. So if we specify:

cmis:document=publicationpage1

in a high-level section folder, all instances of cmis:document in child sections will be layed out using publicationpage1 unless it is overridden by a child section.

Note: If you are familiar with Surf, don’t be confused by the use of the word “template” here. It’s used by Web Quick Start in a generic sense. In the example above, “list” and “publicationpage1” are actually page data objects in Surf. For the Metaversant client that used Spring 3 and Tiles, for example, the template mapping specified which Tile definition to use.

Step 4: Add custom components

We spent most of our time on components. In Surf, components are implemented as web scripts. A web script implements the Model-View-Controller (MVC) pattern. In this case, controllers are JavaScript. Here’s what one of the controllers looks like:


model.articles = collectionService.getCollection(context.properties.section.id, args.collection);

if (args.linkPage != null) 
{
	model.linkParam = '?view='+args.linkPage;
}

This one is simply grabbing a collection of articles and a parameter and sticking them on the model for the FreeMarker-based view to pick up. Behind the scenes, the Web Quick Start API is making RESTful calls to the repository to retrieve (and cache) objects. This is a typical controller–in this app, most of the controllers are less than 10 lines long.

Web Quick Start already has components for different types of content lists. So doing something like the carousel was relatively easy: The collection service returns the “carousel” collection and a FreeMarker template dumps the collection metadata into a list that the YUI carousel control can grok.

We had a couple of places where we had to write our own components. One was the Categories component and another was the Related Presentations component. The Categories component is rendered using a YUI tree control. It gets its data by invoking a Surf-tier web script which, in turn, invokes a repository-tier web script that returns a list of category metadata as JSON. YUI then styles the data as a tree.

The Related Presentations component similarly invokes a repository-tier web script, but its JSON contains only node references. It then asks the Web Quick Start API to convert those into CMIS objects. That allows us to take advantage of the cache if the object has been loaded before, and it means we can re-use the Web Quick Start view templates that already know how to format lists of CMIS objects.

But wait, there’s more

Web Quick Start also has a user feedback mechanism that you can use for comments, “contact us” forms, and, at some point, ratings, but none of that was a requirement for this solution at the time we built it. The capability is there, so we’ll probably expose it at some point. Refer to the wiki for more information on the user feedback functionality.

There’s also a workflow that is used to submit content for review. Once approved, the content is queued up for publishing to the live site. The workflow is the same jBPM engine you are probably already familiar with so the process can be modified to fit your needs.

Although it is a new product and there are still a few hitches here and there, I was happy with Web Quick Start and the time it saved for building a site like this. I’m looking forward to seeing its continued evolution.

DeckShare is a simple site. There is a lot more that could be done with it and, based on client demand (or contributions from others, hint, hint), new features will be added over time. I think it’s a good example of what you can do quickly with Web Quick Start.

Hopefully, this write-up gave you some ideas you can use on your own projects. If you want to dive deeper into the Web Quick Start web application, check out the Web Quick Start Developer Guide on the Alfresco wiki. Feel free to grab the DeckShare source from Google Code and use it on your own projects.

If you’re interested in major customizations to DeckShare or you have a project that might be a fit for Alfresco Web Quick Start, let me know.
Workflow Dashboards in Alfresco Share

Metaversant recently had a client with some interesting requirements around workflow. I thought I’d post what we did here and get a conversation going about the various pluses and minuses of the approach and find out what others have done when faced with similar needs.

There are two main buckets of requirements I want to focus on: Workflow Reporting/Dashboard and Folder Monitoring. I’ll talk about Workflow Reporting/Dashboard in this post and Folder Monitoring in the next.

Workflow Reporting/Workflow Dashboard

Workflow Reporting is something I’ve seen quite often and handled differently each time based on what the client is trying to do. Alfresco is pretty sparse on Workflow Reporting (capturing the data and making it easy to report on) and Workflow Dashboarding (presenting a dashboard of running workflows and/or workflow reports in the user interface). By “sparse” I mean there really is none. Recent releases have seen the addition of the “My Tasks” page, but that is limited to what it sounds like: A page listing the tasks the current user is assigned to.

What most people want when they ask for Workflow Reporting is the ability to capture workflow data both before and after a workflow has completed. This is significant because if you do nothing about it, data about running workflows disappears into the ether when the workflows complete. A Workflow Dashboard is the ability to see all workflows assigned to all users or a subset of users and perhaps some historical via Workflow Reports (maybe time started, current task, time on current task, current actor, etc.).

For this particular project, my client really only cared about running workflows, so we didn’t have to worry about capturing workflow stats before the workflow ended–they just wanted to see all workflows, no matter who started them, in a sortable list with a link to the workflow details and the ability to perform batch operations against the workflows (such as selecting all workflows and canceling). The twist, however, was that the client wanted to scope the list of running workflows to the Alfresco Share site they were started in. So if there were two Share sites, A and B, and Site A’s users had started 24 workflows on documents stored within the site while Site B’s users (which may overlap with Site A) had started 35 workflows on Site B documents, Site A’s Workflow Dashboard should show a list of 24 workflows while Site B’s should show 35.

The Solution

When workflow data needs to be persisted beyond the life of the workflow, we’ll typically just create some objects in the content model to persist the data and we’ll write to those objects from one or more actions defined within the business process definition. In this case, that wasn’t necessary.

The problem boiled down to how to capture the specific Share site a workflow was scoped to and, then, how to query for and display that information. Once that was resolved, the data could be displayed on a custom Share page.

I may post the code at some point, but for now, here’s the high-level recipe:

Step 1: Capture the Site ID in a Process Variable

Alfresco jBPM workflows have process variables that can store metadata about a running workflow. And, the workflow API allows me to query against that metadata. So, the first step was to capture which Share site the user was in when they launched the workflow.

To do this, I used the Form Service to define a hidden field on my workflow’s startup form. Then, I overrode Alfresco’s client-side JavaScript StartWorkflow component to add my own code that finds the hidden field and sets it with the Share site’s unique identifier (the Site ID field).

Initially, I used a straight hidden field for this. Later, I came back and created a new custom component that included not only the hidden field, but some additional markup and client-side logic that pulled back additional context about the Share site for that workflow so that when someone viewed the workflow or managed a task, they would know more about the Share site than just its Site ID.

Step 2: Create a web script that returns the workflow metadata

With the Site ID stored in a process variable, the next step was getting the workflow data to the front-end Share tier so it could be displayed in a dashboard. This involved creating a repository tier web script that accepted the Site ID as an argument and returned the data as JSON. There are some out-of-the-box web scripts related to workflows, but they return tasks assigned to the current user and for this I needed all running workflows for a given site ID, so that required a custom web script.

The JavaScript API has come a long way with respect to workflow, but the ability to apply a filter on task metadata isn’t there yet, so that meant my controller had to be Java-based.

The interesting part of that web script controller looks like this:

WorkflowTaskQuery tasksQuery = new WorkflowTaskQuery();
Map<QName, Object> processCustomProps = new HashMap<QName, Object>();
processCustomProps.put(SomeCoWorkflowModel.PROP_RELATED_SITE_ID, siteId);
tasksQuery.setProcessCustomProps(processCustomProps);
tasksQuery.setTaskName(SomeCoWorkflowModel.TYPE_DASHBOARD_TASK);
tasksQuery.setTaskState(WorkflowTaskState.IN_PROGRESS);
List<WorkflowTask> tasks = workflowService.queryTasks(tasksQuery);

This gives us all of the tasks that have the Site ID we’re looking for, but the Dashboard needs more than that–it needs the Workflow Instance for full context. No problem–the Workflow API can handle it. Here’s where the controller iterates overs the tasks and adds the workflows to a List of WorkflowMetadata objects that will get set on the web script’s model:

for (int i = startIndex; i < endCount; i++) {
WorkflowTask task = tasks.get(i);
WorkflowInstance wf = workflowService.getWorkflowById(task.getPath().getInstance().getId());
workflows.add(new WorkflowMetadata(wf, task));
}

One potential gotcha with this approach is that there has to be a task assigned to an actor in order for the workflow to show up in the WorkflowTaskQuery results. If a workflow were sitting on a wait-state, for example, that workflow wouldn’t be returned by the code above. To work around this, the workflows in this solution always queue up a “Dashboard Task” assigned to the initiator to guarantee that all workflows, whether they are currently sitting on a task node or not, always show up in the workflow dashboard.

The view for this web script simply returns the data as JSON, so I’ll spare you the details.

The other web script I wrote for this piece deletes workflows for a given set of workflow IDs. You’ll see where that comes in next, but, again, the logic of that controller (also Java-based) is very straightforward, so on to the next step!

Step 3: Create a custom Workflow Dashboard page

The workflow tasks are tagged with Share Site IDs and a repository-tier web script is in place that knows how to find those tasks and give back the Workflow Instance data as JSON. The final step is to render that as a dashboard. For this, I used standard Surf framework techniques to create a new page called “Workflows”. The page contains a client-side JavaScript component that renders a YUI DataTable. The data source for the DataTable is the web script created in the previous step.

Step 4: Create actions

The specifics for what someone might want to do to one or more workflows displayed in the dashboard varies. For this project, users needed to be able to view the workflow details. Initiators needed to be able to cancel the workflow. Viewing the workflow details is just a matter of building the right URL. Canceling the workflow is a little more involved–I used client-side JavaScript to make repo-tier web script calls to a custom web script that can cancel one or more workflows given the workflow IDs.

To make it so that only workflow initiators can cancel a workflow, I use the same mechanism that document actions uses: The XML configuration file that defines the cancel workflow action specifies that the user must be the workflow initiator. Then, the client-side JavaScript that builds the dashboard actions checks the workflow data to see if that’s the case and hides the link if the current user is not the initiator.

Here’s the XML for the cancel workflow action:
<toolbar>
<actionSet>
<action type="action-link" id="onActionCancel" permission="initiator" label="menu.selected-items.cancel" />
</actionSet>
</toolbar>

The client-side code that checks action permissions is a direct copy of Alfresco’s out-of-the-box logic that does the same.

The Result

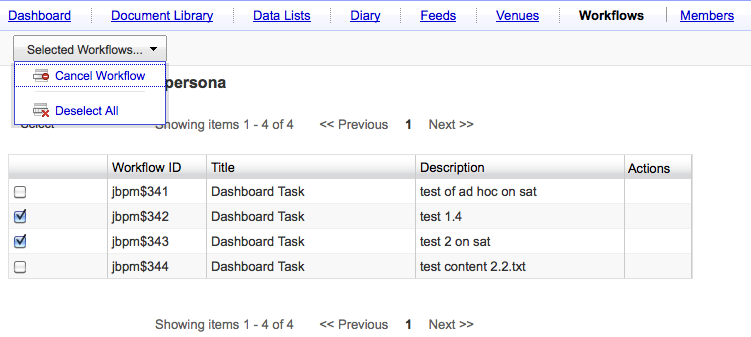
Once fully-assembled, the workflow dashboard looks like this:

Workflow dashboard screenshot

In the screenshot, I’ve got multiple workflows selected and have clicked the “Selected Workflows…” link to show that you can cancel more than one workflow at-a-time.

Now you’ve seen a simple workflow dashboard implementation. My next post will be about launching workflows automatically when objects are dropped into a folder.

Does Alfresco Share need to go on a diet?

When Alfresco first told me about the Surf framework and the plan to build a new then unnamed collaborative client on top of Surf I liked the sound of it. Of course anything other than JavaServer Faces sounded pretty good at the time.

But things didn’t quite turn out the way I thought they would.

See, what I thought would happen was that Alfresco would release a bunch of “mini” clients–highly-specialized apps for the task at hand. Want RM? Here’s the RM client. Doing some team stuff? Here’s Share. Basic Document Management, here’s the DM client. Web Content Management. Digital Asset Management. You get the point. With all of these sitting on top of Surf, each client app would only have the code that made it unique for that particular use case. It’s like taking one Ritz cracker (Surf) and then having a veritable smorgasbord of delicious ECM toppings to choose from.

The Dagwood SandwichInstead, what’s happened is that Alfresco launched their first Surf-based client, Share, for team collaboration, and then, rather than go back to the platter for another cracker, they kept piling on and piling on until that once dainty hors d’oeuvre became a towering Dagwood sandwich.

Let’s face it: Clients love the Share interface. They love it so much they want all of their content-centric apps to be based on it. If the client wants basic customizations–some form tweaks, a new dialog here, a new page there–it isn’t so bad. But the more complex the changes are, the more cruft you have to sift through and either eliminate or work around. A quick perusal through the Share code will turn up tidbits that deal with Records Management, SharePoint, and Google Docs. All of these are optional add-ons to Alfresco, but have worked their way into the Share client “just in case” someone installs that extension.

Okay, so if Share has too much to serve as an agile base in some cases, why not drop down to the underlying Surf framework? Because sometimes, Surf can be too bare bones. Recently, I did an implementation for a client that was essentially a community solution. We used two customized versions of Share: One for the “admin” interface for the community and the other for the front-facing community itself. Share worked great for the admin interface–not much tweaking was needed there at all. The dashboard, document library, wiki, discussion, and data lists functionality all made sense in the context of administering content. The front-facing community, however, was another story. We didn’t need 80% of what was in Share out-of-the-box. But we didn’t drop down to Surf because we wanted blogs, discussions, and some of the Share-tier web scripts for data lists and whatnot. We knew gathering up all of the dependencies needed to “push down” those features into Surf would be a pain. The solution turned out great, but the ratio of used to unused code is kind of scary.

Alfresco seems too far down the every-new-feature-we-come-up-with-goes-into-Share path at this point. But I wonder if the concept of a “distribution” could apply to Share. This would mean stripping down Share to some sort of bare bones minimum, just slightly bulkier than raw Surf. Then, provide AMPs or Maven builds or scripts or something that developers can use to “build up” Share with only the functionality they need.

Or maybe the solution is to make things that are optional, truly optional. It would be nice, if, through a script or this “tear down, then build up” approach, you could completely remove things like:

  • Sharepoint integration
  • Google Docs integration
  • Records Management
  • Wiki
  • Blogs
  • Discussion
  • Links
  • Anything else that’s not about the document library, data lists, categories, tags, and search.

By “completely remove” I don’t mean “hide from the user”. I mean when I recursively grep the Share web app for “Sharepoint” (for example) I get zero hits.

The goal here is to cut way down on the amount of code developers have to sift through, override, and extend when starting with Share as a base. And, once deployed, reduce the amount of code that has to be maintained and upgraded going forward.

Maybe Alfresco should take a lesson from Drupal. Some would argue that the core of Drupal is already too big, but at least the majority of extensions are in (truly) optional modules. And there are a number of Drupal distributions that take core and bundle different sets of modules for specific use cases. Django has something similar with the pinax project.

What do you think? Am I just being a picky eater? Is it realistic to think that Alfresco can whittle Share down to a more suitable base for the rest of us to build on?

7 mistakes developers make when customizing Alfresco Share

I’ve seen more than my–ahem–fair share of Alfresco Share over the last several months. Many clients feel that their needs are so close to what Share provides out-of-the-box, that they can save time and money by starting with Share as the basis for their custom content-centric application. Whether or not that’s a good idea is the subject of another post. This post assumes that, for whatever reason, you find yourself customizing Alfresco’s Share client and wondering what are some of the common pitfalls to avoid. Here’s seven. Feel free to add to the list.

1. Ignoring client-side JavaScript minification

Here is a massive understatement for you: Alfresco Share has a lot of client-side JavaScript files. Most, if not all, of these are minified, or compressed, to reduce the size of a given page and increase client-side performance. If you’ve ever looked at the FreeMarker source for one of Alfresco’s pages, you may have seen something like this:

<@script type="text/javascript" src="${page.url.context}/components/blog/blog-common.js">

It looks like an everyday JavaScript reference but what’s up with that “@script” tag? It’s a FreeMarker macro. It switches out the JavaScript source file for the minified version when debug is turned off and uses the original uncompressed source when debug is turned on, which makes stepping through the client-side JavaScript much more pleasant.

There are two things you need to be aware of here. First, if you find yourself tweaking Alfresco’s client-side JavaScript, you’ll need to remember to deploy both the expanded and minified version of the file. Otherwise, when people turn debug on and off, they’ll see different results. Second, when you create your own client-side JavaScript, you need to minify your own code for the same reason.

You could turn debug on and leave it on (bad idea) or you could use a “normal” script tag and point to the non-minified versions of your JavaScript, but it is really easy to add minification as a part of your build, so you might as well set that up early in the project and you won’t have to worry about it later.

There are several JavaScript compressors out there. Here’s a link to the YUI Compressor. You can drop the JAR into your project and then invoke it from Ant quite easily. Ask Google for some examples.

2. Assuming Alfresco and Share are on the same host

When you install Alfresco it deploys a web application in the “/alfresco” context–that’s your repository and the old Alfresco Explorer client–and a second web application in the “/share” context. Depending on what you’re doing you might deploy numerous additional web apps based on Share or Surf.

Regardless of how you choose to deploy, you need to remember that there is no guarantee your app and Alfresco will be on the same machine, app server, or port number. One of the beauties of the Surf architecture is that you can scale it out across multiple app servers and they can all talk to the same (or multiple) Alfresco repository servers. The underlying Surf framework on which Share is based has configuration and helper variables you can leverage to deal with this. You should not be hardcoding “localhost” or any other hostname in your Share code.

3. Incomplete theme customization

Alfresco Share 3.3 has user-selectable themes. As part of your customization effort you can define your own theme and then configure that to be the default. An easy way to create your own theme is to copy one of the out-of-the-box themes and then modify it to suit your needs. The keys to cloning a theme successfully are:

  1. Copy one of the themes other than “Default”
  2. Search and replace references to the old theme name in the new CSS files (login.css, presentation.css, and yui/assets/skin.css)
  3. In the previous step, don’t forget yui/assets/skin.css!

4. Duplicating, rather than extending, Alfresco web scripts

Suppose you want to change something in one of Alfresco’s web scripts. You may be tempted to change the out-of-the-box controller JavaScript or FreeMarker views, but don’t do it. A nice thing about the web script framework is that you can override even just a single file that is part of a web script by placing your version of the file with the same name in the same folder structure under web-extension. This also works on the repository tier, but instead of web-extension you use the “extension” directory.

For example, maybe I want to extend the document-actions config XML in Share with my own settings. I will NOT copy my version over the top of Alfresco’s. Instead, I’ll put my copy in a file named “document-actions.get.config.xml” under WEB-INF/classes/alfresco/web-extension/site-webscripts/org/alfresco/components/document-details. When Alfresco loads the web script, it will use my version of the config.

5. Not using the web-extension directory

While we’re on the topic, all of your custom Share config files go in web-extension under the Share web application. Don’t put them in $TOMCAT_HOME/shared/classes and don’t put them in the Share web app’s classes/alfresco directory. Use the web-extension directory to keep your stuff separate from Alfresco’s. I also recommend doing the same with your client-side files–create a directory called “extension” for your client-side JavaScript, images, CSS, and so-on.

6. Using the same Tomcat server as the Alfresco repository during development

This one isn’t going to cause you problems, but it sure will slow you down. Even if your production Share web app will run on the same Tomcat as the Alfresco WAR, do yourself a favor: While you’re coding, use two Tomcats. On port 8080, you’ll run Alfresco and out-of-the-box Share. On some other port you’ll run a second Tomcat server with your custom Share- or Surf-based web app. That way, when you need to restart your custom Share app, you don’t have to wait for the repository to start back up. You’ll cut way down on the time you spend waiting for Tomcat to restart which, over time, can speed up your development cycle tremendously.

7. Failing to test on Alfresco’s supported browsers

Have I mentioned how much client-side JavaScript there is in Share? Every time you touch Alfresco’s JavaScript or create your own, you’ll need to test it on the browsers your client intends to use. So there are two recommendations here: First, make sure you are testing across Alfresco’s supported browsers. Second, make sure your clients only expect to use Alfresco’s supported browsers. Failure to do both of these can lead to some missed expectations on both sides. The browsers Alfresco supports for 3.3 are on the supported stacks page on the Alfresco web site.

What am I missing? Add a comment with your Alfresco Share street smarts.